I just woke up to an email this past weekend from my friendly folks at Olympus. This months helpful shooting tips are about shooting the autumn leaves. One of the main focuses from this article is the Exposure Compensation button and how it can help you achieve splendid results with Autumn leaves. What I want to focus on is how the Exposure Compensation Button (looks like this +/-) can be an invaluable asset to your HDR tool box.
Many times when shooting in Aperture Priority mode the Key Exposure (0 EV Exposure) is too dark or too light, sure when shooting for HDR you are going to get the spread of Exposure over time, but the key Exposure is the most important element to HDR photography. Next time you go out shooting, snap your brackets, go back to your Key Exposure, and see how over or under exposed it is. If it is over exposed press your Exposure Compensation button and dial it down a stop or three (-.3 to -1.0 EV) then start your series of brackets. If your key image is under exposed, dial the Exposure Compensation button up a stop or two (+.3 – +1.0 EV). Each tick on the dial when you scroll up is in thirds of a stop, so if you move to the left 1 you are approximately -.3 EV, to the left 2, -.7, and to the left 3, -1.0 EV. Remember for every WHOLE stop you are letting 1/2 of the amount of light in (-1 EV) or double the amount of light in (+1 EV) from the previous image.
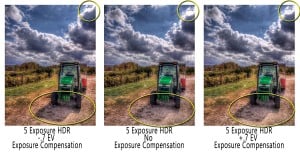
 So how does this effect your HDR images after you have them captured? I ran a little experiment, the 3 images were shot in Aperture Priority mode, with AEB set to 5 exposures at three different Exposure Compensation intervals. The first series of 5 exposures was shot with Exposure Compensation set to -.7 EV, the second image was shot with 0 Exposure Compensation selected, and the third with +.7EV Exposure Compensation. I then tonemapped all of them in their respective 5 exposure brackets with the same Photomatix settings. I then brought them into Photoshop strictly for comparison purposes, no other post processing was done.
You can see minor differences in some areas of the photos, but the images weren’t that far off from one another. There are some minor blow outs in the clouds on both the 0 compensation and +.7, and the shadow detail is a little better with the -.7 exposure compensation. After running the experiment I would have to say the -.7 series is the best.
Just another tool you can add to your HDR tool box. Experiment with Exposure Compensation sometime. You may find it quite useful in certain lighting scenarios, like this one where the clouds displayed highlight blowouts in the normal 0 compensated exposure. Sure there are a lot of things you can fix in post, but why wait til post? Try to get the shot on scene to cut down on one more thing you may have to do later. As with everything, with practice the Exposure Compensation button will prove itself worthy time and time again.


