On May 24th 2009 all of my camera equipment was stolen from my car. Thank God for Renter’s Insurance… It covers all assets in your vehicle too! It was a blessing in disguise as I upgraded my camera body and all lenses to the higher grade glass. I had to make some sacrifices though, one of which was my macro extension tube. I recently tried getting a really up close shot of something and couldn’t quite get in as close as I’d liked to with my 50mm macro. I thought that extension tube would be nice, so I went over to Amazon to find a new one. $125, that is an insane amount of money just to get my lens an inch or so away from the body, in essence that is all an extension tube is doing. So I thought about it and here we are, a Do It Yourself Macro Extension Tube.
What you will need:
- Safety Goggles – Safety First, I didn’t use mine and yes I had to run to the bathroom to remove a giant piece of molten plastic. Ironically enough, I am the safety representative at work… I hate when that happens!
- A Dremel Tool
- Some type of Dremel tool cutting bit, almost any will do.
- A Dremel Sanding tool.
- A Rear Lens Cap
- A Body Cap (You can get this combo really cheap on Amazon for Olympus, Nikon, Canon, Sony)
- Super Glue
- JB Weld, or equivalent epoxy
How you will do it:
- Find, buy, or steal from your friend, a Rear Lens Cap and a Body Cap.

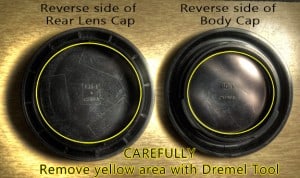
- Flip them over to show the reverse side of the caps.
- With your Dremel cutting bit and safety goggles on, carefully trace that inner circle found inside the caps, I have highlighted them in Yellow in the image. You want to maintain the areas that attach to both the Body cap and the rear lens cap. Do not cut off the attachment points.

- After the center holes are removed, carefully sand the inside cuts as they will be very crude. The plastic has a tendency to melt and make awful looking cuts.
- After the two caps are sanded, wash them thoroughly with soap, warm water, and a sponge. This will make sure not plastic debris gets in the body of your camera.
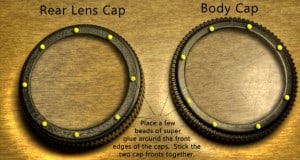
- Once dry, apply a few dots of super glue to each half on the front side of the cap. There should be a little rim left over after your cuts.

- Place the two hollow caps with the front sides facing each other. hold them tightly long enough to allow the super glue to stick. Do not stop here! The super glue is acting as a tacking agent so the halves do not move when you apply the epoxy. If you stop here and try to take a picture, you will almost certainly have horrible pictures due to light leaks in the seam.
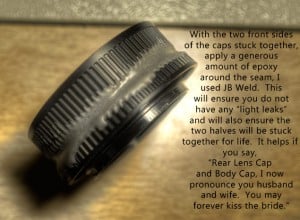
- Mix approximately a silver dollar amount of JB Weld and generously apply it around the seam.

- Allow 24 hours to cure.
- Mission Accomplished! Find something to Macro.
NOTE: You will not be able to Auto Focus with this Extension Tube. If you want that luxury spend the $125 on the real extension tube. I prefer to manually focus my Macro shots, this ghetto Extension tube works perfectly for me!
THE RESULTS
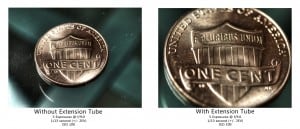
A stellar 44.2% increase in macro magnification. I had all of these supplies at home, so I managed to do this at no cost. If you are in the same boat, I highly suggest using this DIY method for a macro extension tube. There are other methods online, but unless you want a Pringles can hanging off of your camera body, this is the way to go!


