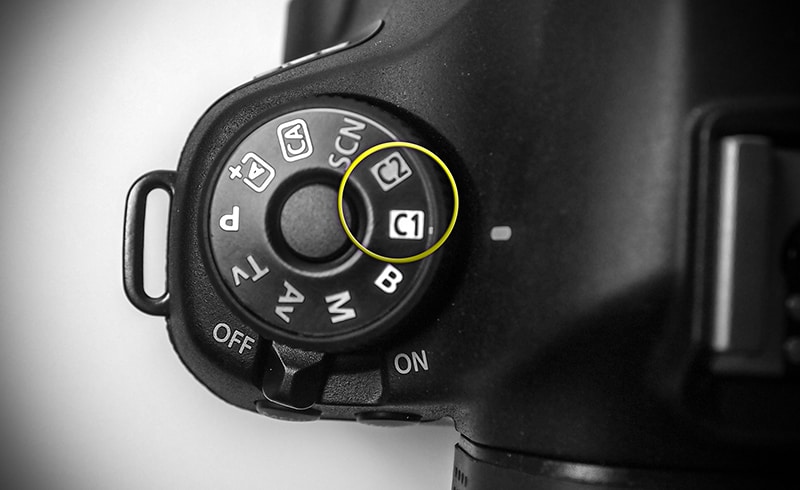
I C1, I C2 … what do I C those two doing?!?!
Some cameras have these wonderful custom buttons on them and they are cleverly labelled… C1 and C2 for the Canon. Often times we overlook them and even sometimes fail to add anything to them for the fear of not knowing how. Not to speak for all cameras, but on the Canon 6D and the Sony a6000 the Custom Camera Buttons are almost self explanatory… almost!

A Place for Custom Camera Buttons with HDR
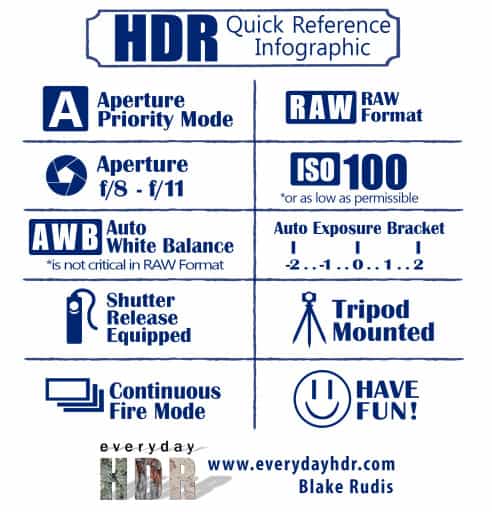
There are a plethora of benefits for adding your own settings to the custom camera buttons. For instance, I am an HDR guy by trade and there are quite a few things to keep in mind when shooting for HDR on the landscape. You have to have your Aperture rather small, between f/10 and f/11, ISO at 100, if you can maintain it with the shutter speed. You also want to be in RAW and Aperture Priority Mode with an auto exposure bracket setting of +2/-2 over a 3 shot spread. Of course, continuous fire mode, Auto White Balance (if in RAW) and tripod-mounted are very critical.
If you miss any one of those settings you could be in a world of hurt for HDR. All the more reason to use the custom camera buttons! My C1 button is programmed to have all of the above bolded settings in lock down. I can go from shooting a just about anything in any mode to shooting for HDR with the swivel of my shooting mode dial.
In the Sony a6000 it is a bit more difficult. These settings are buried in the menu options and can be quite difficult to operate quickly. You may face the same issues with your camera. If that is the case, consult with your camera’s manual to see how you can add your own custom settings. Of course, not all cameras are created equal so keep that in mind, you may not have a custom setting at all.
Whether you do or do not, here is a cheat sheet for setting up your Custom Camera Buttons for HDR. Feel free to follow it while setting up your custom camera buttons for HDR or print it and put it in your camera bag if you do not have custom camera buttons.

A Place for Custom Camera Buttons with Night Sky Photography
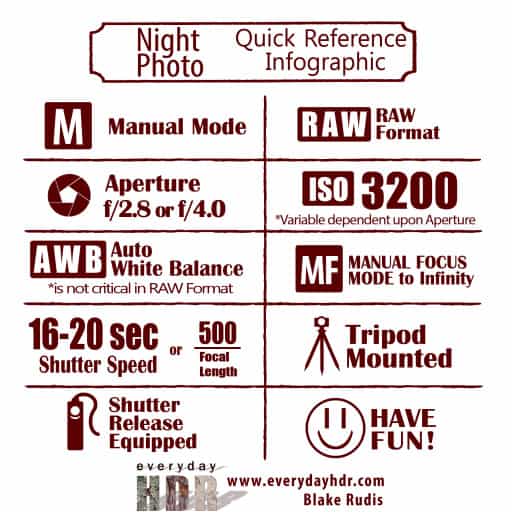
I am going out to the Flint Hills in Kansas this weekend to try and get a Milky Way shot or two. Living in the Kansas City Area makes it difficult to get a decent Milky Way shot due to the amount of light pollution. Prior to my departure, I did a ton of research on the perfect settings for night sky photography and have set my C2 button to the following. These are 2 great resources Photography Life and Night Sky Pix.

While many of these settings are dependent upon many variables, this should get me to the point of experimentation while removing a lot of guess work.
Do you use Custom Camera Buttons?
If so, what are yours set to?


I always use one “c” button for flying birds or fast moving objects. Sh speed 1000/sec .Apr 5.6, ISO AUTO, A1 servo mode, Cont high speed shooting.+1 Exp composition,
Day time WB. EVAL metering. Any suggestions?
It looks alright to me, are you shooting Raw or JPEG? The reason I ask is the WB will not matter too much in RAW as it only saves a JPEG preview of the WB and can always be edited to any WB in post. If you are in JPEG, that may be a necessary setting just remember to change it if the WB setting changes (cloudy, sunrise/set, etc)
Hi Blake
An excellent summary. I will print a copy as an aide memoire to place in my camera bag.
Do you recommend switching off the image stabilisation system when the camera is mounted onto a tripod? In my case the OS is in the lens rather than the camera body.
If you think this should be done, I will add it to my check-list.
Many thanks
I think it is a good idea to… However, I frequently forget so I can’t say I do it all the time 🙂 It generally will be better if you turn it off as the compensating motors will not be running (which can sometimes incur movement).
Hi Blake,
Great Article! I have a Canon 7D and have C1 set to HDR (just like you suggested), C2 set to Concert Photography, and C3 set to Fast action, ice skating (Granddaughter), football, car racing and etc. It sure does save time and I don’t have to remember settings! At my age, that’s a necessity. 🙂
Dennis
Aw man, you have 3…. not fair 🙂
I use a wildlife bird setting of iso 640, minimum A=4.5 – 5.6 depending on zoom, -2/3 stop compensation (sea birds can burn out in bright sun plus it gives me a higher shutter speed) S = fast as possible, especially for small to medium sized birds that need more than you think – typically 1/1600 – 1/2500
Nice, I never shoot wildlife, but this is helpful both from you and Kumar above. Thanks for adding to the conversation.
I’ll print off a copy for my camera bag, as a reminder to manually set those settings that are available. My Nikon DSLR has a custom settings menu,but neither custom buttons nor auto exposure bracketing.
It can be tricky with some cameras, but there is always a work around if you are willing.
Good reminder, too often overlooked.
But how do you get your custom to mount your camera on a tripod??? ha ha, just joking of course!
🙂 Pack mules I carry them with me just for that.
I’m lucky to have a dedicated HDR Button and by using a wheel can select one of five different bracket sets. I also have 4 different settings slots which can be saved in memory which can then be assigned to any of the programmable buttons on the camera.
Nice! Again, not fair, you have 4 memory buttons 🙁
I have a Canon 70D with only one C button and I am now using it for HDR.
Muchas gracias Blake for another great Insider tip.
That is so cool. no i did not realize those buttons great to know Thank You so much
Might want to also set up the camera to hold focus between images? back button HDR. Great for a memory setting.
Great and simple instructions thanks
Actually, you covered this with manual focus.
Nice Tips Very Useful information.