Yep, Luminosity Masking has been added to Adobe Camera Raw and Lightroom
I don’t think it was ever on my Wish List for Adobe, but they must have known I wanted Luminosity Masks in Adobe Camera Raw! I have shown Luminosity Masking here in Photoshop several times, but this is the first time you will see it for Adobe Camera Raw (or Lightroom). That is because it is a new feature for Photoshop CC 2018.
I am not going to go into the whole breakdown of what a Luminosity Mask is. If you want that, check out this post here. Instead, I am just going to fill you in on the new features for both Adobe Camera Raw and Lightroom.
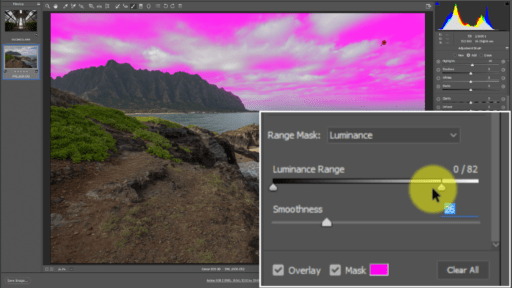
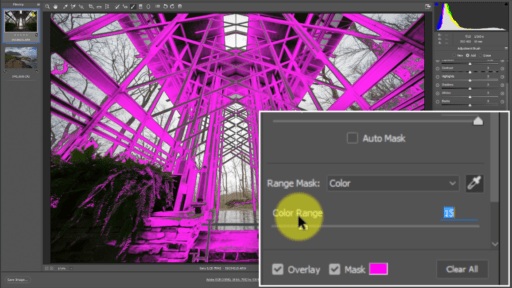
You will find these features anywhere you were able to make a mask before. Those places would be the Adjustment Brush, the Graduated Filter, and the Radial Filter. They are all the way down at the bottom of the tool settings just above the visualize Mask checkbox.
There you will find two types of Range Masks. One is the Color Range Mask and the other the Luminance Mask. Here is the written difference. However, be sure to watch the video tutorial below for even more help using these new tools!
The Luminance Range Mask
I prefer to use this Mask setting when I need to protect a certain area of my photo based on the luminance values. In the video, you will see how I make a blue sky very blue without affecting the puffy white clouds. Just like Blend If, think of this as a Protection adjustment. Say, “I want to protect the highlights or I want to protect the shadows” and move the slider accordingly.

The Color Range Mask
The Color Range Mask is a tricky one. It will select a Color Range from an Eye Dropper that you select on your photo. However, it only works within an area you have masked. In the tutorial, I paint the entire canvas with a mask and then use it to mask some pretty tricky areas VERY quickly. You could also use this on a smaller selection, you do not have to paint the whole canvas to use it effectively.

Get the full Masking Course here!


Thanks so much for the tutorial, Blake. Since upgrading yesterday, I’ve been waiting for a good video demo of the new features. I agree they’re awesome.
Awesome! Thanks for watching 🙂
Thank you very much..you really made it so simple and understandable
You are welcome. Thanks for watching.
How does this compare to ON1 2018 RAW luminosity masking?
I see where the question is coming from. Essentially it is a similar feature just different programs.
nice tuto !
How do you see same color enhancer than ON1 in lightroom ? at the moment we select everythig and protect but we can’t make a hsl on a specific area and change hsl, then add a second hsl panel in a stack and change other colors,…
in fact it would be nice that HSL becomes a local adjustment too, isn’t it ?
i suppose it doesn’t have the flexibility and power of ZSE ?
best regards
marc
ON1 is a different animal here. Much more control because of blend modes, protections, and opacity. Lr and ACR are missing that. These Lr and ACR tips are best used for quick adjustments and not for extensive things.
Definitely missing the power and flexibility of the ZSE, no threat on my front, phew 🙂
That’s the best demonstration I have seen so far on these new features. Thanks.
Awesome! Glad I could be “that guy” 🙂
Hi Blake, I’m with Don on this one. How does it compare to ON1s luminosity masking. May be I’ll watch your video first then compare.
I see where the question is coming from. Essentially it is a similar feature just different programs.
Great, Blake
Excellent tutorial Blake (as always) – thank you very much for sharing it with us.
I wasn’t even aware of it (guess I didn’t read the full list of changes/upgrades) and I am really surprised 🙂
PS and ACR get better and better and I am really happy about that, pair all these features with the speed (brush, gradients …) and you have a winning product.
Makes it kinda hard to use any other raw processors (I am using only the Effects from ON1 Raw) and if it gets even better, I am looking at hard times for other software developers. Competition is good 🙂
Always ahead with your workflow tips and tricks!
Thank you for instructing us
Hey Blake, I too was excited about the enhancement to Lightroom and ACR I recently purchased ZSE and am wondering if you’re gonna update techniques for that workflow with these new ACR capabilities.
I too would like to use this feature, unfortunately it doesn’t show up in my copy of Lightroom Classic. At the update, I chose to keep the old Lightroom and install the Classic in a new folder.
Could this have screwed it up?
In ACR it shows up, but not in LR Classic. Any suggestions?
Extremely helpful. Thank you! Now to go practice
Thanks!
Blake, I was using both the luminance and color adjustments in ACR and it really good until I selected the OK button, then everything I had done went back to the original prior to making the aforementioned adjustments. Am I supposed to save the work somehow or what am I doing wrong.
Suberb!!! Luminosity with 1 file instead of multiple pic. Great explenation Blake thx!