As a follow up to last weeks 5 HDR Tone Mapping Tips: Photomatix and the following weeks A Few HDR Shooting Tips, here are my top 5 post processing tips I cannot live without using Photoshop CS 5. I have several hundred tips to give out, hence all of the tutorials I do, but the following tips are features I cannot live without when processing my HDR photos.
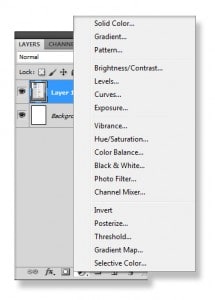
 1. Adjustment Layers are the bread and butter to making any HDR image pop. I have not processed a single HDR image without using adjustment layers. The most important adjustment layers being Curves, Levels, and Saturation. If you get yourself better acquainted with all of these you will be making awesome HDR photos in no time. I have never seen a perfect HDR image come out of any HDR tone mapping program, you have to think of the result as a negative that needs some good old adjustment layer dark room time.
![Mask]](https://f64academy.com
/~f64academy/wp-content/uploads/2011/11/Mask-219x300.jpg) 2. Masking is essential for making awesome HDR images. I am constantly using masks on my adjustment layers. Adjustment layers, for the most part, make global changes. However, when you make an adjustment layer, there is an empty white rectangle next to the adjustment, this is a layer mask. Select that blank rectangle and start painting on your image with black where you want the adjustment to disappear, paint white where you want those areas to come back.
2. Masking is essential for making awesome HDR images. I am constantly using masks on my adjustment layers. Adjustment layers, for the most part, make global changes. However, when you make an adjustment layer, there is an empty white rectangle next to the adjustment, this is a layer mask. Select that blank rectangle and start painting on your image with black where you want the adjustment to disappear, paint white where you want those areas to come back.
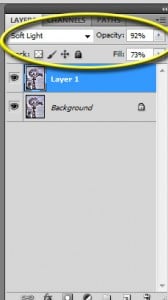
 3. Blending Modes can add some much needed flare to any HDR image. Try using them sometime. For instance, duplicate the image you are working on, select the duplicate in the layers palette, go to the drop down box that currently says normal, change it to Soft Light and adjust the Opacity and Fill to your liking. You will instantly add drama to your photo, scroll through the rest of the blend modes while you are at it, you may find something you like.
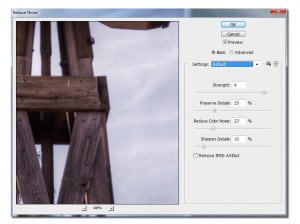
4. Noise Reduction can really help clean up the pesky noise that tone mapping can introduce. Go to Filter>Noise> Reduce Noise, I typically use these settings and adjust them as I need based on the amount of noise in the image.
5. High Pass Sharpening is usually the last thing I do to an image unless I am uploading it to the web. Some web pages like Redbubble automatically sharpen the image when you upload it, dual sharpening tends to make the image look too sharp and many times introduces artifacts that are a nuisance. For printing purposes, high pass sharpening is a must it can really set your images apart from the rest!


