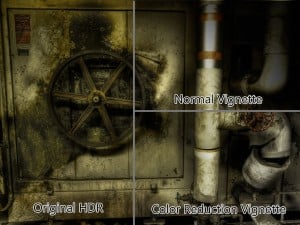
So vignettes have hit the streets running as one of those awesome ways to make an image go from eh.. to Wow… I don’t want to like vignettes because they seem so cliche, but they work, they really work. They do a great job of diverting one’s attention to the focal point in an almost subliminal way. So how can we spruce up the vignette a bit to get a different look with the same concept? Photoshop of course! I have used the power of blending options, specifically Color, and really enjoy the outcome.
- Duplicate the image layer you would like to vignette by pressing Ctrl+J (Cmd+J)
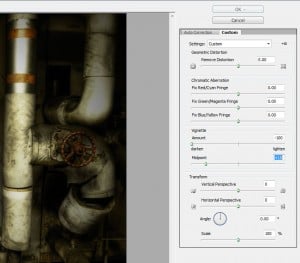
- Go to Filter>Lens Correction or press Shift+Ctrl+r (Shift+Cmd+r).
- In the Lens Correction panel click on the Custom tab.
- In the Vignette section change the Amount to -100 and the Midpoint to +15

- Press Ok
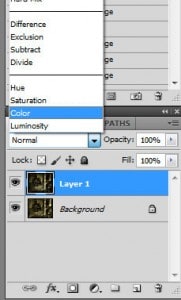
- Now, in the layers palette, select your vignetted layer and change the Blend Mode to Color.

- And there you have it, a subtle, what I like to call, Color Reduction Vignette! A nice alternative to the typical Vignette seen all over the web.
This Vignette effect is found in my Actions Package coming very soon to the Everyday HDR Store! If you like what is going on here, you will love the fact that it is fully automated in my Actions set. Check out this effect as well as 25 other Actions, all in one nice neat package! The package will be available for purchase on 11 January 2012!


Cool tip, I dig it!
Blake, this is not a comment on vignette manipulation. I just learned from ON1’s Photo Raw video that you are a Windows user. I am too and I have been complaining to ON1 for a while now that in Windows the control sliders are way too tiny for us Windows users. I wonder if you are having the same problem as I am where it sometimes takes several attempts to grab the sliders due to their tiny size. I guess everyone at ON1 has a MAC and doesn’t have that problem.
I was told by ON1 that the problem would be fixed in Photo Raw, but so far I’m still having the same problem.
Comments?