There are many ways to convert to black and white with the 5 billion photo programs out there. They are very easy to do and most of the time consist of the click of a button. With one swoop of the mouse and a click you become the king or queen of desaturation. Amazing and convenient right? Not in my humble opinion! These simple push button conveniences are the McDonald’s Apple Pies of black and white photography, it is an apple pie but there is no work involved in getting it. Wouldn’t you rather a rich home cooked apple pie that fills the room with that fresh cinnamon smell and oozing apple pie filling? Your black and white images should be the exact same way! Push button black and whites, in most cases, yield more like 50% gray and white images, where is the black? It really isn’t there, I see it all the time, and while some may like the look, I like my BLACK and WHITE images to be just that, a contrast between BLACK and WHITE. By using the push button techniques, without the knowledge of your options, you are robbing the star of the show its glory. Let me show you some for examples, you will be on my side in no time!
6 Black and White Conversion Techniques
Technique #1: The Grayscale Mode Adjustment (Push Button)
The easiest of the Black and White conversions in Photoshop.
- Open your desired Black and White image in Photoshop.
- Proceed to the top of your screen and go to Image>Mode>Grayscale.
- Done… your image is Black and White. If you would like to add color elements be sure to change back to RGB, CMYK, or LAB, whichever you normally edit color in. When in Grayscale mode, every picture or color added to the image will be in the scale of gray, imaging that! To revert back simply go to Image>Mode>RGB etc..
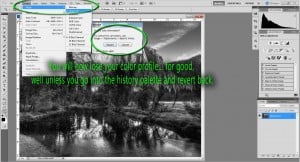
It is important to know that your color profile is now gone! You have removed the color values from the magical world of color hues and are now left with that color’s equivalent gray. Which in a pinch with time constraints this isn’t a bad option, however, time or not, I like control!
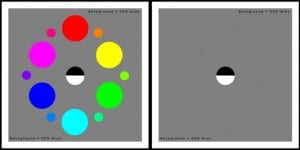
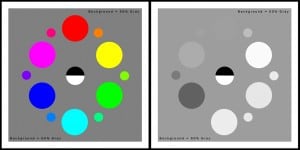
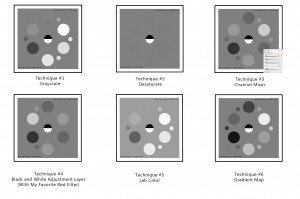
Notice the effects of the grayscale conversion on the CMYRGBWK color wheel. The red value has come very close to medium gray, it is maybe 52% gray. The black and white mode conversion has not yielded any of the colors even close to black.
Technique #2: Desaturation Using Adjustment Layers
Convert your image by removing the color saturation without effecting the original image using an adjustment layer.
- Open your desired Black and White image in Photoshop.
- Create an Adjustment Layer from the layers palette using the Hue/Saturation Adjustment Layer.
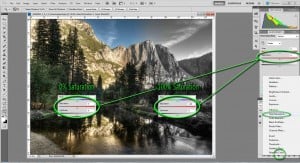
- Slide the saturation slider to -100% saturation. You have now removed the saturation of color from the image.
- You can now flatten your image and save it.
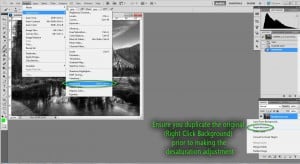
- You can also Desaturate your image by navigating your menu bar to Image>Adjustments>Desaturate. If you desaturate this way make sure you duplicate the original layer first to ensure you do not make any hasty adjustments to your original that are unwanted.
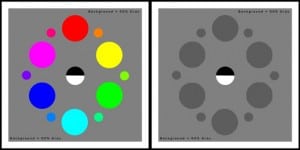
This is by far my favorite magic trick in the book! Desaturate has literally removed all of the color from the color wheel, every Primary, and Secondary color is now 50% gray. Keep in mind if the hue for any of the color information changes, lets say you add a little bit of white or black to the colors, they will yield their respective gray value once the desaturation is complete. This is with a -1 Exposure, it added approximately 13% black to the already 50% gray from the desaturation, making all of the colors a respective 63% gray. Check it out:
Technique #3: Using the Monochrome Channel Mixer (in RGB Mode)
Finally! Some control for us OCD control freaks! This is a great way to manipulate the individual color values mono chromatically. I prefer working in RGB mode while using this method, I tend to get horribly muddy results in CMYK.
- Open your desired Black and White image in Photoshop.
- Right click the Background image in the layers palette and select Duplicate Layer.
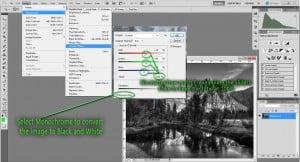
- Proceed to Image>Adjustments>Channel Mixer.
- Ut oh! More technical slider bars! Have no fear, this one is simple and pretty easy to understand with a little bit of instruction.
- Select Monochrome at the bottom of the Channel Mixer box. This will convert all of your colors to their grayscale equivalent and even tell you how much percentage of each is coming through.
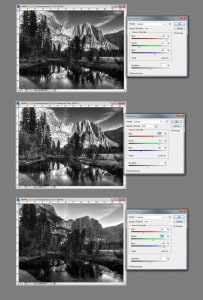
- No matter how much I manipulate the colors, I like to keep my image at 100%, if you have more than +100% your image becomes very white, and less than +100% it is too dark. Check out a couple of variations below:
- Rather than allowing Photoshop to make the crucial black and white conversion decisions (by desaturating or converting to grayscale mode), you have now manipulated the channels to your liking.
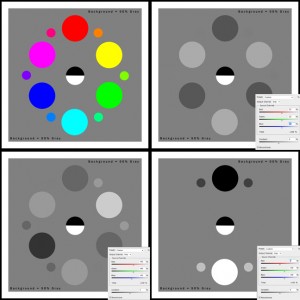
Not quite the same channel mixer profiles as the above image. I wanted to show how certain settings would change the gradient values of the colors on the color wheel. Your decisions could yield many of your vibrant gradient values to become 50% gray.
Technique #4: The Black and White Adjustment Layer
If you are lucky enough to own Adobe Photoshop CS 3, 4, or 5, you have a handy adjustment layer called Black and White. How convenient! While it is convenient, I do not care for its ability to destroy your image if you go too far.
- Open your desired Black and White image in Photoshop.
- There is no need to duplicate the layer as this adjustment will create a separate adjustment layer.
- Go to the Layers Palette and select Adjustment Layer>Black and White
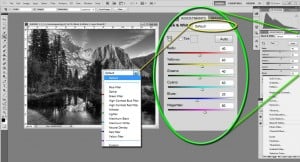
- A Black and White image will now appear and an adjustment box above your layers palette. This is very similar to the Monochrome Channel Mixer technique, however, you now have the option of 6 colors to manipulate instead of 3 (Blown up and highlighted in green below).
- You can also select filters! This takes me back to High School. I would load my Canon AE-1 with hand rolled black and white film, take it outside and assess the clouds while screwing on my Red Filter… I loved that red filter for black and white images, and now I have my very own digital one :). Scroll through the area that says default with a drop down menu (Highlighted in Yellow below).
- I highly recommend starting with a filter and making slight variations to your heart’s desire, may I stress slight.
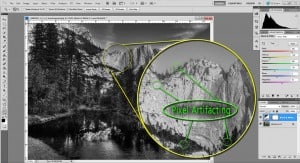
- Don’t get too carried away with these sliders, they are not nearly as forgiving as the Channel Mixer sliders. Drastic changes tend to create some really horrible pixel artifacts. When you take a slider to the far right or far left you are completely removing or heightening the existing color in its gray value. This can create some pretty noisy images! Take a look below.
- When you are finished you can flatten your image or save it as a .psd, whatever your typical work flow may be.
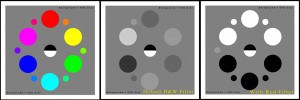 The effects of the black and white adjustment layer. The default setting on the left and the red filter selection on the right.
Technique #5: Lab Color Desaturation
- Open your desired Black and White image in Photoshop.
- Go to Image>Mode>Lab.
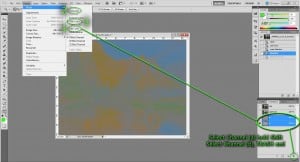
- Go to the Layers Palette select Channels.
- Highlight channel (a), hold shift.
- While holding shift, highlight channel (b) and trash them.
- You will be left with a black and white image.
- Go to Image>Mode>Grayscale.
- Go to Image>Mode>RGB, (to make it editable with color).
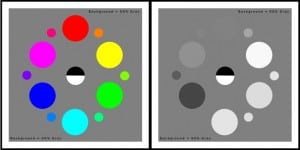
Lab color is a good start but the gradient values are still on the light side.
Technique #6: The Gradient Map
I like this one, a lot, it produces some nice Black and White images and pretty easily too.
- Open your desired Black and White image in Photoshop.
- Go to the Layers Palette select Adjustment Layers select Gradient Map
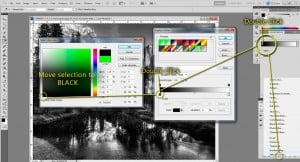
- Go to the Adjustment Palette Double click the far left portion of the Gradient Map.
- In the Gradient Editor, double click the bottom left slider (mine is green because that was my foreground color at the time).
- Select your stop color to Black, and you now have a black and white image.
- You can flatten and save, save as .psd, or continue with your workflow at this time.
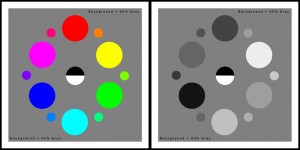 The final conversion and the most accurate. I would love to have simply posted this as the one an only way, but then I would be like every other Photog out there with tutorials….only showing you the final opinion. Look at those color gray scale values, you are really running the gamut and showing true value for blue. I don’t know about you but I am pretty much sold on the Gradient Map!
Contrast Comparison
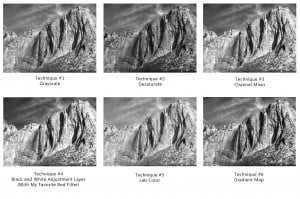
You are probably sick of looking at that image, so here are all 6 techniques done on a different image for contrast comparison. For demonstration purposes, each image has been converted but not post processed any further so you can see the contrast differences.
You too can have your very own color wheel to play with. I suggest bringing it in as a temporary layer over your image to see the effects of your preferred grayscale method. You can download the color wheel here:
Don’t Stop Post Processing
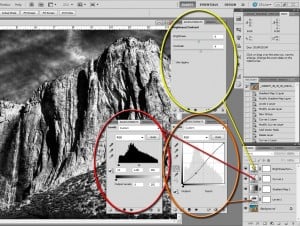
We don’t stop here! I am going to post process it further because I am not completely pleased with the contrast between black and white in any of the photos. As stated at the very beginning, this IS about the star of the show! I will start with the Gradient Map base and adjust the Levels first, then the Curves, and finally some Contrast (Using Adjustment Layers). No secrets… here is the complete workflow.
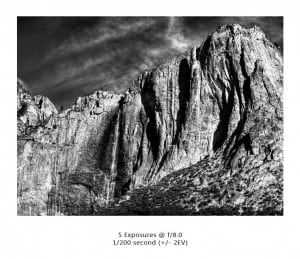
And the final image with no distractions. Notice the strong contrast and the power of those dark black shadows.
I hope this helps in your Black and White Conversion endeavors! Take care everyone, and go do some Black and White HDR’s this weekend for crying out loud!



NIK software’s Silver Efex is the way to go with Black and White. I said it was Photoshop for a while but Silver Efex does it all and it’s so easy I can even use it.
I have seen Silver Efex displayed at Photoshop World, but that is yet another program I would have to buy! These programs add up! I like the gradient map method in Photoshop a lot, I will have to look deeper at Silver Efex. Thanks for the tip!
Great tutorial man!I havce learnt a lot of things!
Awesome! I am very glad. Thank you for the feedback!
Very nice tutorial Blake! I am trying out the Topaz B&W plugin at the moment and loving it. I know it is a matter of taste somewhat, but what do you look for when you are picking a B&W photo transformation? Are there particular details or is it just simply an “artistic vision”? Thank you for ALL you do Blake!
With Much Respect, Tal Pipkin
Thanks Tal!
Hmm, it really is artistic vision, however, I ensure I have a solid WHITE and solid Black somewhere in the photo. You can do this by making a new Levels adjustment, hold alt(or option) while grabbing the white handle. The image should turn black and show little areas of white, as you move the adjustment to the left it will introduce more white, however, it may blow those areas out. You don’t want too much blown out areas, but a little bit of white is mandatory. You can repeat the process for the black handle, however, it will provide you with the areas that are clipping. Again, you want some black but not huge areas as these areas will be lost information once it is saved.
I like to make my black and white images with a strong black area, a strong white area and a nice gradient of grey in between. Very similar to Ansel Adams’ zone system. I like to think that the higher the contrast in black and white images the better. My favorite method is by far the gradient map method as it renders every color in its grey value, this is different from desaturation as desaturation simple removes the color value. I say in the end, experiment and you will find your favorite B & W conversion!
Ansel and Minor are my idols in the B&W realm. Thank you for bringing the Zone System into digital world.