White Balance 101: Fixing Color Temperatures in Adobe Camera Raw
Color Balance, Color Temperature, White Balance, they all go hand in hand. Every photo should get some love in the color department, but how do you know what needs what where? Before you just dive into those temperature sliders in Adobe Camera Raw or Lightroom, you have to understand the basics of how a camera records your White Balance.
All cameras record color similar to how they record tone. You have probably seen the words Exposure Value (EV) on your camera. The Exposure Value is what range of tones the camera records from overexposed +EV or underexposed -EV. At any given time our camera can only store one instance of exposure value in a given shot.
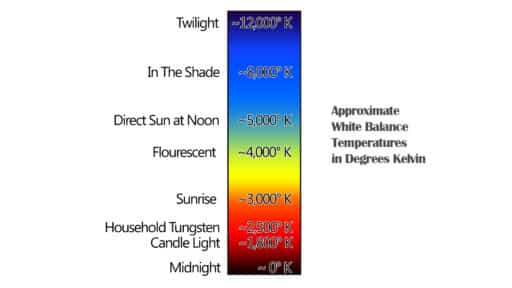
Similarly, there is White Balance for Color. Our camera can only capture one instance of White Balance at a time. It is recorded in degrees Kelvin. It refers to the warmth or coolness of a scene.

If you are shooting in Jpeg, you’d better make sure both your Exposure Value and White Balance are near perfect. Jpeg’s are like snapshots of a scene, they do have some data that can be manipulated, but it cannot go as far as a RAW file. With a RAW file, you have the ability to make serious adjustments to the Exposure Value and Color Temperature. The severity of your adjustments relies on your camera’s sensor and how it handles Dynamic Range and Color Depth.
Just because our camera captures one instance of White Balance and Exposure does not mean we are at a loss. To get more exposure we can push and pull the Whites, Blacks, Shadows and Highlights. To modify the Color Temperature we can use the Temperature sliders in ACR or Lightroom.
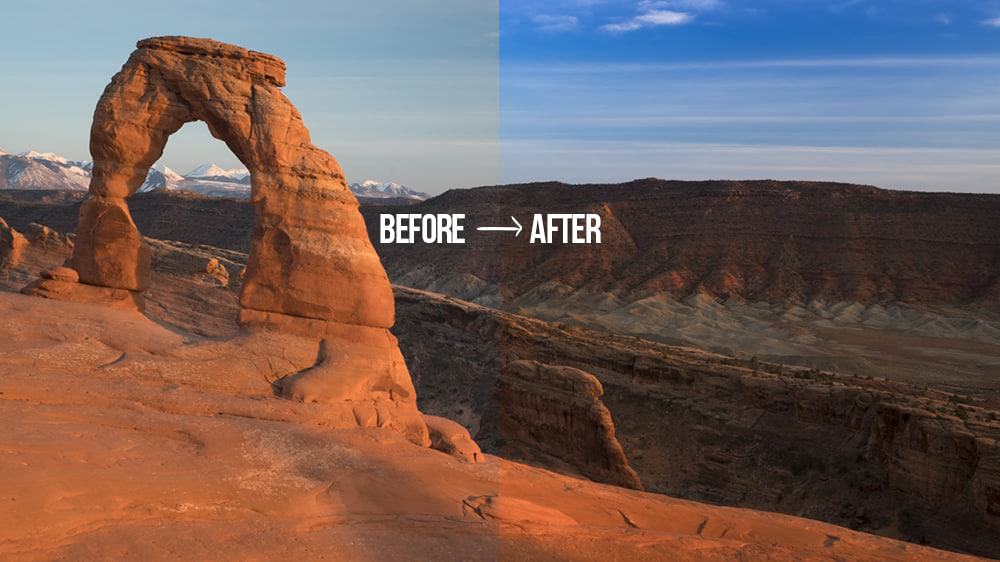
All of that is fine and well and pretty self-explanatory for most people who have spent enough time pushing sliders around. However, what happens when you push the color temperature to cool down the sky and the warmth of your foreground suffers? That is where you need to use some outside the box thinking and separate your image into regions and edit them individually. You could do this in Photoshop or just about any editing program that allows for masks, but I prefer to do it at the RAW level, therefore ACR or Lightroom is the optimal choice (if you have ON1 Photo RAW you can do it there as well).
In this tutorial, I will show you how to use the Adjustment Brush and the Graduated Filter to break your image into distinct regions. This technique will allow us to make our beautiful blue sky bluer and our red rocks warmer without the two regions color temperatures competing with one another.


Great tutorial
Thank you!
GREAT information!!!
Thanks, James!
Lightbulb moment! The awareness of kelvin temperature is going to help a lot. In my attempts to process red rock images they are either too saturated or muted. “Why!!! I would scream (in my head) at the monitor.” Thanks for the info.
I love those moments! It seems so simple, huh? Knowledge is power 🙂
Loved this tutorial! Targeted adjustments to color temperature really can make or break an image and it’s impact to the viewer. Blake has done a fantastic job in making his approach to tackling this issue a relatively simple and easy way to improving an image. Thanks Blake!
Woohoo! I love it when I nail it with the audience. I am grinning ear to ear, thanks for the kind remarks!
Terrific info. I have always wondered why the color temperature didn’t seem right in my photos. I didn’t realize it was because the camera couldn’t capture more than one. I have used layer masks to correct it in Photoshop. Doing it with CAR was new to me.
Cheryl
Ps can make this much more difficult than it needs to be. One thing I never really liked was their lack of basic editing tools like Color Temperature as it pertains to Kelvin in Photoshop. Sure you have all kinds of ways to edit color, but some of them can do more harm than good.
I saw a new sony in-camera (sony app) filter today which allows 3 different zones. Its mainly for applying an ndr filter effect but it says you can also apply different color temperatures. When I saw this, I said to myself why would you ever want to do this. Now I know! I did not realize color temps could be different in the same digital image. I just also assumed the effect you demonstrated was due to brightness differences. Thanks for the great lesson…
Yep! Mind boggling, huh? The new Sony App is cool, I just bought it and played with it. It requires a lot of fumbling through buttons. I guess it would be great for someone who knows nothing about post processing, but for us, it is a little elementary. The other issue is that it does not take into account obstacles like trees, Lighthouses, or natural arches. So you have to either do a big feather, or have your obstacle half and half. Not very cool!
Glad I taught you something new!
This is an excellent tutorial, Blake. Never thought of approaching this type of post processing in this manner. Brilliant!
Mark
Thanks for watching, Mark!
Thanks Blake. I needed that tutorial.
No problem! Glad I could help!
Blake,
Great information on using graduated filter or the adjustment brush with making.But,I noticed you did not discuss using a Color Checker Passport or some other similar tool. It is a great way to actually capture the color temperature. Why? Thanks ahead for response.
Terry
You bring up a great point, but the truth is, I don’t use them. Between getting the shot, avoiding tourists, getting the settings right, and being able to move quickly, I don’t have the time to be that nit picky with the Color Passport. Because I shoot in RAW I have the ability to manipulate the color without worrying. If I were shooting in JPEG I would probably use something like that, but in these instances where I am shooting in RAW and the Kelvin temperatures can change very quickly in the landscape, it would require too much extra work. Studio environments are great for those tools though.
The only time I use a color checker is to set custom white balances on my cameras for specific shoots. I have, for example, one for IR shooting. For an indoor sporting event it’s sometimes helpful to have a custom white balance setting for the available lighting, especially for swim meets.
Great tips, Blake. Is it my imagination, or is the masking brush in ACR better at finding edges than the new and unimproved smart selection tool in PS CC 2017? I haven’t really like the new toolset in PS since they updated it so maybe I’ll just use ACR as a filter when I need to do some basic masked adjustments like this. Hmmmm
Excellent topic and tutorial. I have experimented with using these ACR tools but never had the best results. Mainly because I didn’t know how to use them in the most efficient way. Your tutorial has now opened my eyes and has expanded my knowledge with getting the most out of using them.
Thanks Blake, as usual your tutorials always provide greater knowledge and understanding with all the topics you cover.
Sweet! I am glad I could help demystify the inner workings of ACR 🙂
Good information and video!
Since you shoot in RAW I was wondering about your thoughts on “FastRawViewer” which allows you to see the effect of color balance (and exposure)as added to a pre-conversion RAW image.
Interesting. I will look into it. I have never used it.
Fantastic! I learned so much in a few minutes.
Thanks as always,
Vinny
Awesome! Thanks, Vinny!
An added benefit of my giving up Facebook for Lent. I have so much more time to learn from your tutorials. Time MUCH better spent 🙂
Great tutorial. Wish I could see it written out step by step!
Thanks!
Step by step tutorials require a LOT of time, time that I just don’t have to continue producing content. It is something I would like to do, but the problem is in this industry content gets swept up and ingested so quickly that writing that out step by step would take me a ton of resources that would just be gobbled up by the viewer and leave me with lots of lost hours that could be attributed somewhere else. I know that may sound harsh, but that is the nature of our online education platforms.
Thankyou Blake for a very easy to follow video. I have previously been reluctant to use masking &/or the graduated filter in Camera Raw as it seemed difficult, however after watching your video, I’m keen to try.
Awesome! Glad I could inspire you to try something new 🙂
Another informative video Blake..thank you. I’m thinking that the Zone express panel would achieve a similar outcome? A great location btw!
Blake, once more, I have gotten a very good learnings from your video. By now, I know I have benefited from many of your videos, the problem is that sometimes, I remember something can be done because of a video I watch, but I don’t remember exactly how to do a task. Is there a library of the videos you have produced, and shared, that can be accessed on demand? That would be just so awesome!
Thanks again for sharing your knowledge!
Great session, keep them coming!
More great info! Thanks.
I wasn’t aware that I could use the adjustment brush while using the gradient tool. This made the tutorial awesome for me. What about using the white balance tool? I would click on the snow as my white and would it have been close to the actual temperature? Another trick that I use is my Xrite Passport to just hold it at arms length to get a proximity match for the color in the scene. Great explanation of how the camera sees color in ACR.
Thanks! That was amazing. Just tried it on a couple of shots. What a difference.
I think Blakes tutorials are some of the best on the web dare I say I think they are on pare with phrearns. It’s all about the details and Blakes style is very intuitive. Although he can speak fast but that’s an easy fix just turn the speed down. ??
I always lean so much from you Blake – thank you!
I always learn so much from you Blake – thank you
Blake, I appreciated this tutorial very much. I showed me how to be more precise in color temperature selection. I have a question, though. Can’t you achieve the same result in Camera Raw filter with the HSL sliders in PS or in LR?
Yes you very well could. I find the ability to use the brush here and the minimal tools for color correction perfect! Sometimes Photoshop can give you too much control.
Really clear good tutorial. I wish I could save it to use over and over until I master the technique!
Thanks!
Enjoyed your class. Probably have to watch them more than once to fully undend.
Awesome I have alot of images I took in Australia, but at the time I knew nothing about post processing or anything else. But your tutorials will help me in the future
Watch this tonight {Kinda late but better than never. As usually you rock.
Keep up the GREAT work.