Blend If Has Brothers!
I have done a ton of tutorials showcasing one of Photoshop’s most powerful features, Blend If. However, I am often asked, “Blake I see you using Photoshop for Advanced Blending with Blend If, but can I do this in ____________ program?” It is a great question because these advanced blending adjustments are imperative for various tasks in our workflow. For instance, I use Blend If to protect shadows and highlights from sharpening or I use it to only apply noise reduction to my shadows.
The good news is that many programs and plugins have ways of applying advanced blending. After further research in ON1 Photo RAW and Affinity Photo, I found a few ways that Blend If is incorporated but with very different ways of applying it.
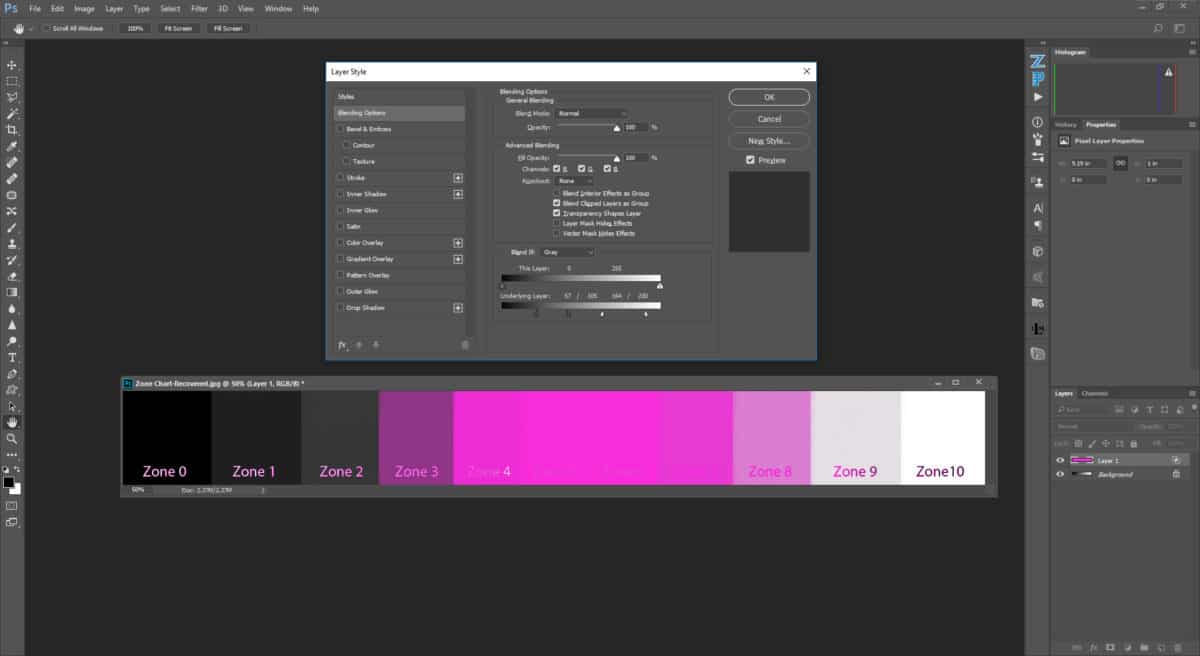
Photoshop Advanced Blending
Blend If is the go-to option for advanced blending and protection in Photoshop. In the Layer Styles, you will find a slider that allows you to protect your image based on the luminance values of the area you are selecting. By sliding the handles from 0-255 and using ALT or OPTION to feather them, you can make some pretty accurate yet advanced blends in your images.
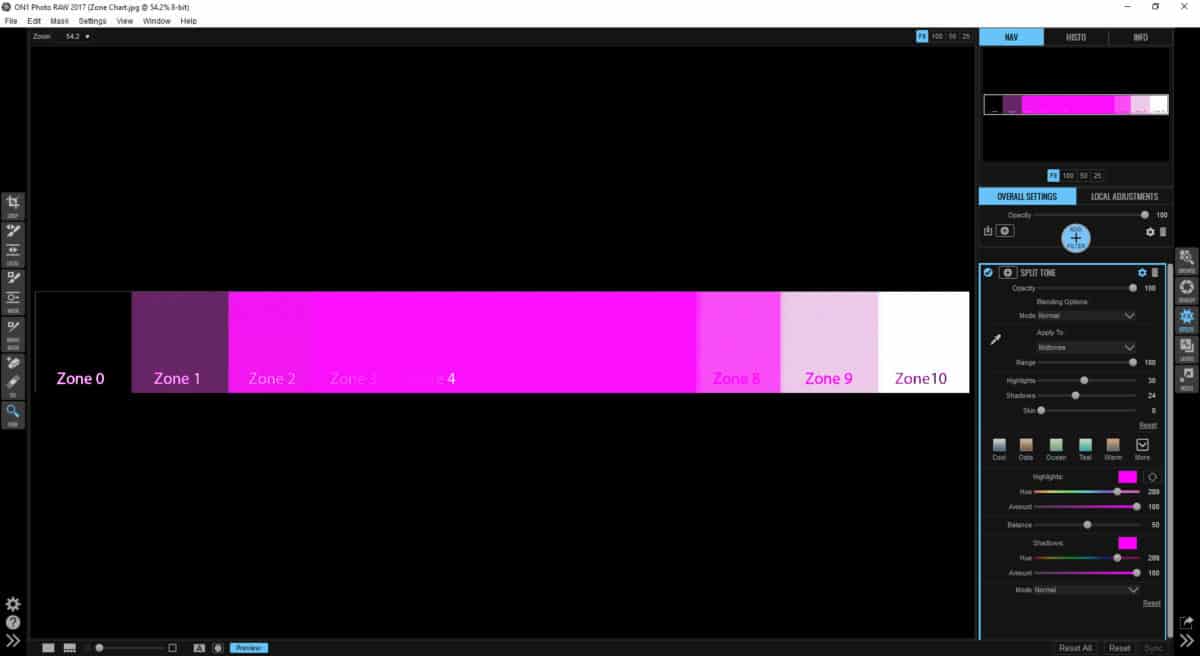
ON1 Photo RAW
ON1 Photo RAW has incorporated advanced blending in their Effects panel for as long as I can remember. It is not one slider like Photoshop, but many sliders with specific names. It makes it a bit simpler, yet harnesses the same potential in your photos for advanced blending. There is also a setting called “Apply To” which will only apply the selected Effect to various parts of your photo.
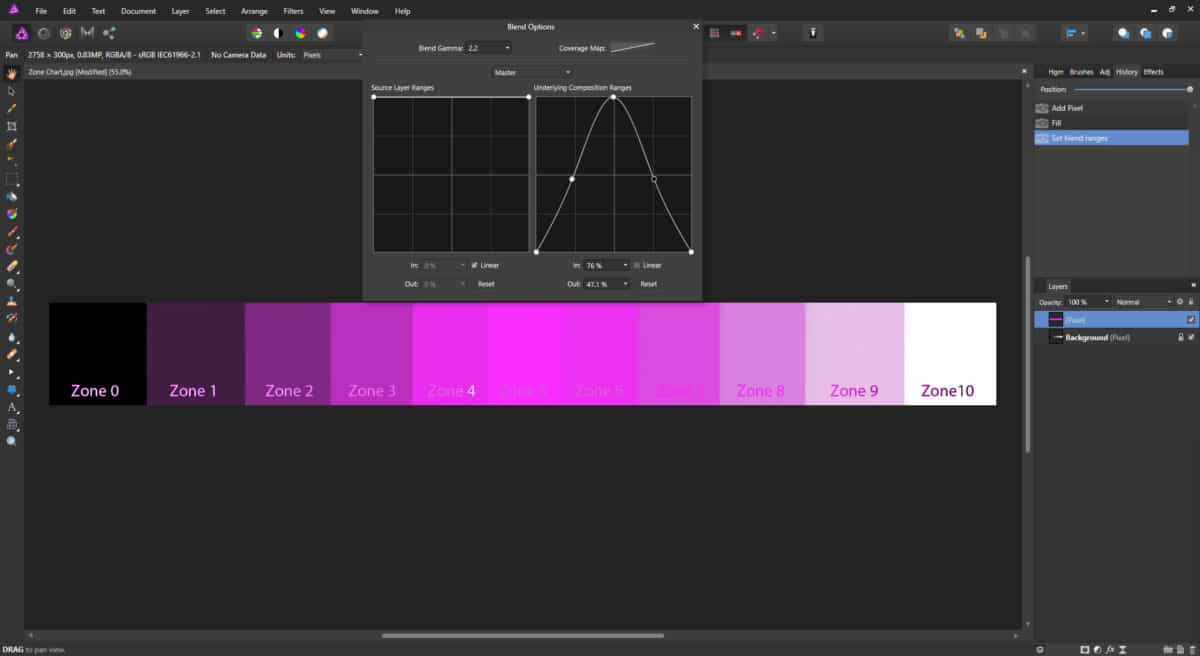
Affinity Photo
Affinity Photo is probably the most sophisticated Advanced blend option in the industry. It allows the user to define the blending of the layers based on a linear or curved grid, similar to a tone curve in Photoshop. By manipulating the points on the grid one can come up with unlimited combinations in one fell swoop.


Very nice! The primary challenge is in learning when/where to apply this technique to an actualimage. Perhaps a follow-up ??
When you have the time, more tuts on On1-RAW stand-alone, and on
On1-RAW + PShop
Thanks for your efforts.
I know what you mean, Gerry. I use it a lot for just about everything really. Primarily for Noise Reduction to protect my highlights and mids from the blurring of most noise reduction algorithms. I also use it to apply sharpening to only the mid tones so I don’t sharpen the shadow noise.
I also use it for color grading and have found myself using it for nearly everything these days.
Thanks so much for showing how you can do some of the things you do in Photoshop in ON1 Raw and Affinity Photo (AP). I have chosen to use AP over Photoshop because of the cost. While their tutorials provide a lot of information, I appreciate the advanced things you do in Photoshop and struggle sometimes to figure out how to do things in AP. I hope you’ll do this more, maybe consider developing a parallel series on using AP. Also, I’m enjoying your tutorials in ON1 Plus very much as well.
AP seems to be drawing a new crowd. So far, I like it, but not enough to dump Photoshop. I just do so much with Ps that I don’t see that in my future. I may consider doing some parallel tutorials as the needs present themselves, but it would be way too time consuming to mirror my Ps work in AP because the audience is small in comparison.
Hi Blake,
I’ve watched several of your blend-if tutorials and always had some problems getting my head around it. However this tutorial turned on that proverbial light. Will be trying to implement this in my image processing from now on.
Thanks very much, keep up the good work.
Woo hoo! Sweet. I am so glad it stuck with you this time 🙂 I appreciate the feedback.
Very nicely done, I have always wondered what the blend window pop-up was for. I have seen the Blend if but never understood it. Thank you for taken the time to do this video.
Awesome! Glad you understand it a bit better now. It can be a tricky concept to wrap your head around.
Thank you for that information Blake I have been using Ps Elements with the plug in sites plugins, now moved to Affinity Photo and that Video explained what I wanted to know I think I have my head in the Right place now .
Hello. My name is Victor. I live in Russia. I do not know English, but I see a video that you do and I know what to do. I have not used this tool, I did not know what to do, and now I understand and I will try. Thank you for the lesson . You cool people. Good luck to you .
I know On1 Photo Raw and Photoshop can work together. Can a raw image move between the 3 programs and if so how and can it be done non destructively?
Unfortunately no. Each program rights different data into the Exif data and/or makes their own sidecar file which the programs do not read across all platforms. You could save the file as a 16 Bit Tiff and get pretty close to a RAW file, though.
Blake, I’ve followed you for so, so long. And learned so much, but I have to tell I just didn’t understand this tutorial. I only you Lightroom and Photo for my work so I replay that portion a couple of times, still dumb Bob.
Keep the tutorials coming for Photo RAW, big learning curve.
No problem, Bob. Keep at it, it will come to you at some point. It may not be right now, but in time you will understand it if you work at it. This is not an easy task to get in one, two, or even three sittings.
Trying it again, where did the color strip come from?
Hello Blake
Thanks for the tutorial.
Can you do blend if in “channels” as well as layers in photoshop? I never tried it and don’t own it anymore.
I do use the blend if equivalent in both channels and layers in affinity.
Thank you for the greàt tutorial.