Dodging and Burning is not just a Photoshop thing!
I will be the first person to advocate that Dodging and Burning is the most powerful technique we have in our arsenal as Digital Artists to make incredible images in Photoshop. These techniques can be used to add instantaneous depth and pull a muddy image out of the muck and make it awesome in minutes!
I have created several videos now on Dodging and Burning in Photoshop over the years:
- Curves Adjustment Dodging and Burning…. 2015
- Automatic Dodging and Burning in Photoshop…. 2014
- Dodging and Burning With a Purpose: Photoshop CS5…. 2012
- Dodging and Burning…. 2011
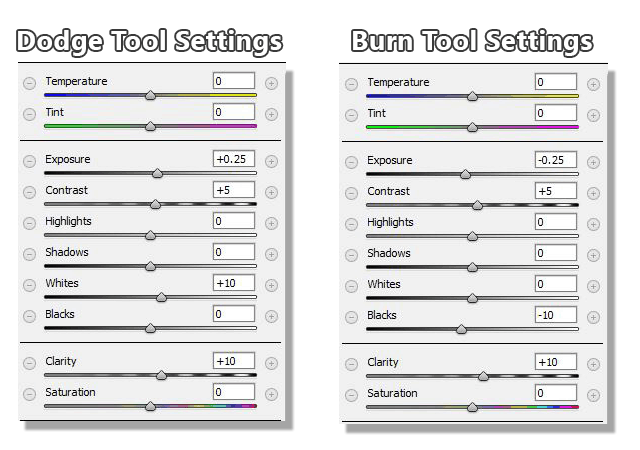
Photoshop is a great source for dodging and burning your images, but did you know you can use Adobe Camera Raw or even Lightroom for this? I have been experimenting with this over the last few months and think I finally made some Dodge and Burn brushes in ACR that work like a charm. The secret to Dodging and Burning is that it is not just about increasing or decreasing the exposure in the brush. It requires a little boost in Contrast, Clarity and even the Whites and Blacks.
Here are the settings I use for making my Dodging and Burning brushes in Adobe Camera Raw.
You can do the same in Lightroom in the Adjustment Brush panel.

There are several benefits to using these techniques in ACR or Lr:
- More accurate control over tone and color
- Temperature Color Control
- Point and Click Brush for easy adjustment
- Easier to adjust intensity of D & B adjustments
- Correction to the video: Lightroom is capable of Wacom Tablet sensitivity ACR is not.
Creating an Adjustment Brush in Lightroom is a bit different than Camera Raw. Eric says in the comments:

Check out the Video tutorial on this topic here:
[hcshort id=”9″]


Wow, wow, wow, Blake! Your previous Curves D&B in PS had become my go-to Dodge and Burn, but I think this will become my new go-to. Can’t wait to give it a try! This is amazing. Thank you!
Thanks! It took some time to get the perfect Dodge and Burn settings so they set you up for the bigger adjustments with the other sliders. It is more than just exposure. You will surely enjoy this!
Blake,
Great tutorial, as usual. One question, i just loaded LR 6stand a lone. Where d I find Camera RAW. usually if opens automatically.I is one of the reasons I bought LR 6.
ACR opens in Photoshop. It is Photoshop’s version of Lightroom essentially. They have similar features, almost identical in the way they edit photos, just a bit different in the overall layout.
OUTSTANDING! I never thought of this and the flexibility is fantastic. Thanks as always.
Vinny 🙂
Thanks Vinny! This was one of those “Ah-Ha Moments” for me. Thanks for watching!
Blake, thanks for this helpful tutorial, I use LR CC a lot but I cannot see how to create adjustment brush presets in LR.
It’s clear form your video how it works in ACR Thanks
Go ahead and give that a shot see if that helps:
https://helpx.adobe.com/lightroom/help/apply-local-adjustments.html
In LR CC the Brush Preset is under Develop > New Preset. First select the Brush, then set the settings, next go to the top of menu bar and select Develop > New Preset. Uncheck all the boxes and then check the settings you set for the Brush Tool. Name it: Dodge or Burn. When you want to use the Dodge or Burn Tool you created, it is located in Presets > User Presets. You have to first select the Develop Module before you see the Presets module. I always finish a photo with LR by using the brush tool to dodge and burn, but I had no idea I could set up a Dodge and Burn Preset. Thanks! Blake for the helpful tips and setting suggestions. Your lessons have made a big difference (improvement) in my photo processing. Thank You! Thank You!
Great tutorial Blake! It adds a whole new powerful tool to my workflow toolbox. Thanks!
Awesome, as always. Every time I watch one of these I feel like I need to re-edit EVERY image on my drives. That would be painful.
But, sure do enjoy. Thanks,
Haha! Me too! So much to learn.
Blake, thanks for a great tutorial. I just had to do some D&B on a B&W conversion and had to guess at the settings. Going forward this information will be a great help. I do have one question however. You did not touch on Lightroom and specifically the ability to save a brush type. As far as I know, saving a brush is not available in LR, except maybe in a preset. Can you elaborate on this and explain how this might be accomplished?
Thanks,
Dave
Ooh yeah, that’s a problem! Just got off a Google Chat with Jake McCluskey to look into this, he’s my Lightroom guy 🙂 There is no way to save a brush preset that I/We know of in Lightroom… ugh! Sorry about that.
Ok, thanks for the confirmation!
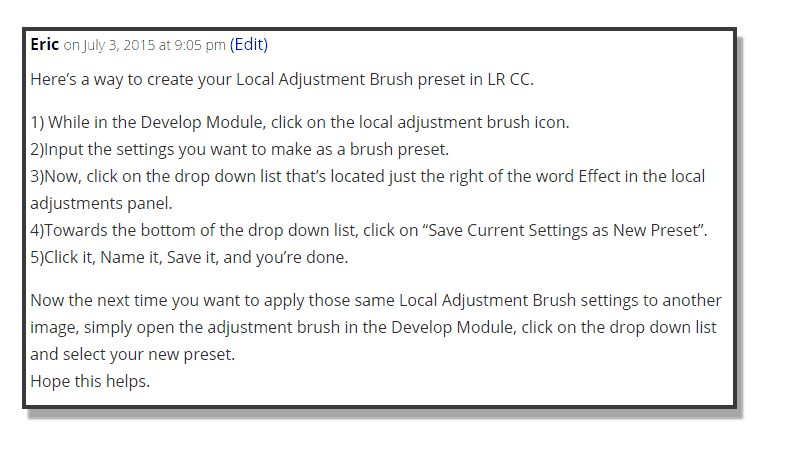
Here’s a way to create your Local Adjustment Brush preset in LR CC.
1) While in the Develop Module, click on the local adjustment brush icon.
2)Input the settings you want to make as a brush preset.
3)Now, click on the drop down list that’s located just the right of the word Effect in the local adjustments panel.
4)Towards the bottom of the drop down list, click on “Save Current Settings as New Preset”.
5)Click it, Name it, Save it, and you’re done.
Now the next time you want to apply those same Local Adjustment Brush settings to another image, simply open the adjustment brush in the Develop Module, click on the drop down list and select your new preset.
Hope this helps.
Sweet you Rock Eric. I’ll copy this and put it in the Post.
Thanks, Eric …. another way to set a “preset” in LRCC. So many hidden things and ways to do one thing, makes me crazy.
Stop! Stop it! Stop right now! Every week you are blowing my mind with each new tutorial, I can barely adjust to one before you come out with another tutorial and blow my mind again. Brain matter is going to start leaking out of my ears from all the input you are sharing with us!
This is an awesome tutorial, yes it has blown my mind with the possibilities, and I am excited to give it a try.
Excellent information as always, thanks again.
Okay fine! I’ll take the month off and I’ll put off the launch of the New Zone System Course. I could use a break 🙂
Glad you are learning a lot here, that’s my number one goal!
Oh wow, oh wow! The more I apply this tutorial, the more I get excited about this new skill you shared with us!
Thank you so much!
Blake, I hate the Wacom sensitivity. I’d rather start out light and keep building. I keep trying to like it. I’ve never had a drawing or painting lesson, so I don’t think I have the artist touch like you have. I do use it a lot.
Hi Blake, great tutorial as always. I am running photoshop CS6 and ACR 9.0 when I select the adjustment brush I don’t see all the sliders you are showing (the black and white are missing). What is the version of ACR you are using is it that which is shipped with Photoshop CC??
That is odd. I believe CS 6 has the Whites and Blacks sliders. I thought they changed that with CS6. It has been a while for me since I went all CC and stuff. I’ll look into this.
Excellent D & B tutorial – can’t wait to try it. Would like to ask if you would consider doing a tutorial on the Wacom tablet (as you use it). I have recently purchased one and the tutorials I have seen, re setting them up differ. I would really love to see your version of what you consider to be the most preferred and logical way. Many thanks. Julie
Hello Julie… this is interesting. I didn’t do much to set mine up. I plugged it in and turned the touch feature off completely. All I need it for is the pressure sensitivity. I use a left handed Mouse and right hand on the tablet with pen. I don’t use all the features of it because my left hand is dominant when editing with the mouse. Oddly enough, I am right handed with everything else.
Hi Blake & Insiders,
Eric mentioned how to create an adjustment brush presetting in Lightroom CC, but I’m wondering if anyone knows if it can be done in LR5 & if so, is the procedure different?
I’m thinking of getting Lightroom 6 or Photoshop & Lightroom CC – it’s just a matter of the cost [is it worth it when I only get around to processing an average of 1 photo per month (maybe I should watch less TV)].
While I’m here, can anyone tell me what one would revert to, if one cancelled their CCTV subscription – what they had installed before?
CCTV subscription was supposed to be CC subscription – sorry, it happened on my phone keyboard
Thanks for another great tutorial, Blake! Although I am not a portrait photographer, since you mentioned that preset you use on your son’s eyes, I recommend that you do a tutorial on improving eyes in a portrait/photo.
Sweet, I’ll look into that Juan. I mainly do portraiture of my sons for fun. Nothing pro, but I do have fun with it.
Great tutorial and so clearly explained.
I am still using PS cc 2014 and do not have the white&black slider in my ACR when I click the healing brush. I have not had time to upgrade yet because am using mac and will have to redo my Topaz products so dragging my feet I guess.
Always awesome – always more to learn… thanks
I typed up some notes as I was watching to go along with your dodge and burn settings — us over 65 crowd need all the help we can get to remember all of this stuff.
Would this be a good technique for portraits, too?
Yes, but I would move the clarity in the opposite direction to smooth skin, especially on women and children
I’m confused. I have LR 6.1 and my adjustment brush options do not include either Whites or Blacks, pretty critical to this technique. What’s going on?
BTW, there are pre-installed Dodge and Burn presets, but they only bump (+.25) or decrease (-.30) Exposure.