Glow Brushes in ACR and LR? How???
I have long been a fan of the Orton Effect. So much so, that I built my variation of it for the Zone System Express called “Radiance 2.0”. The glowing effect makes an amazing atmosphere for your photo, regardless of the genre, but I wanted it in some Glow Brushes too!
The other day I was experimenting with the Radiance 2.0, and I thought, “What I wouldn’t give to have this kind of glow, but in a brush!” Of course, your first thought is to just mask the effect in Photoshop, there’s a brush, right?
Sure, but I want even MORE control than that.
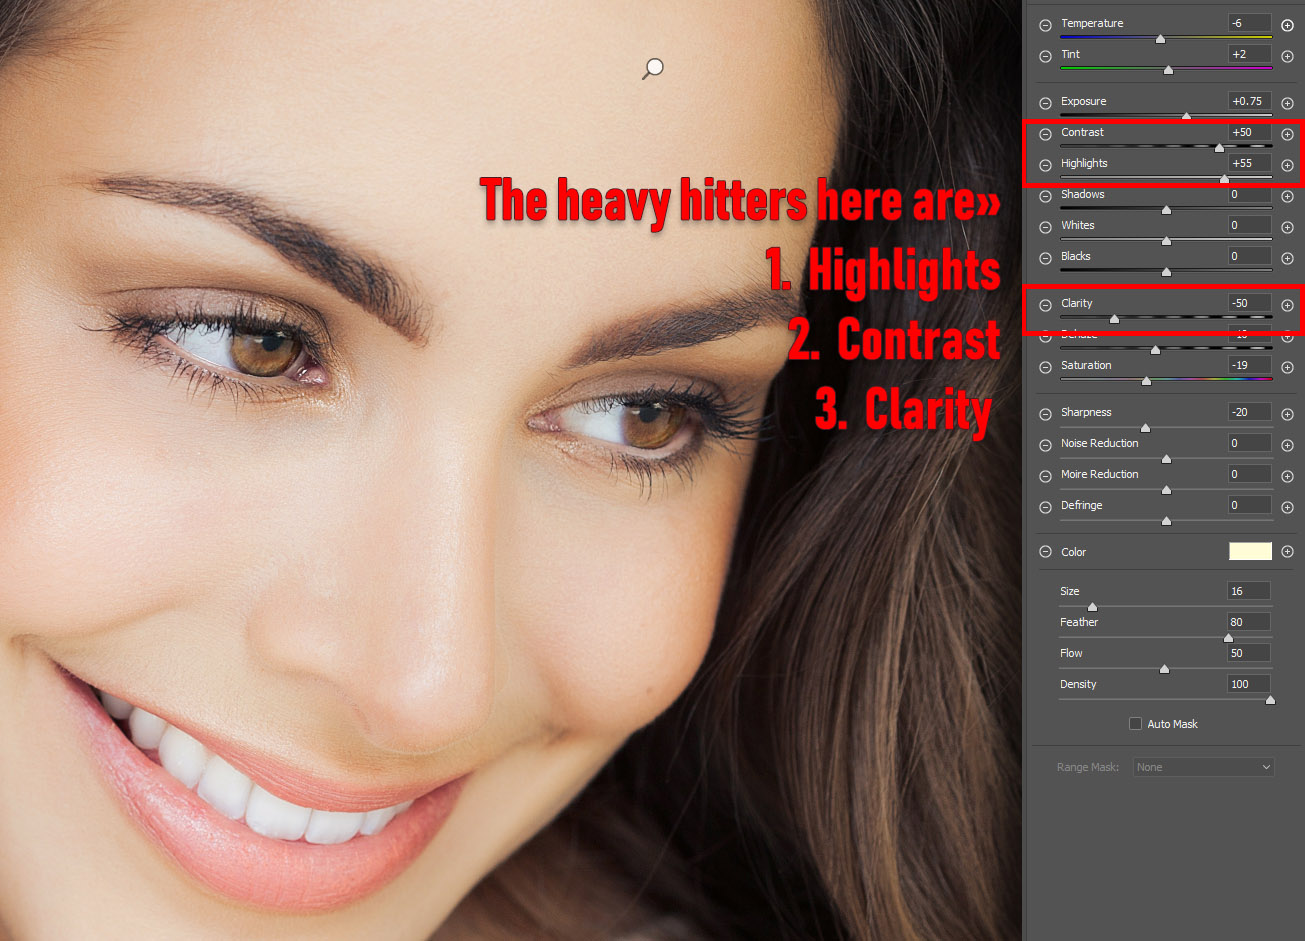
So I started experimenting with the Local Adjustment settings in Adobe Camera Raw, and I found some fascinating results with just three sliders!

As it turns out, it didn’t take that much experimentation to find the effect I wanted. I just had to deconstruct the Orton effect, document exactly what it was doing to my photo, and reproduce it with the Local Adjustment Brush. Here are my findings:
1. The Big three for Glowing Brushes are: a Highlights Increase, an optional Contrast Increase, and a Clarity Decrease.
2. If you want more umph, you can reduce the Dehaze (but only slightly)
3. You can use Tint, Temperature, or Color to add some warmth or coolness to your glow
4. The Radial Filter, Graduated Filter, and Brush can share the preset!
5. Regardless of what you shoot, these Glow Brushes are fantastic for drawing attention to the focal point of the photo.
I would love for you to make your own as well. However, I am going to get you started today with a free 9 Brush pack and a video tutorial to boot. Please, before you download them, watch the video in its entirety so you understand exactly how they work.
Enjoy the Glow Brushes!


Another Blake Rudis homerun
Thanks! 🙂
THANKS BLAKE- Very informative video with useful information and Brushes.
Cool, Blake! Thanks again.
I believe I learn far more about Photoshop and its associated programs from Blake than anybody else. This short tutorial demonstrates all of his assets, preparation, organization, thoroughness and a humility.
Thank you, Blake
Thanks so much! I really appreciate that. I do put a lot of prep work into this stuff. Sometimes its all I think about, ha!
Thanks! Jeff, I am having one heck of a time trying to get Mac users (some not all) to find the right place to put these. Do you happen to have the correct file string for the ACR and LR places to put the brushes. It’s killing me, lol!
Genius as usual. Thanks for always teaching things so completely!
Blake: Thank you very much for another very useful technique!
Loved your “dodging and burning blend if” tut recently! Wow! I’ve used it on every portrait since! Genius! Such an improvement to my work.
Now this amazing Glow Brush! So grateful for your generosity.
I’m having problems with installing them. I can see they are present in the location your instructions showed to put them on my Mac. But when I open ACR and click on the little rectangle beside Brushes, the drop down menu only shows the native three options, not any brushes. What do think I did wrong? I’ve restarted PS several times. I double checked in Library location and they are present. So sorry to bother you.
Yeah, I’m not sure what is going on with Macs. You could always make them from. The instructions in the video.
Thanks, Blake! I’ll try that. Your instructions were great!
No instructions for installing in ACR!
Yes they are in the PDF
Awesome!! Thanks so much…greatly appreciated 🙂
hello Blake,
Really nice tuto !
I waste lot of time to launch ON1 from Lightroom just to add some glow or sunshine.
These brushes seem a good alternative !
best regards
marc
Thanks!
Thanks a lot,Blake for the awesome tutorials and the freebie.
Is there a major differences between the Glow shown here and the one appearing in Topaz.
Regards
Murali
Cool!
Blake, I love the way that you bring the theory as well as the application into your tutorials. I learn so much from you.
Again you succeeded in bringing new ideas and inspiration into a set of tools that are easy to use and make pictures outstanding!
Thank you Blake for this tutorial and new set of brushes!!! I love to share your video with the other members of our fotoclub FODIFI Wondelgem, Belgium.
Thank you Blake you are always such an inspiration and a wonderful and generous teacher.
Hi Blake
Am a little embarrassed to say that I can find neither of these two locations (../LocalCorrections or …/LocaladjustmentPresets) on my Mac. Am I the only one? Any suggestions appreciated?
John
Found it – please ignore previous post
This is indeed very interesting…. I will try this on some old portraits~
I’ve loaded the Glow Brushes in the Local Adjustment Presets folder on my Mac (retried numerous times including a reboot). I use Lightroom and that is the folder identified to be used with Lightroom. After numerous attempts the Glow Brushes do not appear. There were five presets in the Local Adjustment Presets Folder when I copied the Glow Brushes to that folder. When I open the brush tool there is a pull down menu labeled “Effect” and “Custom” that reveal the five presets that are in the Local Adjustment folder. The Glow Brushes appear in the Finder folder but do not appear in the pull down menu. I’m stumped. If anyone can help, let me know.
I’ve successfully loaded the Glow Brushes. My folder structure for Lightroom has been modified over time and differs from the one in the download.