Panorama’s are fun, once you have gotten past the frustration and easily convoluted workflow. A couple years ago I did one the archaic way, taking each image and manually masking them, it took me 4 hours. Those were the days of Adobe CS 8.0, which as I recall had an automate button but it wasn’t very good. Now there is CS 5 and I am pretty sure CS 3 and 4 work very similar, regardless life is much easier. Wait Blake, “Before you get Photoshop happy, what about advice for shooting and Photomatix processing for digital pano’s?”. Ah yes! Thank you for stopping me!
Tips For Shooting HDR Pano’s:
Because your pano is comprised of many photos (to make it more difficult it is HDR, it is now 3 to 5 times the amount) there are some things to consider during the shooting phase.
***DISCLAIMER: What you should always remember: Rules are meant to be broken… So break them. These are simply guidelines!***
- No Auto ISO – Set your ISO the same for the entire set of images.
- No Auto White Balance – Your camera may adjust the white balance as you scan the horizon.
- No Auto Focus – Try to focus your image as best you can from about the midpoint of the scene to infinity.
- No Auto Aperture – You are taking HDR images that one should be a no brainer!
- What about Exposure? – You still want to maintain the proper +2/-2 Exposure set, so adjusting the exposure as you pan is acceptable.
- Camera direction – It makes for more work (because there will be more images), but holding it vertical for a horizontal pano will give you more pixel count vertically, and the opposite is true for vertical images, for vertical pano’s hold the camera horizontal. I just figured that out as I am typing this, one of those gee whiz moments…shhh… don’t point an make fun, it’s not nice!
- To Tripod or not to Tripod? – I don’t typically use one unless my image set is going to go below 1/25, I know my hand and what it is capable of. If you are uncomfortable without it, by all means use your resources.
- How Much Overlap should I Take Between Pictures? Why thank you for asking! Most programs including Photoshop like about 20% overlap to successfully stitch em together. So I would follow suit with about 20%.
Processing In Photomatix Pro 4.0.1
Batch Processing will become your best friend, let’s call em’ Your Batch! Well, it is a one sided friendship, because once you figure it out, you will walk away from it and then Your Batch is left all by itself to process your images. Oh, but don’t worry, Your Batch is extremely submissive and loves the little attention you give it so much that it will continue to do this for a life time. Let me introduce you to My Batch, soon to be Your Batch!
You will want to get to know Batch Processing because it allows you to find a setting you like for the pano image set and then program all of the HDR exposures that follow to be processed the same exact way! Just as you want your pano HDR images to be taken with the same WB, ISO, and Aperture, you will want them to be processed using the same Photomatix settings!
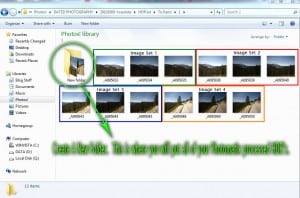
- Set up your images to be pano’ed in a folder.
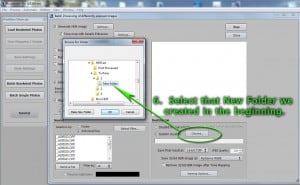
- In that folder create a New Folder.
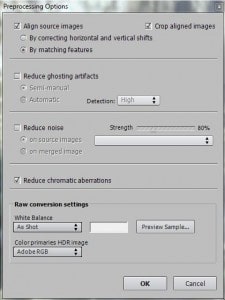
- Open the first set of the series in Photomatix and start the pre-processing.
- You will want these to remain consistent for the rest of the images. My preprocessing settings are the same 95% of the time, unless I have some ghosting to take care of.
- You will need to remember these settings for the Batch Processing part.
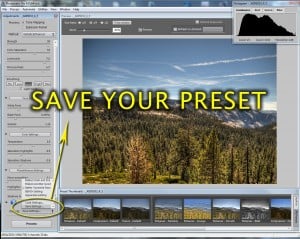
- Now you want to get your image just right.
- Play with the slider bars until you are satisfied with the results.
- SAVE THE SETTINGS IN YOUR PRESETS! I even named mine Better Yosemite Pano, well… because it was definitely better than the first one I have saved!
- You could go ahead and process at this time, but since I am batch processing I will just save the preset and exit the window to get me back to the beginning of Photomatix. It will just make this a little easier to explain in the future.
- Go back to the beginning of Photomatix (Workflow Shortcuts).
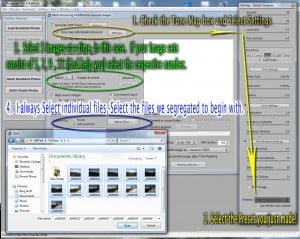
- Select Batch Bracketed Photos.
- A laundry list of options is going to open! Do not fear this is your new best friend remember, make it Your Batch!
- Select the following items, I have broken it down pretty simply for ya 🙂
- I also select that little box at the bottom that says, “Remove 32 bit HDR-image….etc…”, otherwise Photomatix will save that ungodly large 32 bit map file.
- Now Click Run… Congratulations, you have just made a new friend! Now walk away from it… seriously, peace out! We’ll see you when Your Batch is done!
- In the dialog box you can see the Batch processing working. As it is doing so, there is even a bar at the top showing you the progress of the images. Once they have all completed, if you set it up right, they will all be stored in that new folder we created in the beginning of the Photomatix portion of the tutorial.
Automating A Pano In Photoshop CS 5
- Now that the images are saved in the respective folder, let’s get our Automate on in Photoshop.
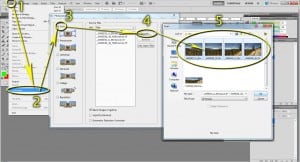
- Start by going to File>Automate.
- A new dialog box will open.
- Select Auto. This is usually your go to option, Auto will reposition the images and adjust the perspective of the images to make the key items match up.
- Select Browse. You want to navigate to the New Folder you created in the beginning of the tutorial. If everything was setup correctly, you will see your HDR’ed images in the folder as well as the tone mapped settings (I always delete that file since I have already saved the preset)!
- Select all of the HDR images you just had Your Batch process.
- It should go something like this!
- After you have made your selection, select OK.
- You will start to see PHotoshop running at Ludricious Speed, I DARE YOU to try and process images that quickly!
- What Photoshop is doing is compiling your images based off the matching features it finds between pictures, hence it is critical to ensure you have 20% or more image overlap. If you set it to auto, not only will it reposition the images to match features, but it will also adjust the perspective as the perspective of the image will always change from one image to another.
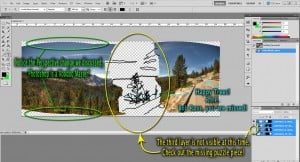
- Once Photoshop has finished matching the features of your images it will display them as layers in the layers palette with an automated mask. Check it out.
- Now what?
- Crop the image and add your adjustment layers as you see necessary!
You have just successfully made HDR Panorama’s Your Batch!




Doing a bit of perusing of my old journal posts and I stumbled across this link of yours. For some of us out there we do our processing without to much questioning if it is the right way (is there one correct way? I think not). However it was good to find some comfort that I am not the only one doing my processing in the method you have listed above.
I do thank you for going to the effort to detail this as that I do not have the patience.
BTW, excellent tutorial.
I go through the same battles with myself, I question myself even more-so because I post my tutorials for the world to see. What it comes down to though, is how well it works for the individual. Photoshop has so many avenues one can take when post processing, there are 3-50 different ways to do the exact same thing, it is all about how your brain works and what avenue best maps your mind.
Thanks for the comment and the compliment, take care Jason!
Great “How To”! I am reading this secretly at work right now and can’t wait to get home to process my first HDR Pan! Thanks a bunch. (Ill post it on my website tomorrow if I have success…)
Awesome! I am glad it helped, make sure you get back with me so I can see the Pano you put together. Nice website, keep up the posting. Take care Adam.
Blake, my 7 shot Pano did not come out very well (handheld wasn’t very helpful here, but hard to take a tripod on this kind of hike!). Buttt, the 9 photo, 3 sets of 3 brackets vertical one did! I posted the new picture as today’s post; check it out! Thanks again.