Sydney, Australia
Jeff catford, what a guy! He always has constructive things to comment about a fellow HDR artist’s work, that was my first introduction to Jeff. I am not one to receive a million comments on my photos, but when I do they go something like this, “So great!”, “Amazing shot!”, “Love it!”. These comments are all fine and well, but they do nothing for me as an artist but reenforce the fact that others like the image at hand. Que in Jeff with comments like, “This is excellent Blake. The post processing – specifically hdr – is spot on and has resulted in an image that is a total delight to view. Thank you.”. To everyone reading this, that is how you make a comment! The world of Photography websites needs more Jeff Catford’s that go into detail about what is working in the image! After perusing through his gallery, I was taken back. After accepting the feature Jeff also informed me that he is the father-in-law of Jason Ruth, October 6th EverydayHDR feature! I would love to sit in on one of your dinner conversations! High five from far away Jeff!
What equipment do you use for your HDR process?
- Nikon D200 – Not quite a fossil yet
- Sigma 10-20mm which I use just about permanently. It is equally perfect for big Outback skies as well as tight urban landscapes and architectural interiors. However, lately I have been allowed to borrow my wife’s new …
- Nikon 18-200mm – thank you Spike – the long end of this lens lets me to pretend that I’m a nature photographer and hang out with Josie my daughter and Jason her top bloke husband
- Manfroto 190 CXPRO3 tripod – Absolutely essential as is my …
- Nikon MC-36 Remote
- Photomatix Pro 3.2 – Is there anything else?
- Photoshop CS4 – The third eye
- Topaz Adjust 4 – Great for sharpening and a couple of other tweaks – but in general a wild beast that needs to be kept on a very short chain.
- Noiseware Professional 4.2 – Smooth as…
- Hammer and chisel and much faffing about
Was there an initial image that inspired you to start shooting HDR photography or was it simply by experiment?
Stay with me here … but I think it probably goes back to all those classic Ansel Adams images: Clearing Winter Storm – Moon and Half Dome – Moonrise, Hernandez, etc., etc. I spent many hours of my more naive years in the darkroom attempting Zone System techniques with 35mm roll film! All very embarrassing when I look back on it. But I did learn to appreciate the beauty of the full tonal range in a photographic image. It was something to strive for.
When I first began reading about HDR I could see that the digital darkroom also had a wonderful solution for getting more tonal control outside the limitations of a basic digital image.
Like others though, I was initially put off by the many toxic HDR offerings that were out there. With encouragement from Jason and after bit of tentative experimentation, I pulled my toe out of the water, took a deep breath, and jumped right in. I’ve not looked back!
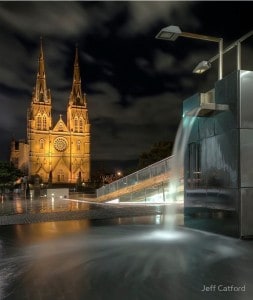
I can see this was a series of long exposures, 7 to be exact. The image appears flawless, but I know how ruthless HDR processing can be on dark areas such as night skies. Did you have any difficulty with noise in post processing?
Isn’t there something about what bears do in the woods here? Yes.. those night skies are an effort. I spend a lot of time on them. I usually start with Noiseware Professional to remove what noise I can. I then cheat a bit, well a lot really, by going over every part of the sky using the Smooth tool and ‘scrub’ away at any remaining unwanted artifacts. I also use the Clone Stamp and the Healing Brush if the situation will benefit from it. I’ve even been known to import whole sections of sky from just one of the original HDR series of exposures to get richer blacks and improve smoothing – I’m partial to smooth skies.
The trick here though is to keep the softening that this process introduces into an image away from the foreground features – in this case the fountain and the church – which I like to keep very sharp.
Like I said, a hammer and chisel and much faffing about are part of my armory. But I really enjoy it. It allows me to get a very intimate knowledge of my images.
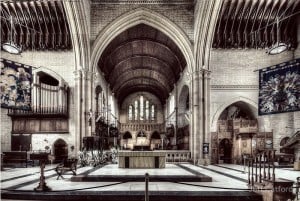
This image has a vintage feel to it and your HDR processing really helps describe the subject matter, can you go into your workflow a bit?
I’ve had a long term fascination with altering the ‘real’ colour of my images. I really like B&W, toned monochromes, duotones, etc. I also like desaturation, especially to the point where the remaining colour is only just perceptible. I dabbled with this in my old film days, but the chemistry was expensive and difficult to get outside the major cities…. and guess where I was living then… But now with digital darkroom possibilities … well … the possibilities are endless.
With this image I began with a bit of luck. The altar area was filled with a soft white light. I like to call it cream cheese light. It always helps to have a good start like I did here.
The post processing began with Photomatix Pro. I used to have some hard and fast rules about where I put some of the Photomatix settings but I’ve learnt to be a lot more free in my approach. I began, as usual, by getting the tonal range close to where I wanted it – good shadows, good highlights and all the good bits in between. I then worked on getting a good level of smoothness without destroying clarity. All through this I generally hum a bit and keep a murderous eye out for halos and ridiculous colours.
When all was as I reckoned it looked good to be, I experimented to get a feel for how the image could be processed in Photoshop. At this stage, I usually play around with the colour balance slider but rarely get anything that looks promising. The Highlight and Shadows Saturation sliders are another story though. I push both of these, separately and together, up and down just to see what is possible. Normally I don’t leave the settings too far from the defaults for processing though, but I do get a good idea of what I want to do.
I then processed the image, opened it in Photoshop, saved the 16 bit tif, converted it to psd and set about on my usual bull-in-a-china-shop processing method. Yes admission time here. My PS skills are very ordinary.
The Photoshop stage began with duplicating the background, tidying up the image and making the usual level and curves adjustments. I then added a B&W adjustment layer and worked it to my liking. This included toning the B&W. I wanted it to be warm with a rich dark chocolate tone. I then reduced the opacity so that the original colour began to seep back in. I added a little gentle masking to the banners to bring out a bit more colour there. I then continued to work on the colour by experimenting with saturation layers and photo filters, keeping or discarding them depending on the results.
The final steps were to sharpen the image using Topaz Adjust and straightening it all up using Cntrl-T and dragging it into shape. Most people wisely use the Lens Correction filter to do this. I don’t know why, but I prefer the Transform option.
Bit of a tip with straightening images. No matter how tempting, always leave it til last. If you ever need to do a copy and paste from one of your original images into a straightened version, be prepared for a lot of frustration. If you think that sounds like experience then you could be onto something.
I see that you shoot a lot of 7 exposure bracket HDR images, that gives you a range of +/- 3EV! How do you control your highlights from blowing out of control?
Hmmm I think your question may have just taught me something… 🙂 But, to answer… I do a lot of fine tuning in Photomatix to bring the highlights under control as much as possible. Photomatix really does offer a lot of control if you’re patient with it. The really unruly areas I then attempt to sort out in Photoshop. I am a shameless user of the Clone Stamp for starters. I also have no qualms about pasting in more appropriately exposed sections from any of the single original seven exposures. I do feel though that sometimes a blown highlight – from a small widow for example – is acceptable. In the way that we readily accept, indeed expect, that a desk lamp will give a warm glow I think that, providing it doesn’t dominate an image, we also accept that often a window will blow out… how did I go … did I get away with that one…? … 🙂
Anything else you would like to add? The blog floor is yours!
For me HDR is still an evolving process of learning and experimentation. I no longer see it as an end in itself, as a method of getting that perfect range of tones to beautifully render a scene.
Although I like those images, I also like the HDR look. Not the garish toxic HDR that gives the process such a bad name, but the subtle look that a well processed HDR image imparts. I am now finding that I like to take that look for a bit of a walk and see where it ends up. The HDR process is just the starting point.
And finally Blake, two thank you’s. Thank you for this opportunity to babble about myself and thank you for Everyday HDR. It has rapidly become a very valuable resource for us HDR proponents.
More Jeff!!!




Love your work … great interview … I’ll be watching you.
Cheers