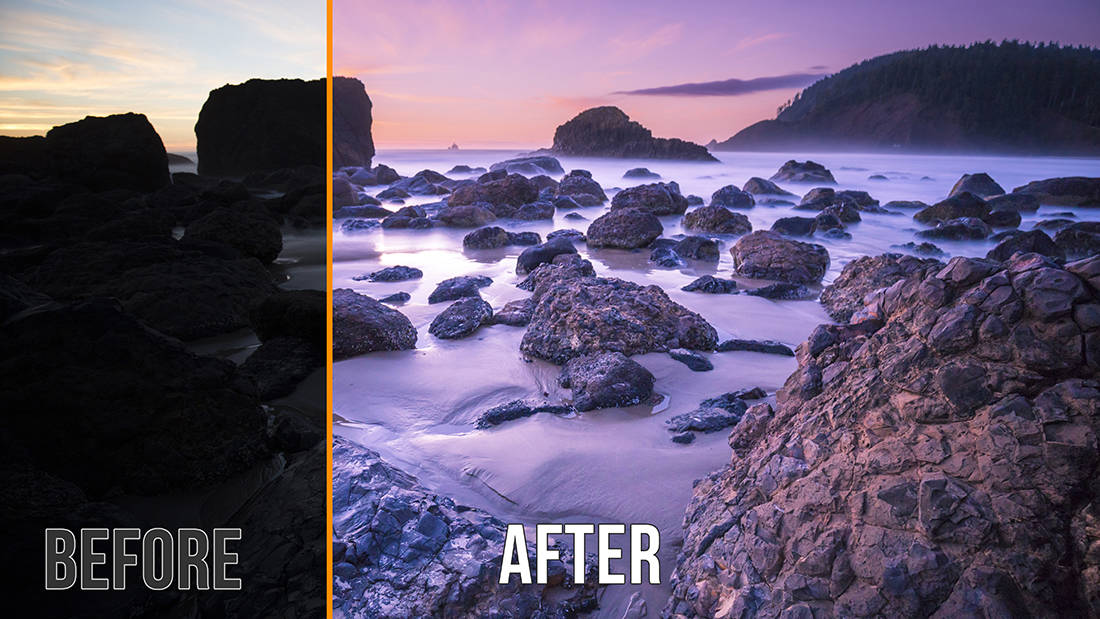
I don’t always make underexposed photos, but when I do, I sure as heck know how to fix them!
Surely I never get everything correct in the camera. More often than not I am over or underexposed. I don’t always get the shot in focus, and I rarely get my horizons straight. Other photographers and subscribers to the blog seem to think my exposures tread on water, because they only see my highlight reel. The truth is I’m just like every other photographer out there. I do not have super human abilities to make every shot amazing out of camera and for this I am very thankful for the RAW file!
While on the workshop in Cannon Beach with Shutter Click Adventures in October we ran across a gorgeous sunset over the ocean. I was between my camera and bouncing all over the beach ensuring no one needed any assistance capturing the scene in front of us. I was distracted, in a good way of course, and wasn’t paying attention to my exposures. I took my skill-sets for granted and instead of ensuring all of the exposures were good before I recomposed my camera, I kept shooting. When I looked at my images later my memory card was full of poorly exposed photos for the foreground and overexposed for the sky. Luckily, I had a couple of underexposed 10 stop ND long exposures in the mix mix to help me out, because even the best HDR tone mapping program couldn’t help the amount of tone compression I was getting in the sky.

Fixing Underexposed Photos
The RAW format has so much dynamic range in the file that even some of the worst underexposed photos can be fixed with a bit of tweaking. For this reason I tend to expose to the left, or towards the underexposed side of the exposure spectrum especially when shooting the sunset. The sunset is usually not my focal point, but it is the “Best Supporting Actress” and for that reason it helps to underexpose the photo slightly to ensure you have enough range in your sun-setting sky. The foreground elements may appear dark, but they can be resurrected.

A vast ocean sunset will always give you some trouble in camera. There are ways to mitigate this trouble. One way is to use a graduated ND filter that will assist with getting a nice even exposure. The Graduated filter I have goes from 2 stops to 0 Stops making it appear like a gradient filter in Photoshop. This allows you to expose for the foreground while maintaining all of that nice color in the sunset by underexposing it by 2 graduated stops. I forgot mine in the condo we rented for the trip so I was SOL there.

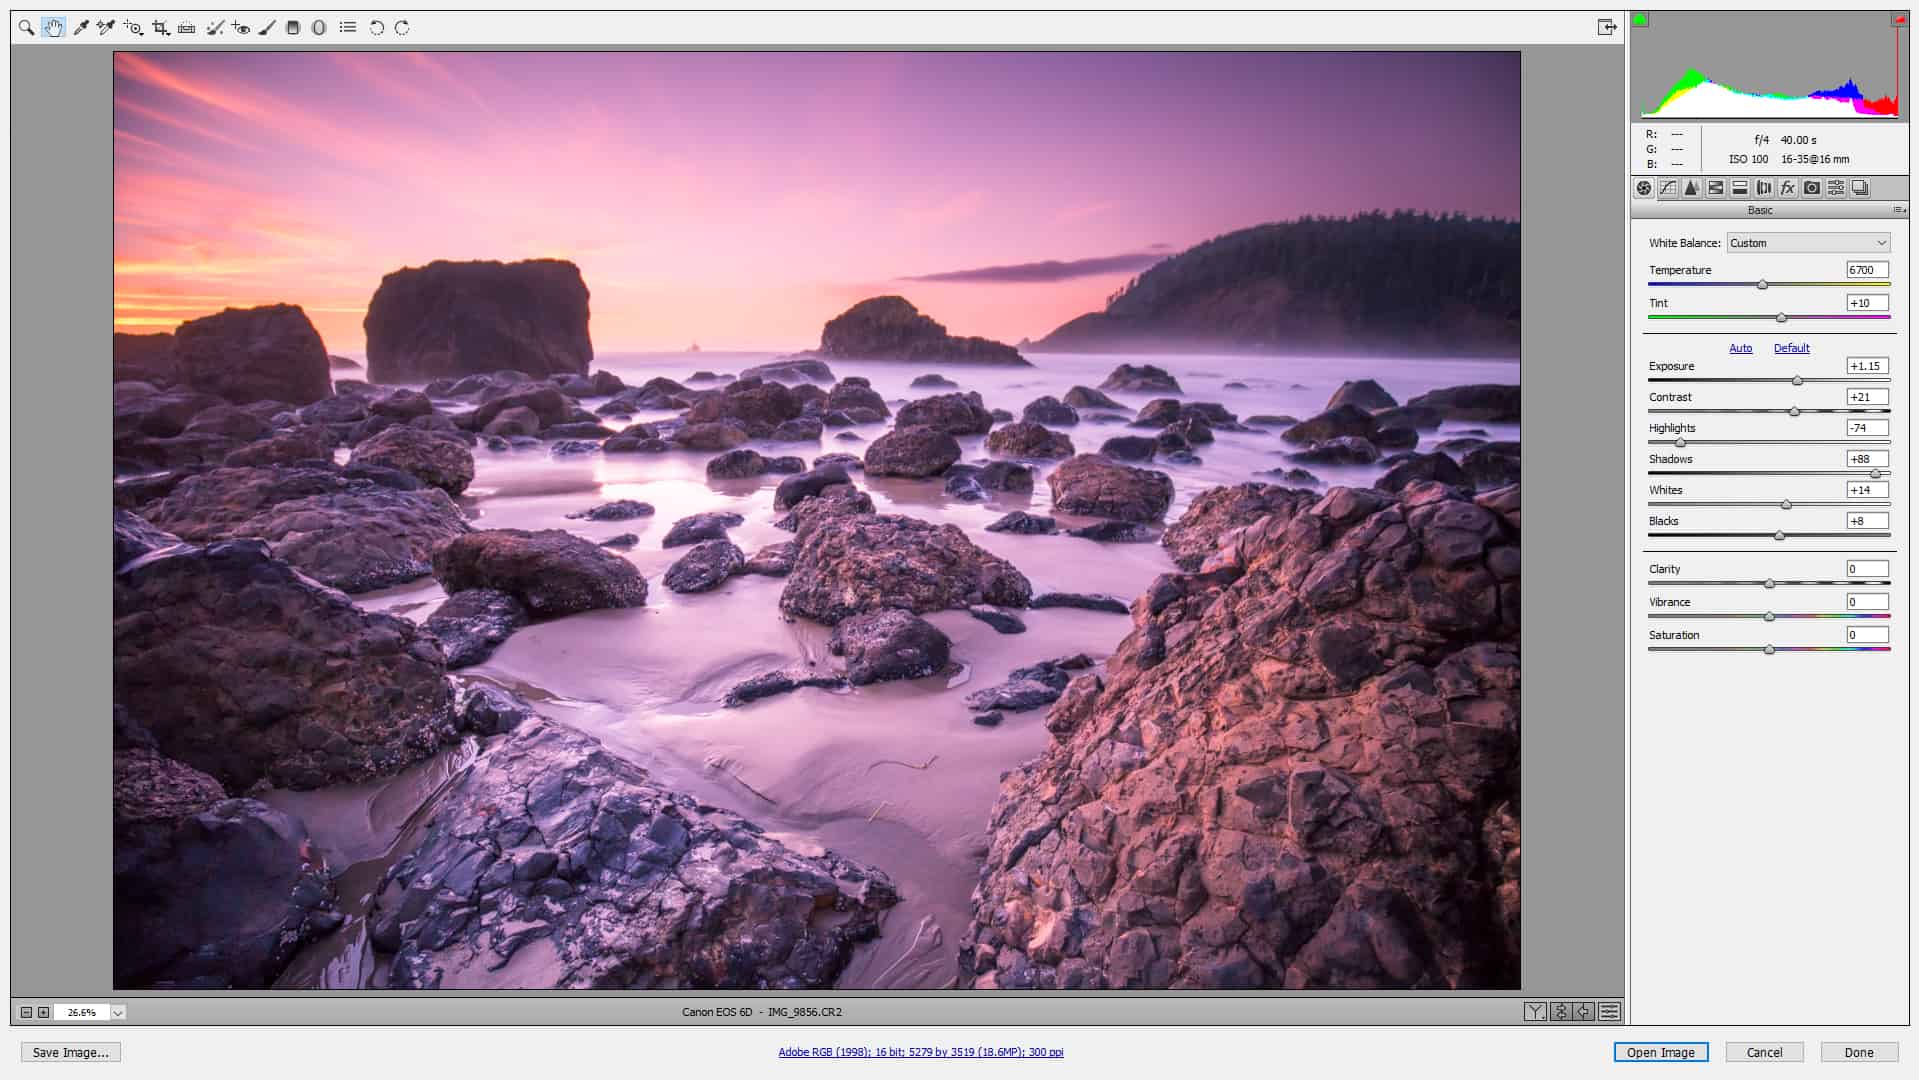
The other way to mitigate the sunset trouble is to expose your sunsets to the left of the exposure spectrum. In the photo we will be discussing in the tutorial, the foreground was approximately 3-4 stops underexposed while the background was about 1.5-2 stops over exposed. This is no problem at all for Adobe Camera Raw or Lightroom to fix. So instead of tossing those exposures, take a look at this tutorial and resurrect some of those images. It is not difficult you just have to know what sliders to tweak.
Like the style of this tutorial? You will LOVE HDR Insider! Full-Length HDR Workflows, Critiques & More!
[hcshort id=”9″]


Loved that one Blake.
But now I’m asking myself “how many did I throw out over recent years”!
Thanks again.
Regards.
Chris.M
Haha! Me too, getting it right in camera is so 1965 🙂
and why I never throw away anything. Hard drive space is cheap. Thanks, Blake. I love going back and trying things after watching these.
Typical Blake!
Nothing particularly new here from a TECHNICAL, i.e., how the sliders in ACR/Develop Module work, but it’s your ARTISTIC approach, and expression that gives meaning and depth to what you have to say.
So glad to have someone with formal training in “art” bring their knowledge into the photographic realm and articulate it so well.
Thank you, that is such great feedback. I really do like your approach to the teaching here. You are correct, the tools are all the same and concepts are similar to all photo editing, but its why we move the slider, now how.
Thanks Blake for another excellent tutorial! A couple of days ago at our camera club meeting, the subject came up concerning those in our group that are unwilling to share knowledge or resources with others. I have a hard time with this because I believe that if we help each other learn & develop we can all benefit from the synergy. I am so happy that you see the value in sharing your knowledge with the rest of us! Thanks Again!!
Thanks, John. I guess I learned a loooooong time ago (3 other siblings) that in the end I received so much more reward from sharing than from holding it in. Glad we are on the same page!
Thanks for another great tutorial. I’ve used camera raw for years, mainly as my conduit into Photoshop. I really never went by the basic adjustments. Your tutorials have shown me what a powerful tool I had right in my hand.
Yep, ACR can very well be used as a stand alone in many cases. There are a ton of wonderful tools in the program, you just have to spend enough time with each and every one of them.
Blake–thanks for another great tutorial! I have quite a few underexposed files (took them intentionally as part of an HDR series) and I will experiment with them.
No problem! Thanks for watching!
Great video. Any chance you’d provide the image as a download so we can work along with you?
Thanks Alan! I don’t typically share the YouTube video images as they are for free educational purposes. However, all of my paid training courses allow you to follow along with the images.
I especially appreciated your explanation of the split-toning. Now I’m willing to use this technique. I noticed, though, that you did not make any Clarity adjustments. Often I adjust clarity after I adjust highlights and shadows but before I adjust blacks and whites. I was also wondering about your whites and blacks adjustment. I watched a webinar where the presenter suggested pressing down the alt key when you are adjusting either whites or blacks then setting the amount based on the point where whites or blacks are just beginning to become visible. This method works well when adjusting images with average dynamic ranges. However, with high dynamic range images, I, like you, do it by sight with an eye on the histogram, too. I photograph a lot of sculpture in museum galleries that can be quite challenging if the gallery overall lighting is low but spot lights are creating hot spots in the image.
Another fantastic tutorial. Just to let you know I always shoot in Jpeg and now it;s raw, for the simple fact I;m a neebie to all photography and photoshop and I have learned alot from you in such a short time and your way of teaching is wonderful. Again thanks
Awesome! Another one converted! Woo hoo!
Nice one blake, goes to show how much you can do wih a RAW file, if any one shooting in jep they must be mad after seeing that vid, outstanding Blake as is all of your work
I have dabbled in using some of the Colour and Highlight sliders, ect in a freeware package, Faststone Image Viewer. I also have shot in Raw.
My biggest problem is I’m colour Blind!
I have been able to lift the overall quality but I have also way overdone it as well not being able to see where I have gone wrong.
Have you any suggestion on how I can edit with out ruining it or going too far?
I also agree with your comment on it is your interpretation of art not cheating, as it has been done in dark rooms since the art of photography begun.
Cheers, Geoff
Blake,
It seems you find a way to take the process to the next level.
Many thanks,
Jerry R.
Thank you very much for this tutorial. I will try this on some of my images from the trip to Oregon to see what I can come up with.
Can’t believe how timely this amazing tutorial is Blake. After a six year “layoff” I’m back to creating (I’m all about us being artists) and trying to remember all I forgot about Photoshop. Fortunately, I never shoot anything but RAW and I never throw anything away. I’m working on a project that will include nothing but fog images. Most of the images are underexposed so, I’m assuming this tutorial should work well with those images?
And thanks for sharing!
Blake As always a wonderful tutorial . ACR rocks.
Hit another one out of the ballpark, Blake! I have several images from that very beach, at your workshop, that I thought were goners. I can’t wait to use what I just learned in your tutorial to bring them to life. Yea, you!
No better way to explain it.
Blake,
Outstanding teaching once again. What was the ISO setting for your 50 second shot? My guess is that you were at the camera optimal setting (100 to 200 for my Nikon bodies) due to the ND filter presence.
Thank you! It was an ISO 100 shot.
Hey Blake;
I just opened up one of the photos from our Oregon Workshop. I am sure we all had some under exposed images especially because no one wanted to leave the beach until there were no more rays of light left in that day! I followed along with the tutorial and brought back one of my favourites. Great “down to the basics” tutorial for both the experienced and novice as well! I am sure it will save many photos that wouldn’t have made the cut. I always find it interesting to move the exposure slider back and forth (Light Room or Camera Raw) to actually see what the dynamic range of the photo really is!
Love it Blake! Makes me wonder how many times have I had a shot with nice composition that is just too dark and I’ve put it in the discard pile. I play with them sometimes, but the amount of noise usually discourages me from continuing. I’m going to pull one out that I had assigned as garbage to see what I can do!
Hi Blake, hope I’m not submitting my comment too late to grab your ‘eye’ (I’ve only just got around to viewing this video).
I’ve shot in RAW & used only the manual setting since I bought my first DSLR in 2012. I just have one question; would this also work on night-time images where there are also areas of bright light, such as spotlights used to light up building exteriors?
Edit : Btw, great info in the video ?
Thanks! It may work. Those areas of bright white may be over exposed so there may not be enough information to bring them down. It really depends on how bright white they are. In any event you’d want to do the opposite of this tutorial. Brings the whites down and so forth so that they aren’t over powering. Obviously at this point I am speculating… it really depends on the image 🙂
Thank you so much. Thanks for sharing.
WOW! Excellent tutorial! I use RAW with some regularity, but not as in depth. The tool palette was very useful info as was your work flow.
Thanks for sharing your expertise!