I have been experimenting a lot lately with speed light macro photography and I can easily say, I am loving it! Once you get the basics down and start popping off shots, it feels like every one of them is a money maker. I am pretty excited to see the bottom of this post, so let’s get down into this!
The Setup:
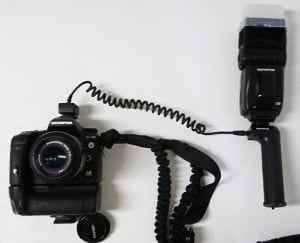
This is my typical setup. The handle of my flash bracket, with the cable attached to the flash. This allows me to work in TTL Auto FP with the ability to mobilize the flash with my free hand to my liking. The flash is of utmost importance, ensure that your flash can shoot in Full Power TTL. TTL simply stated is Through The Lens. In TTL mode your camera will communicate its current settings (f/stop, ISO, focal length, Exposure value) with your flash so that it can use the correct amount of power to light the scene. Most basic flashes auto sync with the camera at EV’s of 1/200th to 1/250th, but in FP, or full power mode, the flash can sync with the camera at extremely fast shutter speeds. Ensure that the flash you have, or are thinking about purchasing has high speed sync capabilities! Examples of this high speed sync can be seen in sports photography where a soccer player is frozen in motion just before the foot reaches the ball, or in water droplet photography where the motion of water is stopped as an ice cube breaches the surface.
Other helpful tools:
- Tripod- Tripods and macro photography usually go hand in hand, but I have found mine is only useful when photographing still macro subjects such as flowers on a calm day.
- Shutter Release Cable- A great asset to use in conjunction with a tripod to ensure you don’t include camera shake with your shots.
- Dedicated Macro Lens: I shoot with Olympus’s Zuiko 50mm fixed telephoto macro lens. Other similar lenses (Canon, Nikon, Sony)
- Extension Tube: An extension tube pulls the lens away from the camera body allowing for double magnification. (Olympus, Canon, Nikon)
- Camera Mode- I like to keep my camera in manual mode when working with high speed macro photography. Manual mode gives me the ability to switch the shutter speed and f/stop on the fly making adjustments fast and easy.
- Focus- Manual focus is a must! Auto focus is a pain when you are working with macro photography constantly hearing, veee vooom vee vooom vee voom. Heaven forbid you move when trying to auto focus, vee voom vee voom vee voo, all over again!
- White Balance- I usually set the white balance to flash for simplicity sake. If I need to adjust it later I can do so in Adobe Camera Raw.
- Shutter Speed and f/Stop- These two work hand in hand with one another, if you want high Bokeh, that cool out of focus effect in the background, go for a low f/Stop like 1.8-2.0 but your shutter speed will have to be very fast, like 1/2000. That is a good place to start, if you need more light, either dial in +1 on the flash menu on the back of the camera, or lower the shutter speed to 1/1250th. If you want everything tack sharp, shoot at an f/stop of 10.0 or higher, but know that you will need to adjust the shutter speed to something slower, maybe 1/200th – 1/250th. Much of this is variable to the ambient light around you or the proximity of the flash from your subject.
- ISO- I always try to keep my ISO at 100 to ensure a sharp image free of noise. I will adjust all other settings before manipulating the ISO, as you know with HDR the higher the ISO the more noise in tone mapping.
- RAW or JPEG- I suggest RAW especially when shooting Macro shots, it is very rare that you can pop off 3-5 bracketed exposures while a spider is dancing around its web. For that reason you may find yourself tone mapping a single exposure. RAW files hold up much better than JPEGS when it comes to the single exposure processing game.
Consider The Environment/Subject Matter
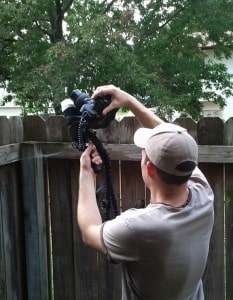
With Macro photography it is really easy to get right in there and start shooting, but be cautious of your environment. Many times I get behind the viewfinder and start focusing and BAM, my lens hits my subject matter! With the spider pictures I had to watch my flash and my camera to ensure I did not bump the web. Hitting the web would destroy it and disturb my subject matter. A few weeks ago I shot my sons eye with an extension tube, I was literally half an inch from his face. One over zealous movement and my lens would have been in his little eye. Always consider the environment and the subject matter before starting your macro shoot and adjust yourself and the camera accordingly!
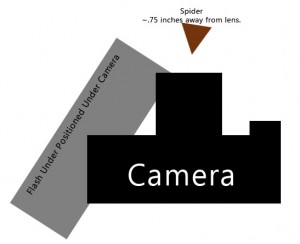
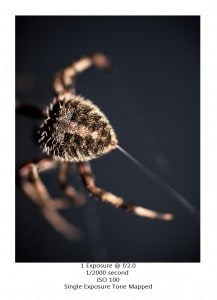
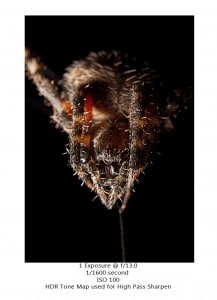
In the image above, you cannot see the spider, not because it is small (this spider is hella big) it is because my lens is blocking it. I am literally 1/2 an inch to 3/4 of an inch away from it. Always be aware of your subject matter and the equipment you are working with.
Getting the Shot
Start out by achieving black. Take a few pictures with the flash off. Once you have achieved black, turn the flash on and use the flash as the primary light source instead of the ambient light around you. For the spider close ups, I started at f/2.0 @ 1/2000th. It was about 6 PM and there was still ample light out, but I achieved solid black in my frame. I then turned the flash on, set it to TTL Auto FP, and did a test fire. I positioned the flash just over my head and camera left with the flash head angled slightly towards the spider. As I suspected I needed to adjust my light, but instead of adjusting the shutter speed I added 1 stop of light to the flash from the back of my camera making the flash fire a little harder. At such a high shutter speed I was able to catch this spider as it was making it’s web.
***One thing to keep in mind when shooting in manual focus with both hands occupied (one on the flash, the other on the camera) set your focus first. I focused my lens all the way in, just under .74 feet. I then used my hand and moved the camera back and forth until I got the spider in sharp focus …Pop… the flash goes off and image is captured! Both hands occupied but the image is in perfect focus.***
Difference In f/Stops
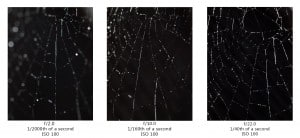
The difference in f/stop is very important when shooting macro. A large aperture (f/ 2.0) will create strong Bokeh around your subject matter, while a smaller aperture (f/10) will create minimal Bokeh with a medium focal range, and a very small aperture (f/22) will allow for a very wide focal range keeping 50-75% of the image in focus. As you decrease aperture you will need to increase the shutter speed as more light will be required to capture the image. Take a look at the examples below and notice the significant shutter speed difference as the aperture decreases.
Extension Tube
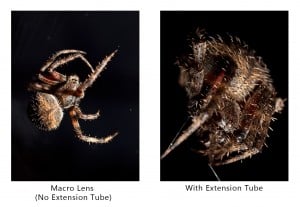
An extension tube can really get you right in the face of even the smallest portrait work. It is an essential piece of equipment to get the smallest details of any subject on camera. It is very simple in theory, it pushes the lens away from the body similar to how you push a magnifying glass away from your face for larger magnification. They can be pricey for such a simple product, but if you can’t afford one have no fear! Here is my DIY version with a lens and camera body cap! There is one downfall, no auto focus or aperture adjustment (unless your lens allows you to set it manually), you have to do that before putting the DIY extension tube on.
Here is an example of the magnification difference.
HDR Tips With Macro Photo
So how does all of this relate to HDR photography Blake?
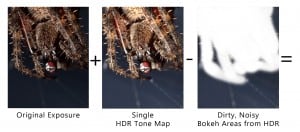
Well, you can really make a single exposure macro just pop with a mild tone map treatment. The problem with HDR and Macro is Bokeh. Wherever there is Bokeh, there is going to be a lot of noise when tone mapping the single exposure. So while you tone map, ignore the noise in the Bokeh area, just get yourself a nice looking subject matter. Once you have the perfect tone map, proceed to Adobe Photoshop and mask out the noisy areas with the original exposure behind it.
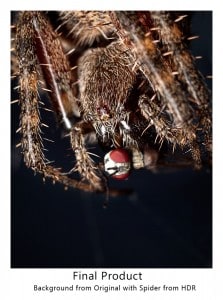
I got really lucky with this shot. Split seconds were a must here, she devoured that bug in less than 5 seconds. High speed sync for the win!
***When shooting macro with the intent to tone map, ensure you shoot in RAW. RAW files tend to handle the tone mapping process better, yielding far less noise.***
You can also use the tone mapped image as a nice detailed High Pass Sharpen.
- Tone map the single exposure to your liking.
- Open the original in Photoshop.
- Align the Tone mapped file on top of the original.
- Highlight the tone mapped layer and select Filter>Other>High Pass
- Give it a 5.0-8.0 in the dialog box.
- Change the High Pass layer’s Blending Mode to either Overlay, Soft Light, Hard Light, or Linear Light
In Conclusion
If you learn nothing else from this (what I thought was going to be quick but turned out hella lengthy) tutorial, please take this away. Many say failure is not an option, but with this tedious type of photography failure is welcomed, if you are failing you are doing something right. I must have shot over 200 shots before I got this handful of good ones. Many were over exposed and a ton were underexposed, but the most important part, I learned, I adjusted, and in the end received and ounce or two of success. Success is not the absence of failure, success is the product of relentless persistence through unavoidable failure. Oh yeah, you should probably quote me on that one with your Facebook, Myspace, Face Space, My Book, AOL instant messenger, or even your G+ page! Remember to have fun with your camera, it has fun with you.
*** No spiders were hurt and/or blinded in the making of this tutorial! I have proof, Charlotte is still there! ***



I’m unsure if this will be ever replied too however i guess its worth asking.
I’m relatively new to Macro photography and although I usually get some decent shots one thing that really bothers me is how much light I sometimes pick up. I use a ring flash that fits on the end on my lens usually it works pretty well however it can “swamp” my subject with light from time to time which i cant seem to avoid. Any ideas on how to reduce this?
I try to answer every comment on the blog!
You can go into your cameras menu and turn the flash down in the camera itself. You can usually control the flash by up to 3 stops of light or more in either direction. If that still does not help, try increasing the shutter speed to allow less of the “swamping” light in at once.
Thank you
I am new to Macro
I have 90mm F2.8 Macro on Nikon D5500 body with a neewer speedlight 750II and use ACDsee Photo studio 2018 software.
You talk about being less than 1 inch from your subject however I can not focus in less than 4 inches (10cms) and the lens rim is 4 cms into the lens housing i.e. 12 cms or 5 inches from the subject in Full setting (21cms when lens is set to limit) please explain.