When it comes to HDR tone mapping, noise can be your worst enemy and many times can separate a good shot from a great shot. However, there are a plethora of options on the market for noise reduction. If you are anything like me, you like to attack the noise after the images have been tone mapped and more specifically, like to tackle this noise as the first step in your post processing. I here it all the time, well what about Lightroom and Camera Raw? Sure they are 2 of the very good noise reduction options, but I like to make my noise reduction on a separate layer so I can have full control of it’s effects and not be limited by sliders and adjustment brushes.
Due to my post processing I have found Topaz DeNoise to be an awesome addition to my HDR tool box. It is built right into Photoshop and aids in seamless noise reduction during my post processing. I can treat my noise reduced layer as a mask, add blending options to it and a whole lot more.
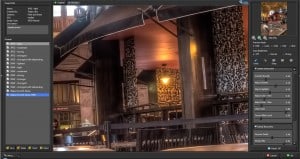
The Interface:
The Good:
- The built in presets are perfect for a quick noise fix and quite honestly will be your go to option for a while before you feel comfortable moving sliders around.
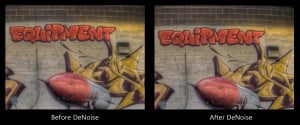
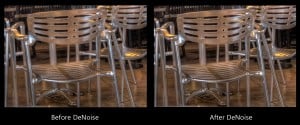
- The noise reduction is very clean and accurate. When it comes to noise reduction, regardless of what program or software you are using, you are going to lose detail, that is a given. DeNoise, does a great job of retaining a great amount of detail while still allowing for a clean noise reduction to the photo globally.
- DeNoise processes relatively fast for what it is doing. Many other programs run a tad slower.
- DeNoise can really make a poor quality JPEG look great and even puts up a serious fight against JPEG artifacts.
- Complete color noise control during the reduction process. You can pop in and out of each channel individually to really get in and rub that pesky color noise out.
- Applying the noise reduction to a duplicate layer in Photoshop really allows one with full control over the effects of the noise reduction at hand.
- The quality of the finished product is impeccable!
The Bad:
- The inability to create the noise reduction on a duplicate layer directly in the DeNoise plug-in. I often forget to duplicate my layer prior to opening DeNoise, I then apply the noise reduction and have to undo, duplicate my layer and then reapply the noise.
The Bottom Line:
While it may seem pretty steep at $80.00 it is worth every pretty penny. Noise can make or break an HDR image, it is nice to have such an incredible noise reduction tool at my fingertips. With DeNoise, I have the presence of mind that my HDR images are in good hands when it comes to superb noise reduction. Try it for 30 days, you can’t go wrong.


Hey, Blake–Spot-on review. In Good Points #2, you hit the nail on the head. Clean, accurate, and preserves a lot of detail. I got interested in shooting butterflies last year, and while I had lots of shots of Monarchs, various Swallowtails, Painted Ladies, etc., I had only one shot of a Zebra Swallowtail. Shot in low light, it had a ton of noise in the background, so much so that I wouldn’t even email it to friends. This was the first image I processed with Denoise 5. I pulled it up, hit one of the canned RAW presets, and was totally amazed by not only the noise reduction, but how much detail was preserved in the main subject without a ton of hand masking. It was so good that I had to flip-flop several times from the original view to the preview to believe my eyes. This plugin rocks….Mitch
Thanks Mitch. I love DeNoise, it is truly spot on with all photographs, but it can truly hold it’s own up against a tricky HDR shot.
Great review! I’d like to see a more side by side comparison vs. photoshop noise reduction and camera raw if possible. Beyond just convenience, is topaz Denoise 5 more accurate at retaining details and reducing noise than any other program? Or can you achieve the same result with camera raw/ photoshop?
I would say they all have their place in the workflow. DeNoise is great for people who may not have Photoshop but have the TopazFXLab. I find myself using a combination of everything really. It is hard to say which is actually better or the best though.
I’m have done a lot of research and I am wondering what you think of this workflow for HDR:
1) Take images in RAW (3 brackets or more)
2) Convert RAW to TIFF 16 BIT in Ligthroom: Rationale
a) I have read that TIFF is just as good as RAW to DeNoise an image, i.e. there is no use denoising a RAW image (what is your opinion out there)
b) Lightroom is superior to Photomatix to convert to TIFF
3) Apply Topaz DeNoise to each image separately and save
4) Select 3 Denoised TIFF images in Lightroom and open in Photomatix Pro to blend in HDR
5) Do slight adjustments in Photomatix pro, do not denoise in Photomatix again, always Tone Map if looking for a more realistic image, save with as little changes as possible since Lightroom is more powerful to do changes
6)Import blended HDR image back into Lightroom and process, always saving at 300 dpi or above if printing a large format image
I know some people add a layer where they do more edits in Photoshop, at this point I can’t wrap around my head to get adding an extra step in photoshop….
That said…could you let me know what you all think? Am I missing something? Doing something wrong? Anything I could do better?
Thanks!
Hello Kevin,
This workflow is always debated among the HDR community, the simple statement, “Do you process RAW images in Photomatix or convert to TIFF first?”. The way I see it all of the front work of converting to TIFF is quite bothersome, however that is because I do a LOT on the back end with Photoshop. Here is what I think about the workflow in order:
1) Always shoot RAW 🙂
2) There is nothing wrong with this, it can just create more work on the front end thus alleviating it on the back end.
a)TIFF is just as good, however, you can DeNoise a RAW image and should. The camera does no form of noise processing on a RAW image therefore it is a must in post. However, as long as you DeNoise it somewhere i.e. TIFF you are okay.
b)I would bet money that LR is better for this process as that is what it is designed for.
3) If you are going this route, yes
4) Good
5) Slight adjustments yes, correct, do not use Photomatix DeNoise if you have already done so, that will just “blur” the photo. Tone map is best. Yes and no on the last part, you want to get a stable photo that you can work with in post, you don’t want it to be over dramatic, but you want to bring out the detail. Whatever settings that may be will vary from image to image.
6) Yes!
I add about 30-40 more layers in Photoshop though. Instead of LR I use Adobe Camera Raw. I do a lot of little local adjustments to highlights, shadows, tone curves, saturation and so on. In the end I am usually around 30-40 layers deep of several masked adjustments. It may be over kill but I like the finished product!
You are not doing anything wrong or missing anything. You are simply creating your own workflow that many actually use in the industry. Your workflow defines you and creates your style. Roll with it! Is there anything you could do better… Yes, there is always a better way to do something. Invite change into your workflow and know that it is a continuous improvement process. The minute you get complacent is the minute you lose the inspiration. Keep doing what you are doing but invite change and open your mind to others workflows and you will always be on the right track!
Thanks for sharing your workflow!
Blake