3+ Hours on Everything You NEED to know to become an HDRtist Today!
Most Basic HDR processing Technique:
Multi-Exposure HDR
Since you already know the Why and the What of HDR, let’s just get right into it! First things first, what you will need. I will not get into brands of cameras or tripods those are your personal preference. I am not biased to Canon or Nikon,for the longest time I stayed out of the battle and shot with an Olympus!
- Camera (with Manual, or Aperture Priority control)
- Tripod (Not absolutely necessary, but extremely helpful)
- A shutter release cable or I/R remote (This is not a necessity but will help alleviate camera shake)
- A computer
- A HDR processing program (I prefer Photomatix Pro and most of my tutorials will be with Photomatix Pro)
What to Shoot For HDR
I feel HDR is perfect for any subject matter. For this method, a still subject is ideal as any movement will show up as a ghost in the processed HDR image. One thing to be careful with is portraiture. The HDR process tends to make people look dirty. The HDR process has the tendency to exaggerate details, which can be very unattractive in portraiture.
How to Shoot For HDR
Set your camera up on your tripod. Hook up your shutter release, if applicable. If you do not have a shutter release you will have to hold your shutter button manually. If this is the case, act like a sniper,slowly release your breath as you shoot and pray you do not move your camera! Any movement may make the picture blurry. To reiterate from the What is HDR page, you want to obtain multiple pictures of the same object with different luminance information. At a minimum, you want one accurately exposed, one under exposed, and one over exposed image.
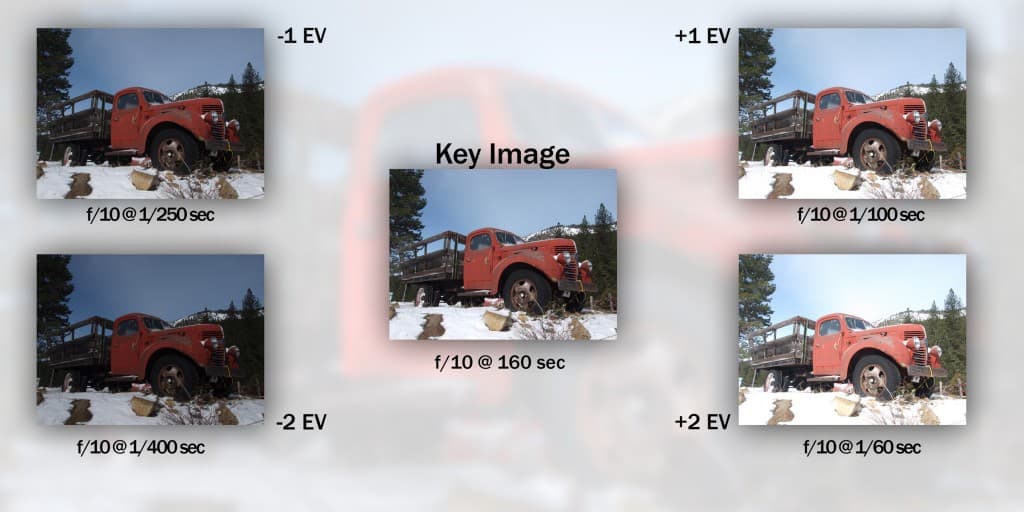
I tend to shoot 5 images, 2 under exposed, 2 over exposed, and one accurately exposed image, or key image as I like to call it. Many cameras will automatically do this with the Auto Exposure Bracket option. When your camera is set to auto bracket (AB, AEB or BKT, if you are looking for the button on your camera or reference in your manual), it takes multiple pictures with different exposure values, or EV’s. Each exposure value or, step, allows the camera to double the light or half the amount of light that crosses your cameras sensor.
This explains the notes I leave on my example images, 5 Exposures @ 1 second +/- 2 EV. That means the initial key image was properly exposed and the images that followed allowed half the amount of light (under exposed) and twice the amount of light to cross the image sensor. The +/- 2 EV, whether it is in 3 shots or 5 has been the most successful for my shots. I have experimented with every amount of EV steps in my BKT setting and find that +/- 2 EV is the most successful for nearly every situation.
Take a look at the example below of this character I met on the way home from Tahoe. Notice how one EV change is a change in the time interval of exposure. The starting point was 1/160 of a second, going from 1/160th to 1/100th doubled the amount of light captured. Once again the amount of light was doubled from 1/100th to 1/60th. The process was repeated for the under exposed images. If you do not have auto bracketing on your camera you can change the shutter speed manually, just be sure not to mover your camera in between exposures.
With the AEB, AB, or BKT function selected at the EV interval of your choice, place your camera in Aperture Priority mode or Manual mode. The advantage of aperture priority mode is it gives you the read out of what the EV should be for the f/stop you have selected to create the key image exposure. In theory, all you should have to do in aperture priority mode is select the aperture you want for the depth of field desired in the image and start your auto bracket sequence of exposures. It is almost like the auto program button for professionals, in most cases it is a good starting point for your sequence of images.
A good habit I got into was looking at the pictures after I take a sequence of shots to ensure there are no blown highlights in the lightest image and now clipped shadows in the darkest image. If the lighting scenario is tricky, another option is to place your camera in Manual mode and select the appropriate EV for the situation. I typically shoot my HDR images in Aperture Priority mode, and use the EV Compensation button to increase or decrease my exposure time.
[hcshort id=”5″]
What are clipped shadows and blown highlights?
Clipped shadows are areas in your shot where the darkest shadow areas have turned into vague indistinguishable black noise that tend to run like ink blobs. The same is true for blown highlights. They are hot spots in your image that are bright white and many times have jagged halo areas around them. These areas happen from overexposing and underexposing your images too far. The +/-2 EV is the best leg to stand on in most every lighting situation to ensure your highlights and shadows are not clipped or blown too far from use. You can check your shots histogram during your image playback on your camera LCD. If I press info a couple of times on my Olympus I can see it hovering over my images as I flip through them. The histogram looks like the graphs you ran away from in algebra with the bell curve and x and y axis. No need to fear, this one is much easier than algebra!
Take a look below at the series of histograms I have provided and what you should look for in your images:
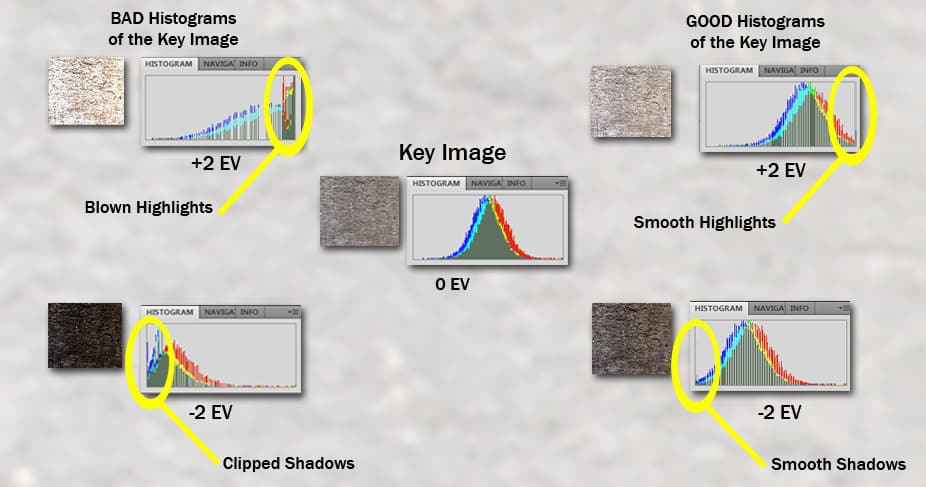
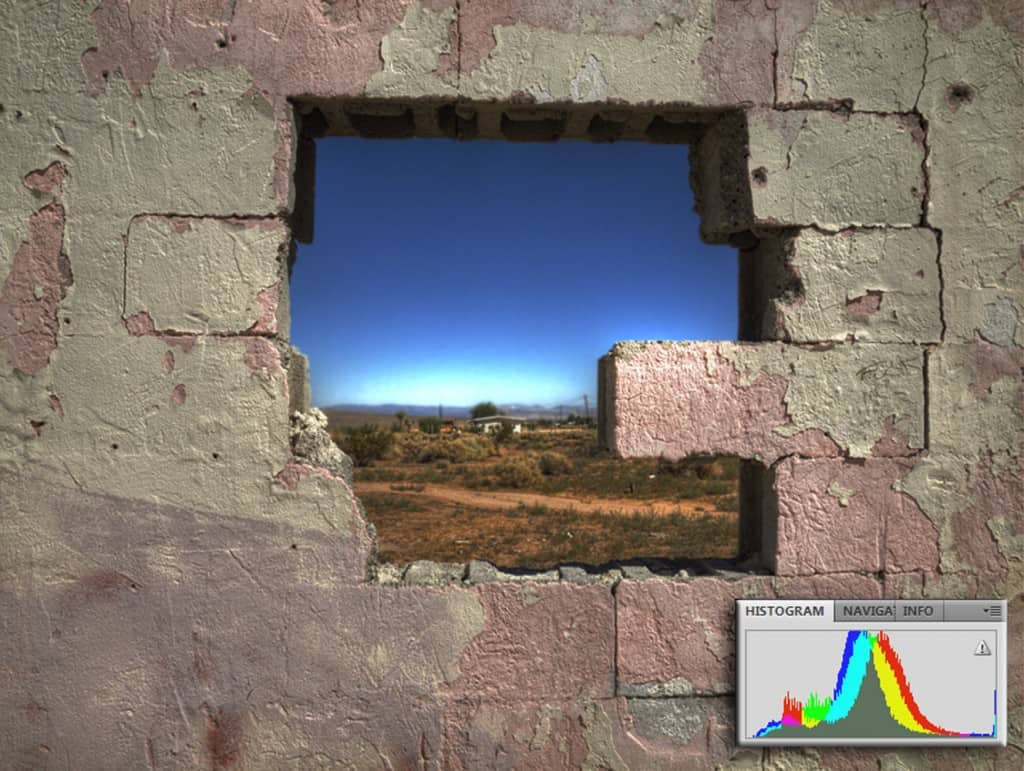
You have all seen this little piece of concrete, it is my background tile for the blog. The histogram is an analytical tool for the light (and in CS5, color) information present in the current snapshot of a scene. Look at the histogram in the middle, that is a bell curve histogram and as close to perfection as you can get, smooth transitions from shadow information to the mids, and the highlights on the far left. All pictures will not have a histogram like this one, it just so happens that this image is predominately 50% gray.
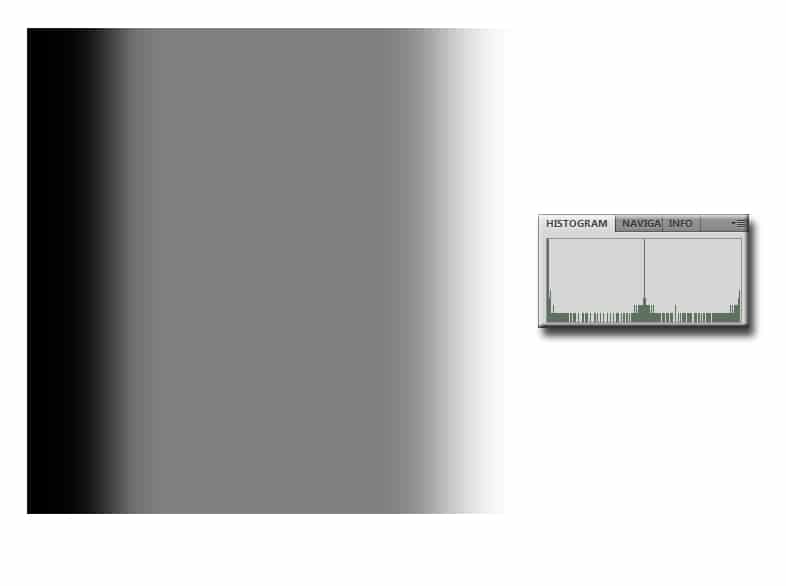
A solid black swatch has one line on the far left, 50% gray is one solid line in the middle and solid white is a line on the far right. All of the information between the swatches will register different wavelengths on the histogram. With that take a look at the transition from dark to light on the histogram below.
You can get a great deal of information by looking at the histograms in your pictures. Looking at the histogram for the image below, we can see that the image does not have blown highlights or clipped shadows since the light informations is staying within the histogram. We can see that this image favors highlights over shadows as the gray information is pushed farther to the right. The actual curve of information looks great, it is not bypassing the top of the histogram. After looking at the histogram a little further I can see that maybe this image could be a little darker globally, but I am attracted to the light pastel feel of the colors and light.
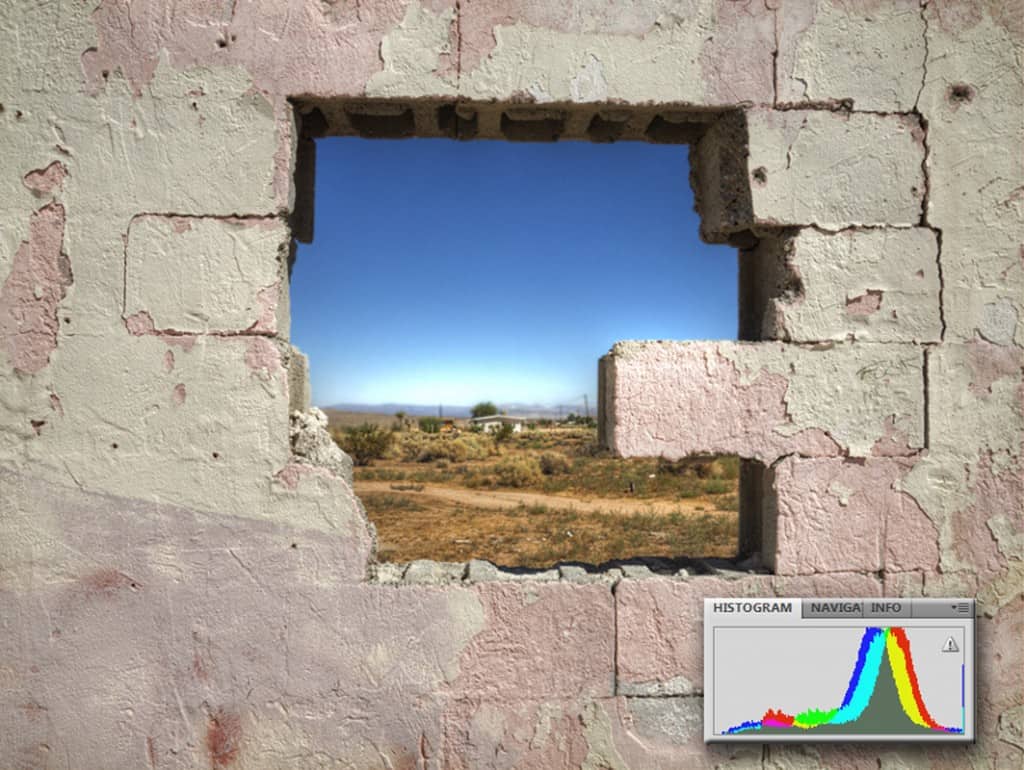
Take a look at the following image to see the same image as above, but with the gray histogram centralized to mimic a natural bell curve. As I stated before, I leaned more toward the first image. You are the artist, you have the final say how the final image will look. I am partial to the first.
[hcshort id=”5″]
Processing in Photomatix Pro
Now that we have the appropriate amount of images of the same object, exposed with the correct EV and the histograms look smooth and pretty, we are ready to get into Photomatix Pro. I will typically be using Photomatix Pro for everything I process. I like it. I like it a lot. It is fast, easy, and for the most part I can get a great product, at least a good starting point for post processing in Photoshop. When you launch Photomatix Pro, press the giant “Generate HDR image” button in the upper left hand side of the screen. A Window will pop up asking you where to grab your images. Browse for the images you just shot and press OK. Here is typically what my options look like for every image:
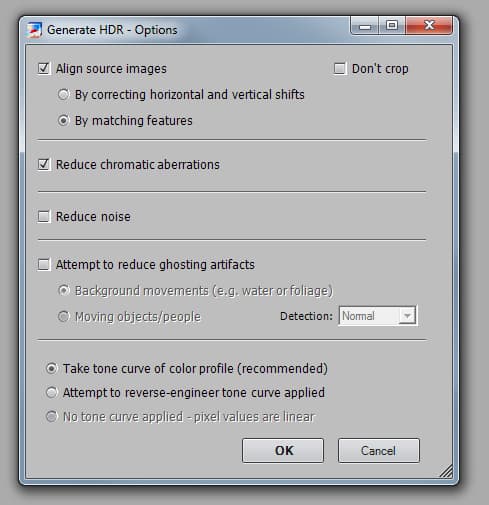
Align source images: Aligns your images by the features below
By correcting horizontal and vertical shifts: they say is typically used if the camera was on a tripod but I have better luck most times with the latter regardless of the stabilization method.
By matching features: Great for handheld HDR’s if you went that route, not recommended as this feature is great at matching up features but if you moved at all the image will still be blurry no matter how you match it.
Reduce chromatic aberrations: these little bastards are squirrely squiggly lines that appear around you’re the sharp edges (or what should be sharp). It is the record of different wavelengths of light recorded by your lens during the picture taking process. These aberraions manifest themselves in red, green, magenta, cyan, or even grayish lines around your sharp details….trust me, you will want this checked!
Reduce Noise: Not the best feature of Photomatix, it adds processing time, and I like to be the one to use my anti-noise plugins in Photoshop. Photomatix tends to reduce noise globally (over the whole image) which can have adverse effects on your sharper areas.
PRESS OK
The resulting High Contrast image must be tone mapped before you go into freak out mode! What you are seeing is true HDR 32 bit image. The problem with modern technology is its inability to display 32 bit images. That is where the Tone map button comes in. You have to tone map the image into a usable 8 bit (.jpg) or 16 bit (.tif). Press the “Tonemapping” Button.
This is what you should see:
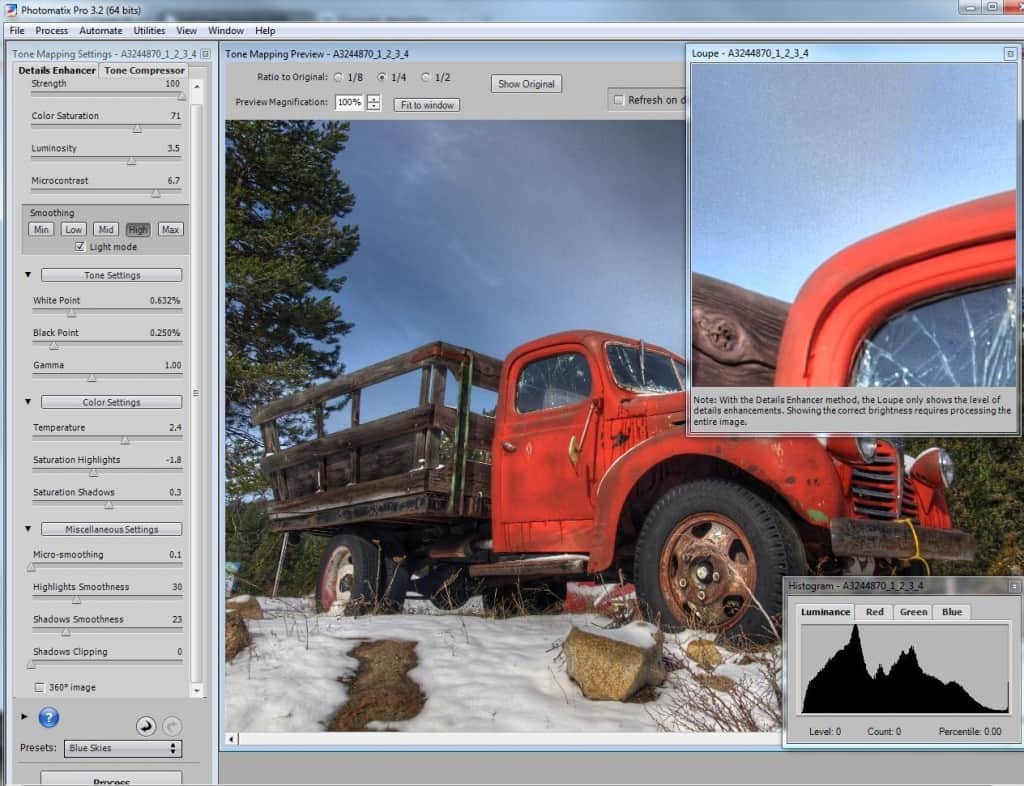
We are in “Details Enhancer” mode. Of the 2 you can select this is the better, in my opinion.
The zoomed box in the upper right corner shows you what the processed image will look like once you hit the “Process” button. This is a great tool to use for noise scanning of troublesome areas before you actually process the image. Click the dashed line box and drag over the image to scan the area you select.
One thing that is important. The fractions you see at the top are ratios of the displayed image to the finished product. Photomatix gives you the option to dull down the effects that are happening to the image to increase processing time of the changes you are making. The lower the ratio the faster the changes you make will take effect, but the lower the quality appears as you are working on it. The higher the ratio the longer the processing time, but the better the image quality while you work your sliders to the left.
The sliders on the left are pretty self-explanatory.
Strength: Controls the overall amount of all of the sliders below, it is your Master slider.
Color Saturation: Controls the amount of saturation in the image. Please be careful with this slider, the HDR community is SATURATED (no pun intended) with people who abuse the saturation sliders in Photomatix and then they have the nerve to post their pictures everywhere and call themselves great. I am lucky that I have this built in receptor in my brain that actually stings my tongue when I see overly saturated images. I am not kidding! It is like a 9 volt battery on my tongue, I am forced to look away!
Luminosity: Controls the amount of vibrancy coming through your colors, move it to zero and you’ve got a great representation of mud. The farther right the more vibrant.
Microcontrast: Controls the amount of contrast in the image on a micro level. This slider can be great for adding depth to your image.
Smoothing: Controls the amount of light in a given area. Pay attention to the histogram as you move the slider bar. It can have a serious effect on the curves of the image. Be careful with this with Light mode selected. In Light mode I never go below “Mid”, it tends to flatten the image by casting horrible halos around objects especially against skies.
Tone Settings: The Gamma slider is codependent upon the Luminosity slider above. Play with the two of them together, I typically keep the Gamma low and the Luminosity High. The white point and Black Point sliders adjust the prominence of the lights and darks.
Color Settings: Temperature controls the coolness and warmth of the image. The farther below zero you go the cooler the image gets (global addition of blue hues), and above zero makes the image warmer (global addition of yellows). You also have the ability to add more saturation to just the highlights or just the shadows. I will show you a pretty cool tutorial with these later!
Miscellaneous Settings: Micro-smoothing is a dangerous slider! The lower you go with this slider the more the details pop out. This tends to give images an unrealistic look. Which is great for some images but not if you are trying to replicate what you actually saw. When it is set at 0.0 the details pop off the screen and tend to become really noisy in a .jpeg tone mapped set of images. When set to 30.0, minor details areas are smoothed out. Highlights Smoothness is great for clearing up noisy skies, the farther to the left, the less noise in the highlights (works globally over the entire image). This may not be ideal for the entire image. Shadows Smoothness is great for reducing noise in dark shadow areas, the higher the slider the less noise in the shadows of the image.
When you have a good set of sliders, SAVE your preset before pressing “Process”! Click on the drop down tab where it says “Presets”, scroll all the way down to save settings, and name it something you will remember by what is does to the image. As you can see in the picture, I am using my Blue Skies Setting. It is pretty good at cleaning up those vibrant skies we tend to see at mid-day.
All presets do not work for all images. The sliders play with light in VERY dynamic ways, and each scene is very different than the next. PLAY, PLAY, PLAY, and then PLAY some more! There is no right answer, just what isright for YOU! You are the artist!
Process your HDR image! It is actually an LDR (Low Dynamic Range) tone mapped HDR image. Remember, I said earlier that the initial image prior to tone mapping was the true 32 bit HDR image. The tone mapping process created a useable format that can be saved either as a (.tif) or (.jpg).
The image we received from Photomatix Pro, while beautiful, is not complete until you run some crucial post processing techniques. The last and final step is to save your HDR image and pull it into your favorite post processing software, mine is Photoshop, but there are many alternatives. The Gimp is a great FREE open source program that is quite comparable to Photoshop.
I usually adjust the curves, levels, color balance, and saturation in Photoshop. These are all subjective to the image being created, some images need more work than others. We will go into post processing later, for now, let all that rest in your brain, it was a lot to take in! Also remember, this is just ONE way to HDR images!
The finished product from 5 (.jpgs) processed in Photomatix, post processed in Photoshop:

3+ Hours on Everything You NEED to know to become an HDRtist Today!
[hcshort id=”5″]


