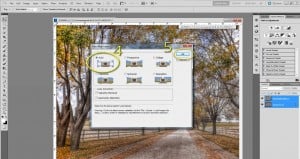
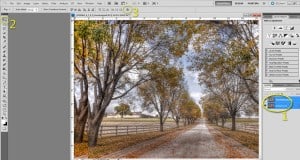
Auto aliging layers in Photoshop is an invaluable tool for any HDRtist. It is very common to create a tone mapped file and use elements from the original exposures to enhance local areas. Photoshop CS 5 has a very simple feature for making image alignment a breeze!
To set yourself up, open your tone mapped file, open the exposure you want to auto align, drag and drop the original exposure onto its tone mapped version. You should have two layers stacked on one another in your layers palette. Now follow these simple steps to ensure the 2 layers are perfectly aligned.
- 1. Select both layers in the layers palette. Press and hold CTRL (CMD for Mac) then click both layers inside their text box. Clicking on their thumbnail will select all, ensure you click on the text area of the layer.
- Make sure the move tool is selected, either click the tool or press hot key: V.
- Click on the side by side face icon in the options bar on the top middle portion of the interface (I have it highlighted with a three next to it in the above image). This will bring up the Auto Align Layers panel.

- By default, Photoshop will select Auto, this is what you want selected.
- Click OK. Photoshop will take a minute or so to think about the pixels in both layers and when it is done, your layers will be auto aligned.


