
Selective Color in Photoshop, is it the best-kept secret?
The selective color adjustment layer is a tool that can make your images pop off the page. Almost every week someone emails me and says, “Blake, how do you make your photos pop in Photoshop?” I usually respond with a multitude of answers because that is the most difficult question to answer.
You have to assume that by “pop” they mean to make them more exhilarating or attractive. Since the beginning of time, we as humans, have always been attracted to colorful things. Go out into the woods and look around, what do you see? A mix of gray, brown, black, and drab greens. However, when you see a contrasting red berry sticking out of a bush or a lone flower growing next to a tree, you immediately flock to it.
Regarding what I know of humans and the question at hand, “How do you make your images POP,” my response is the Selective Color adjustment layer in Photoshop. Before you go running to the HSL layer, hear me out. The HSL Layer is great as a technical tool to get your colors dialed in with the proper hue, saturation, and lightness, but the Selective Color Adjustment Layer is more of a refinement tool.
Selective Color works on the principle of available color and color mixing. It allows you to increase or decrease the percentage of a color within the color in question. For instance, if you have a sunset that is predominantly blue, but you want it to be a bit warmer, you can go into the Selective Color adjustment layer and modify the percentage of the colors available in the given color.
Does that mean you are changing the hue in the color blue? Absolutely, but it is not as heavy handed as the HSL adjustment layer because it does not allow you to change the color property by rotating it around the color wheel. Instead, it removes or adds the percentage of the available color within the color. As you experiment with it, you can go into the color blue, then change the red to 100%. It does not change the color blue to 100% red it just boosts the available red within the color blue.
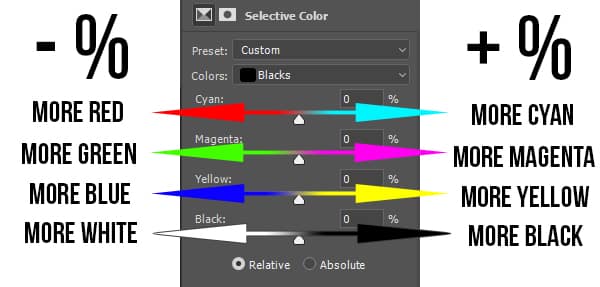
The Selective Color Adjustment Layer accounts for Cyan, Magenta, Yellow and Black. However, you have access to Red, Green, Blue, and White also. An increase in Percentage of a color will yield more of that color while a decrease in percentage will effectively add its complement to the selected color.
Are you confused yet?
Good! Watch this video tutorial, download the actions, and experiment with it on your own and I am sure you will realize soon enough why Selective Color is one of my go-to options for making my images “pop.”
In this tutorial, I will show you how to use selective color to boost sunsets, make grass a little greener, and make the cinematic effect. Don’t forget to experiment on your own and couple the Selective Color Adjustment Layer with Blend If, Opacity, Blend Modes, and Masks!

For Blake, it's all about the art and process synergy. He dives deep into complex topics and makes them easy to understand through his outside-the-box thinking so that you can use these tricks in your workflow today!


Excellent as always Blake! I just returned from a trip to Iceland and Norway and compositionally I am pleased with my photos but the grasses I was having trouble getting back to what I actually saw there. Can not wait to try you new tool to work some magic! Thanks again
Awesome! I am jealous of your trip!
Thanks for sharing.
Hey Blake are you leaving the method relative?
Yes, Relative protects the white Areas and works less heavy handedly. I rarely change it to Absolute.
Hi Blake
Thanks again for sharing your knowledge with us … and also thank you for your On1 Spotlight tutorial.
I like and appreciate your teaching style
Best Regards
Louis Jordaan
South Africa
Thanks for taking the time to watch them! Greetings from Kansas City 🙂
Hi Blake! Another phenomenal tutorial! And with actions… Too cool! Thank you!
I will remember to keep an eye out for that “Toxic Green.” By the way, Pantone actually has a number for “Toxic Slime Green” It is #1be215 in case you ever need it… Lol… As if… Only if… What if… BLEND IF! Have a great day! Cheers, Peter
Haha! Yuk! but that’s awesome to know 🙂
Thanks for a great tutorial on a Photoshop feature I had never used. I can envision several uses for this besides the ones you mention. And thanks for the actions. In this case faster is better
Heck yeah! I am right there with you, just don’t forget how to use it in all that automation 🙂
Another fantastic Friday tutorial… as always your teaching presentation with your clear and concise explanations of your methods are outstanding. I learn more from you than anyone else on the net. Thanks for sharing your knowledge and the actions.
🙂 oh wow! I am honored, you just made my Saturday! Thanks for stopping by.
You rock, dude! LOL This is so cool! I hadn’t realy used Selective Color until I took a few of your classes. This helps to me understand how it applies to an image and more on how to use it. Thank you!
Su
I think you rock too! Selective Color is powerful, huh? Glad I could help.
Hi Blake,
thanks for a wonderful tutorial about colour selection and what it can bring to the image that anyone has been working on in Photoshop. You are without doubt one of the 2 top Tutors in Photoshop in the world, along with Aaron Nace from Phlearn. I look forward to your videos, they excite me in such a way, that most of the time i stop what i`m doing and try to emulate what you have just taught us. Once again thank you for all you do, and also for the Actions you so kindly gave for free.
Brian.
Woah! I am very honored! Aaron Nace is awesome, I never imagined our names would be used in the same sentence, I really appreciate that! I am just glad I can help in any way, big or small. Thanks!
Superb video as always, Blake. Very clear!
🙂 thanks for watching!
Hey Blake,
Great Tutorial as always. I do have a question. I was under the impression that when using Selective Color, the Totals for those color values had to add up to 100%. I see that wasn’t the case with your tutorial.
Thanks again,
Dennis
Thanks for watching! I think you may be referring to the Channel Mixer. The Channel Mixer actually mixes the colors within the channels with their starting point being 100. If you go higher than 100 you start to get artifacts and weird stuff with your colors.
Selective color deals with the percentage values of how much color is within the color, very different as it is not referring to the channels and the available color within them.
Does that help clear it up?
I am data challenged. Wish I could download this video for more study time. Thank you for sharing your knowledge.
It’s on the site and YouTube. You can bookmark either and refer to them whenever you need to.
An interesting bit of information. An effect that I hadn’t used before probably because I had not known about it and how to use it properly.
Hi Blake
Your tuts are truly most helpful. Thanks for sharing your knowledge.
Regards
Willem van der Post
South Africa
Great tips, as always! I’ll pass this along, too!
Thank you for the tutorial. This and the many previous tutorials you have posted have made my understanding of Photoshop so much faster and more comprehensive.
I totally agree with you, Blake. People don’t understand when I say I’m not a passionate photographer. Photography is necessary to give me the images I want to play with and make better through editing with Photoshop and all its possibilities as well as with all the other editing tools out there. You, my friend, have taught me so much about both photography AND editing, esp with Photoshop. Thank you so much!
Kay
Hi Blake,
Great video on how to use the selective adjustment layer.
Thanks!