
Sometimes a Marquee Selection is better than a Clone Stamp
Every once in a while you come across a tricky distraction in a photograph that throws off the whole shot. In the example image today, there is a giant toolbox in the lower left-hand side of the image that is offsetting the balance the symmetrical composition. I was just about to scratch this one and go to a similar photo of a different train car, but the highlights were just not as magical.
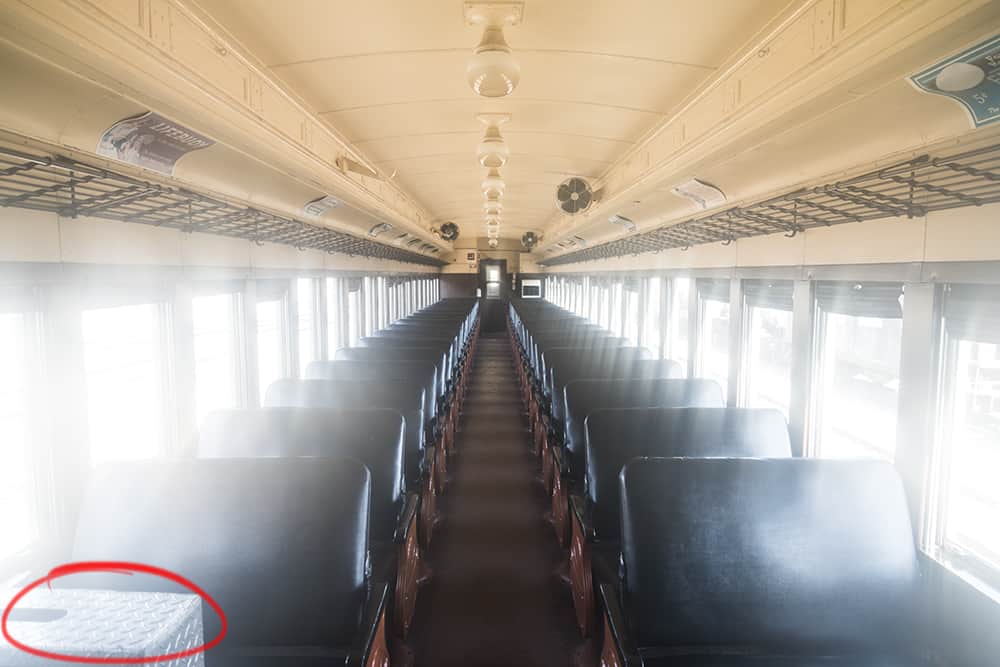
I decided to press forward with this one knowing that there was plenty of information in the image to rescue that one little spot. I did attempt to crop the photo but found it far less appealing. I also tried a shot at the Clone Stamp Tool and the Spot Healing Brush, but alas they were no help. I ended up using the information on the right side of the photo to cover the toolbox on the left side.
Here is the quick rundown: (A video tutorial is provided at the bottom of the page)
- Use the Marquee tool to select the distraction.
- Be sure to leave plenty of room around the distraction with your selection. This is a buffer for your mask in Step 10
- Move the Marquee selection to the opposite side of the image.
- Copy the new selection using CTRL + C (CMD + C on Mac)
- Paste the newly copied selection onto the image CTRL + V (CMD + V on Mac)
- PRess CTRL + T (CMD + T on Mac) to transform the selection.
- Right click inside the layer and select “Flip Horizontal”
- Move the flipped selection to the opposite side of the image to cover the distraction.
- Make a new layer mask on the copied layer.
- Paint with black around the hard edge areas of the selection.
- Add a new Curves Adjustment layer above the selection.
- Clip the Curves Adjustment layer into the selection by pressing ALT (Option on Mac)
- Adjust the Tone Curve until the selection blends in with its surroundings
- Add a new Hue/Saturation Adjustment layer above the Curve.
- Clip the Hue/Saturation Adjustment layer into the selection by pressing ALT (Option on Mac)
- Adjust the Color until the selection blends in with its surroundings.
- You can take it one step further by applying a Color Lookup Table (as seen in the video tutorial)
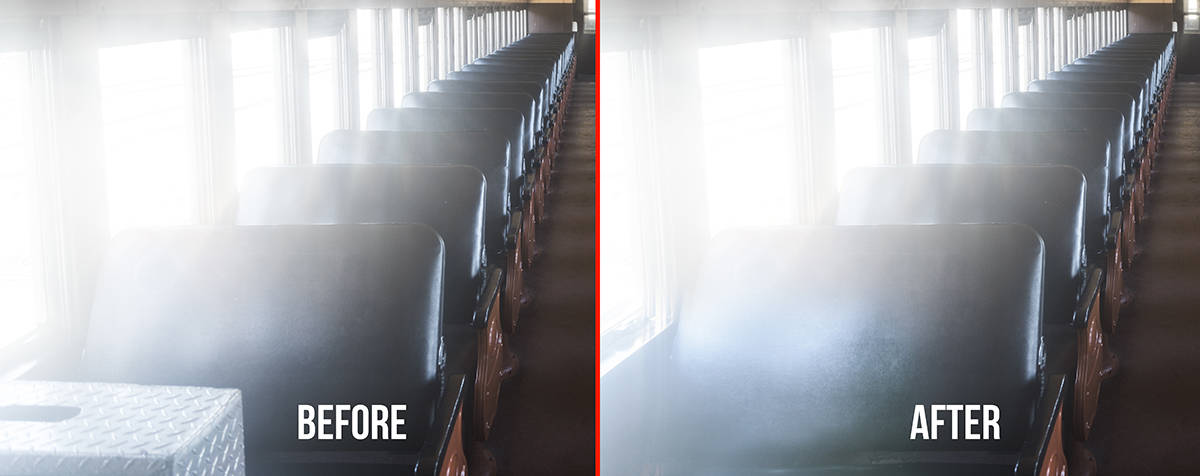
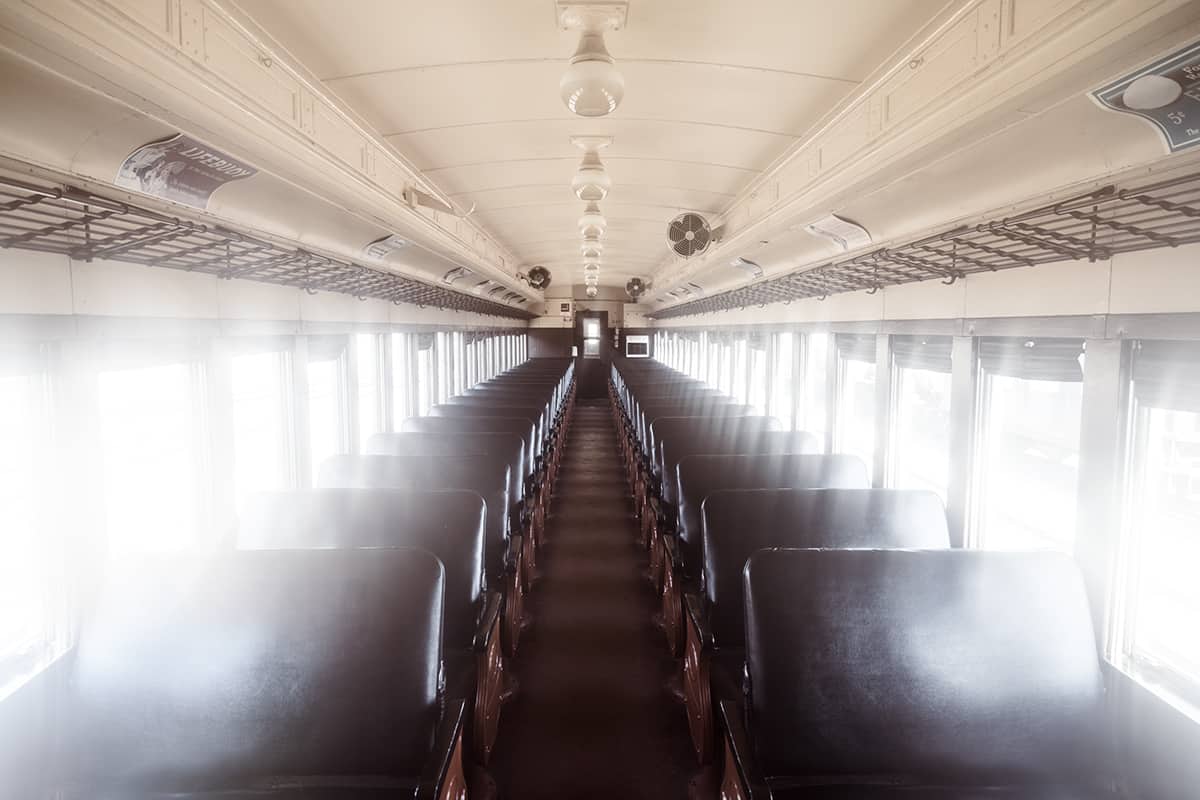
The Finished Image

For Blake, it's all about the art and process synergy. He dives deep into complex topics and makes them easy to understand through his outside-the-box thinking so that you can use these tricks in your workflow today!


What a great video, will try it this weekend, and about cutting your grass 3 times already, that’s nice we have had another 30 cm of snow drop on us yesterday with more on the way, so if you want I’ll trade you places
Oh boy! I do love the snow though, I’ll take it!
Nice video as always. Love the color look up added. Are there a bunch of those we are able to download with whatever subscriptions we may already have?
This is great! I can think of several recent frustrations where knowing this tip would have helped me. Thank you!
To think, I used to use this method all of the time before I understood the Clone Stamp tool, haha! It is a good one to have in the back pocket.
Blake, great tip!
Thank you.
About the snow I’m Soooo sorry. But I’m a suffer dude- I yearn for warm beach weather and pay someone to cut the grass so I can get into the great outdoors with no regrets.
YEah, I would pay someone, but it is so much fun to fly around out there on the Deere!
Hi Blake,
Nicely done! Excellent tutorial. I’ve got some photos that have a similar problem that I will definitely try this on.
Dennis
Thanks, Dennis. I appreciate the feedback. It is a great technique especially for images with symmetrical balance.
Outstanding approach and technique. Many thanks as always!
Vinny
Thanks, Vinny!
I’ve been using a similar idea in PSP for a long time when I run into this kind of situation..however, you’ve taken some further steps and the results are so much better. As usual, good advice, better results and something new to learn.
Woo hoo! High five for learning new tricks!
Awesome solution to a problem we have all come across in the past. Thanks – Jack
Thanks, Jack.
Every time I watch one of your tutorials I learn a new trick which raises my editing skills. Using the difference mode to help with the masking process was especially cool! I’ll be using the color uplook table method as well…so direct and working inside of CC. Thanks
The difference Blend mode is effective to see what is underneath as well as help align up images when Photoshop fails to auto align. Thanks for stopping by!
Hi Blake-
Enjoyed this Friday’s tutorial. Thanks for sharing these awesome techniques.
Ed
No problem, Ed! Thanks for coming by.
A very good tutorial Blake. Some very helpful tips.
Thanks, Don
Thanks, Don. I appreciate it.
Blake,
I like the way you highlight the Photoshop tools you’re using in the video. Because you go fast this really helps me learn.
Thanks,
Russ
Wow Blake, this is so cool! I’ve often had situations similar where the clone stamp and/or spot healing brush would not quite do the job. Your tutorials are so awesome and helpful. I really appreciate you sharing with us these types of “practical” tips!
Thanks, Larry. This one came up while I was working on it and I thought… ding… good teaching moment 🙂 Glad you liked it.
I enjoy all your lessons many I knew and refresh my memory and others were fascinating we think the same way in Art. Keep up the good work Blake one day we will meet.
Well done Blake.
Clear instruction and easy pace. Great end result.
next time don’t leave your camera case in the picture!
haha! I would never carry around a lugging case like that. Phew, I may be strong, but I’m not that strong 🙂
Enjoyed your tutorial and learned quite a bit, thanks, to you. I have Aperture and Elements 10. Would I
be able to achieve a similar effect just with Elements?
Probably not, but I am not sure either. I have little to no experience in Elements.
Aaron Miller I haven’t checked out if it’s at all possible to use these tricks in Elements, but the problem with Elements is once you use more than one layer in an image you are restricted to working in 8bit mode. Elements will only work in 16bit mode on single layers.
Great tip Blake. So easy when you know how – thanks very much. Love Colour Lookup as well. I have used it several times now and it is great.
Thanks! Glad you liked it. The Color Lookup Tables are one of my new favorite things.
Awesome video, as always full of great information and well presented.
Thanks Blake
Thanks, Clyde!
Love love love…. this!!!! This would have saved me so much time on some other projects…. thanks!
Where was I ages ago o this one…. ugh! Well, at least you know now going forward 🙂
I really enjoy your tutorials. Why not use Content-aware fill? Seems like it would take fewer steps.
I just tried Content Aware Fill and it put the back half of the seats in its place. I wish I would have shown that in the tutorial. The problem with other methods is that they are not intuitive enough to flip and reverse other portions of the image. They pull other parts of the photo without regard to what it should look like.
As always you amaze me mate
Thanks! Just glad I can help.
Really good technique. My husband I use this tr hnique frequently, even if the image isn’t semetrical. If a section of a house and garden has car hiding part of it, then it is easier to cut out a similar section with the rectang tool and fit it over the offending car. Yes we need to add the adjustment layers to make things match and sometimes we might need to distort it to make the fit perfect.
I am telling you this because I don’t think many tutorials mention this and often it is the best solution. After a few months have passed I think it would be nice to use the technique on a non semetrical image to cover up an offending object
I have been struggling with a similar problem followed the instructions and WOW. Thanks
AWESOME! Glad I could help. Your enthusiasm puts a smile on my face 🙂
Blake
fantastic tutorial, have enjoyed your knowledge for the last year.Was a photojournalist for the last 30 years,with a small newspaper.But due to illness had to call a halt to my work. Am in a bit of rut now but look forward to your tutorials
your friend from Ireland
pat
That’s hard news to hear, my friend. I wish you the best and pray for a speedy recovery from your illness if that is a possibility. While you may not be able to get out and around with your camera, I am sure you have some great resource materials you can edit and maybe make some artistic composites from. Just a thought.
From a fellow Irishman!
Blake
Blake,
Like all your tuts, this was extremely helpful.
For such a common image dilemma, you provided an easy-to-follow solution!
Thank you.
Thanks, Christoph!
Nice tip. Simple tools I was not aware of previously.
Thanks, Roger.
You certainly have the gift of explaining everything so clearly. I really enjoy your tutorials. Thanks you for sharing.
Excellent tip…and usable in so many different ways…Thanks Blake…great as usual….William
As usual: great.