
This is a rather long ND Filter post, use the links below to skip to the desired section:
Part 1: How to Speak Neutral Density
Part 2: What is Neutral Density?
Part 3: What do ND Filters look like and how do you attach them?
Part 4: What effect will they have on my images?
Part 5: How do I know the proper Exposure for my ND filter?
Part 6: Common Problems with ND Filters
Part 7: In Conclusion
How to speak Neutral Density
In terms of photography there are a lot of different languages to know. Unfortunately, there is no Rosetta Stone for photographic terms. Another unfortunate matter is once you have learned one part of the photo language another dialect pops up that throws off everything you’ve previously learned.
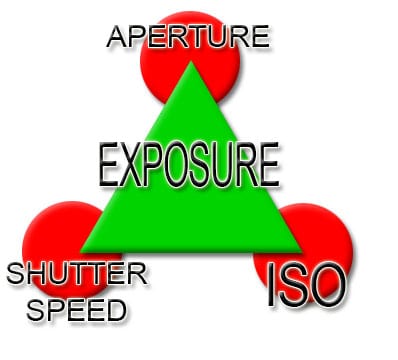
For instance, it takes a good deal of time to understand the reciprocal relationship between the Exposure Triangle… Shutter Speed, Aperture, and ISO. Once you begin to understand that any one of these can change based on the setting of another, the language starts to become more clear.
Example (in Aperture Priority Mode):
- Aperture is set to f/5.6, Shutter Speed is 1/25th of a second
- Aperture size increases 1 stop from f/5.6 to f/4.0, Shutter Speed decreases to 1/50th of a second
- ISO remains constant the variables are the Aperture and Shutter Speed.
In simple terms; as Aperture Increases in size the shutter moves faster to capture the given amount of light. On the other hand, as the Aperture decreases in size (letting less light in) the shutter speed decreases to accommodate the size reduction. In even simpler terms,
- a 1 stop increase, whether that is to the shutter speed, Aperture, or ISO is always going to equal double the amount of light entering the camera.
- a 1 stop decrease, whether that is to the shutter speed, Aperture, or ISO is always going to equal half the amount of light entering the camera.
So where does Neutral Density fit into this law of reciprocity?
Let’s say you are photographing a waterfall in broad daylight and you want to really slow down the shutter speed to get a nice dreamy water fall effect. Your initial light reading at Aperture f/8.0 is 1/500th of a second which is entirely too fast to record a dreamy waterfall. So you move your aperture accordingly to stop down (half the amount of light per stop).
| Aperture | Shutter Speed |
| f/8 | 1/500 |
| f/11 | 1/250 |
| f/16 | 1/125 |
| f/22 | 1/60 |
At 1/60th of a second (stopping down 3 whole stops) you are not going to get that slow moving dreamy water effect. You need at the least a one second shutter to even come close. At this point you are already at ISO 100, the lowest ISO you can go. You can’t stop down anymore. You could quite possibly use exposure compensation and stop down 3 more stops, but that would still only get you to 1/8th of a second and your exposure would be very overexposed and more than likely unusable!
| Aperture f/22 @ 1/60th | Shutter Speed |
| 1 Stop Exposure Comp | 1/30 |
| 2 Stop Exposure Comp | 1/15 |
| 3 Stop Exposure Comp | 1/8 |
This is where a Neutral Density filter comes in. When it is bright outside what do we wear? Sunglasses. They reduce the amount of light entering our eyes making the bright sun a bit more bearable.
An ND filter is the exact same concept. Think of an ND filter as a series of different shades for your camera lens. The darker the shades the more light they block. ND Filters come in all shapes and sizes with many variables of light blockage.
What is Neutral Density?
Here is the definition according to wikipedia, I like this definition enough to quote it:
In photography and optics, a neutral density filter or ND filter is a filter that reduces or modifies the intensity of all wavelengths or colors of light equally, giving no changes in hue of color rendition. It can be a colorless (clear) or grey filter. The purpose of a standard photographic neutral-density filter is to reduce the amount of light entering the lens. Doing so allows the photographer to select combinations of aperture, exposure time and sensor sensitivity which would otherwise produce overexposed pictures. This is done to achieve effects such as a shallower depth of field and/or motion blur of a subject in a wider range of situations and atmospheric conditions. – Wikipedia Definition for Neutral Density in Photography
The key points to pick up here are:
- Reduces the intensity of wavelengths and colors of light
- No changes in Hue or Color Rendition
- Reduces the amount of light entering the lens.
What do ND Filters look like and how do you attach them?
There are 2 common types of ND Filters circular and Square.
Circular ND Filters
The circular ND filters typically are threaded to the size of your lens and attach directly to the lens. They come in all kinds of ND stops from 3 stops to 16 stops all manufacturers make one that will fit your lens. If they do not, you can always purchase step up or step down rings that can be attached to your lens that can then be attached to your filter.
Say you own a lens like the 16-35mm Canon lens which is 82mm in diameter and the 24-105mm lens which is 77mm in diameter. My recommendation would be to purchase the 82mm ND Filter and a 77-82mm Step Up ring. A Step-Up ring may cost a few dollars where the ND filters can be hundreds! 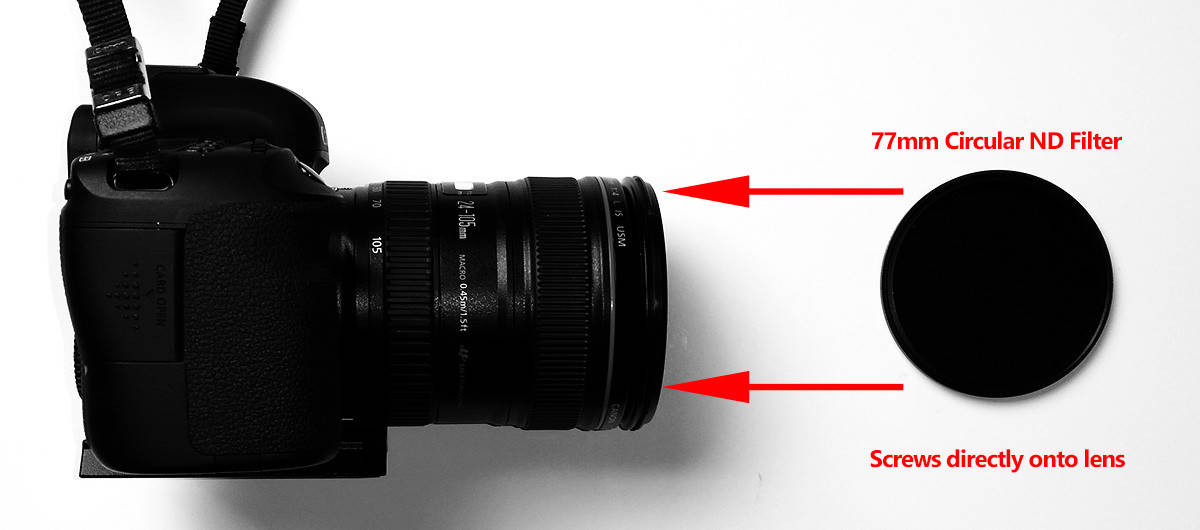
| PROs | CONs |
| A lot less parts and pieces | May have difficulty focusing with it on |
| Rarely have light leaks | May need step up/down rings dependent upon lens size |
| Smaller size makes them easy to pack | Could throw off focus while screwing in place |
Square ND Filters
Square ND filters are a solid piece of glass ranging in size. These pieces of glass slide into a holder which then attaches to an adapter on the front of your lens. Of the two, I prefer the Square filters. While they are more work to setup on the front side, they allow you to focus and meter for your subject, then quickly snap on the adapter and shoot.

| PROs | CONs |
| Quickly attaches to the front of the lens | Many parts and pieces, they don’t pack small |
| Makes it very easy to focus and meter prior to putting on the filter | Prone to light leakage if not set correctly |
| Large filter size fits all lenses via the foundation holder | Large surface area prone to damage |
What effect will they have on my images?
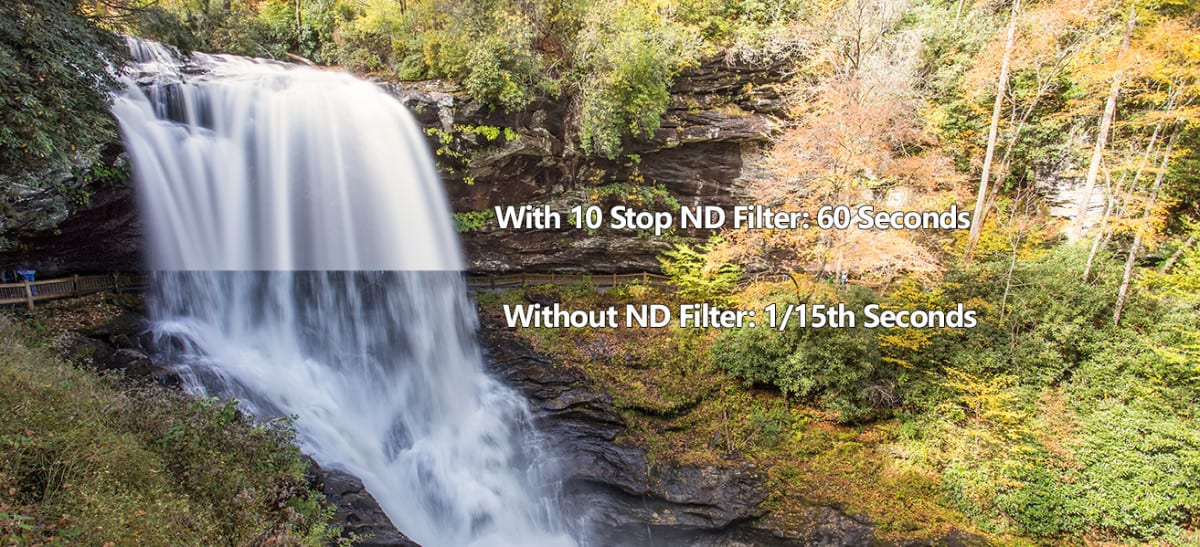
ND Filters can do some wonderful things to your photos and allow you to see a glimpse of time happening in one frame. What I mean is, you can see 3 minutes worth of cloud movement in a single frame. Here are some common uses for ND Filters:
- Make waterfalls look like the dreamy innards of a Creamsicle.
- Show the sunset clouds moving in one frame to create smooth whisping cloud transitions.
- Use in a crowded environment with a lot of people (think tourist attractions) as long as the people keep moving during a 2 minute exposure they will practically disappear.
Here are some examples with and without an ND filter:


How do I know the proper Exposure for my ND filter?
Well, if you are good with math you could do this one really quickly in your head:
T = a*2^b
T= Resulting Exposure with ND filter
a=Metered Exposure time without Filter
b=The stop you are using (3, 10, 16 etc).
Okay, so maybe normal people can’t do that in their head. I like to use the ND Filter App I have for my Android. My phone is always with me when I shoot so I take out my phone and look at what ND filter I have on and select the metered exposure and it does all the math for me. While it usually puts me close to the correct exposure, I use that first calculation as a test and then assess whether I need more or less light in the image. The ND Filter App usually gets me within 1/2-1 stop of where I need to be.
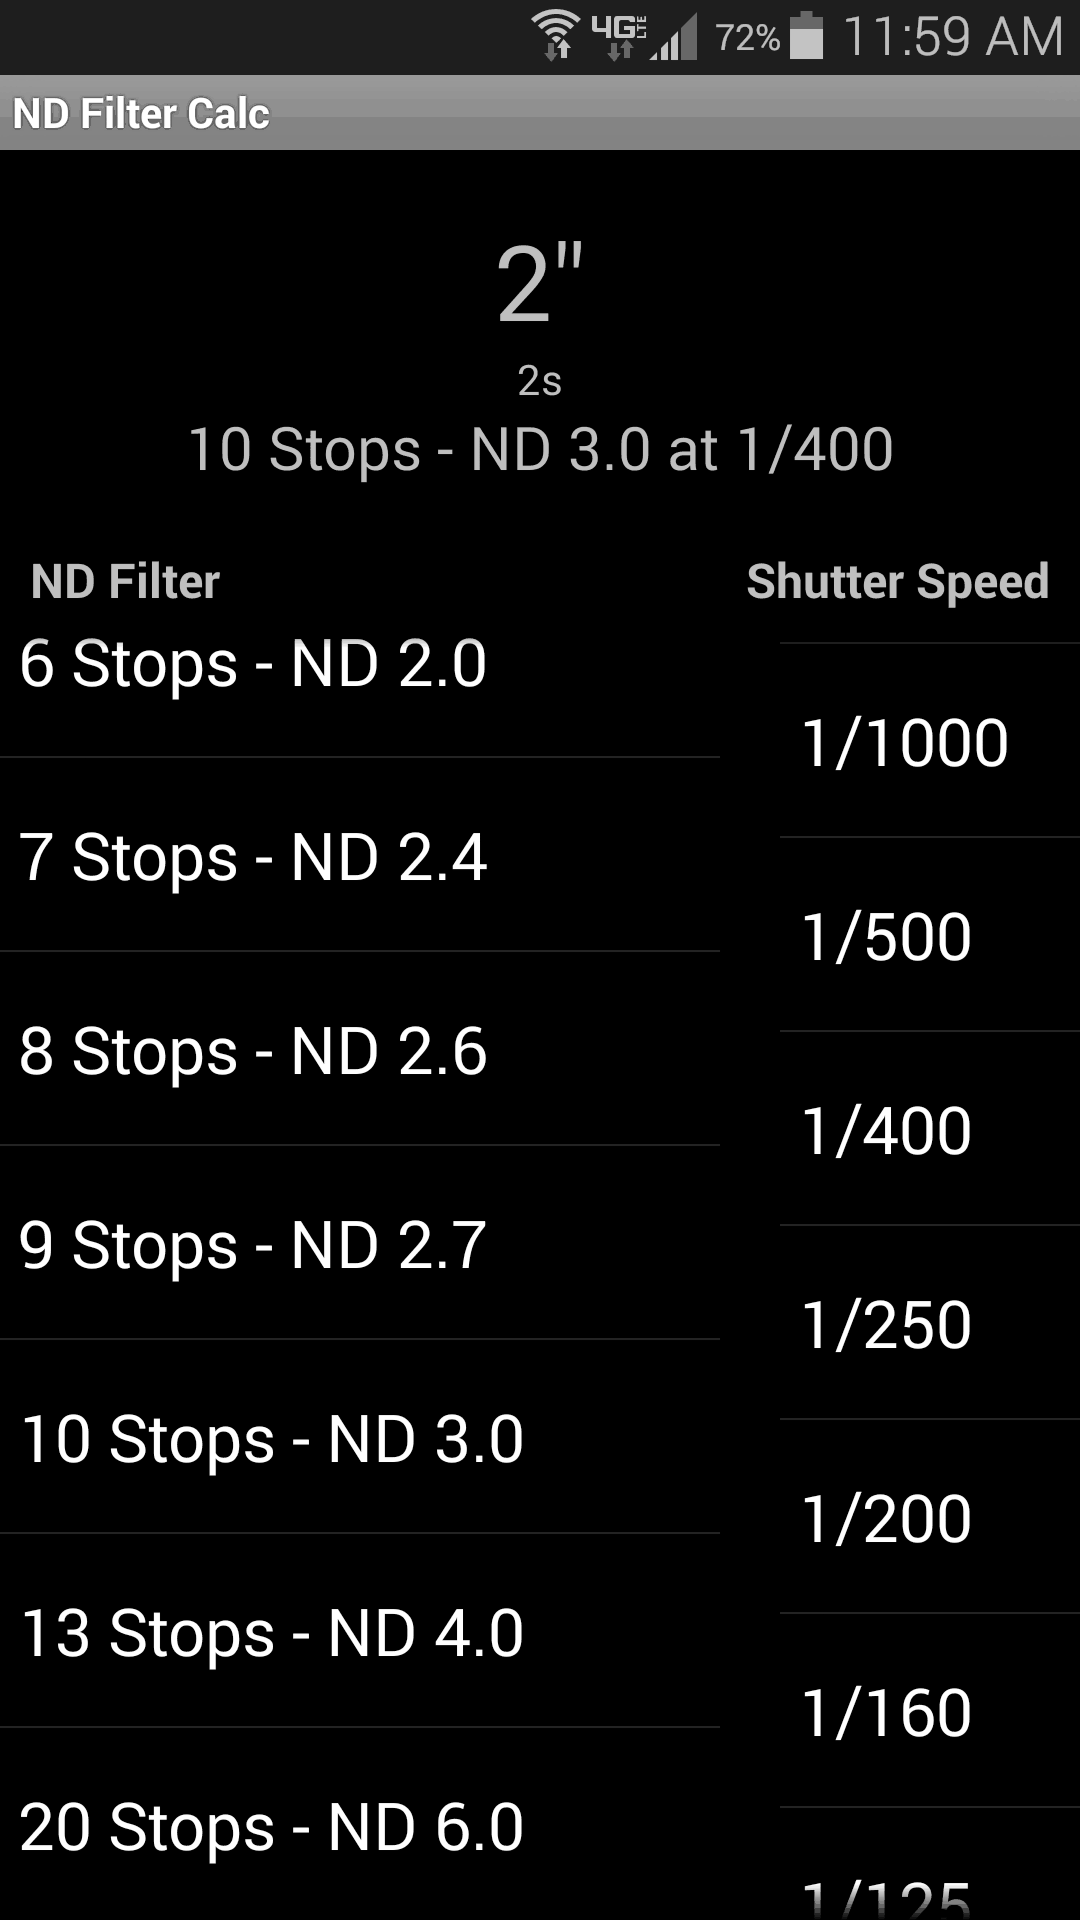
ND Filter Calc App showing the result of a 10 Stop filter at a metered 1/400th Exposure.
The Lee Big Stopper comes with a Chart that I can use very similarly to the ND Filter Calc App, however, it is missing some 1/3 stop and 1/2 stop measurements. It works in a pinch though.
What if I don’t have the chart or the App?
Of course, there may be a time when you don’t have either the chart or the app and you have to do the math on your own. This is how I do it.
- Remember your current Shutter Speed, let’s say it is 1/500th and you put a 10 stop filter on @ Aperture f/8.0.
- Divide 500 by 2, 250, the result of a 1 stop reduction would be 1/250th.
- Now do that 9 more times! Luckily, most of us have ten fingers. Every time you divide by 2 put up another finger. This will help keep your place when you are doing the math.
- 250/2 = 1/125 (2 Stops) 125/2= 1/60 (3 Stops) etc.
- Keep doing that until you get to the resulting 2 second result. That is what you would dial in.
- In Manual Mode it would look like this: Aperture f/8.0, Shutter Speed 2 Seconds. Your in camera meter will look like you are over exposing by a lot, don’t worry about that, just put the filter on and shoot.
What if my camera will only dial into 30 seconds as the minimum Shutter Speed?
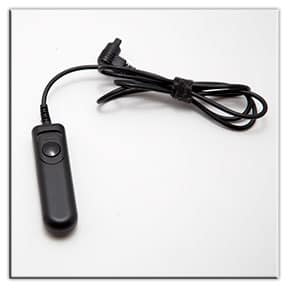
If you do all of the math and you find your camera will only go to 30 seconds in Manual mode and your calculations are telling you 40 seconds you will have to use the Bulb setting. This is often times marked as B on your Mode selection. The Bulb mode allows you to record any shutter speed as long as the shutter is held in place. This is where a Shutter Release is very nice.
While you may not think it, this happens more often than not. Say you are shooting a sunset, you are at f/8.0 with a shutter speed of 1/25th of a second, putting on the 10 stop filter will reduce your shutter speed to 40 whole seconds. Here is how the on-location flow would look.
- Dial in Bulb Mode
- Focus your subject with the 10 stop filter off to obtain the appropriate shutter speed (1/25th)
- Look at your chart or app… it shows 40 seconds
- Place the filter on the lens
- Press the shutter release button and push the lever up so it holds it in place.
- Watch the seconds count on your camera’s LCD display (if it has one) or time it on your watch.
- When it hits 40 seconds, release the shutter button.
Common Problems with ND Filters
There are some common problems you will have with ND Filters. While I have run into a few myself, the more you use them the more you may run into.
- Lighting Changes During Exposure
- Light Leaks
- Color Cast
Lighting Changes During Exposure
This first one is is pretty difficult to judge while you are making the image, but it happens more often than you might think!
Let’s say you are photographing a sunset. There is a 2-3 minute window where the sunset changes drastically as the sun passes behind the horizon. If you start your exposure while the sun is just above the horizon and your exposure time crosses that threshold of time, you may need to adjust for it while you are in the middle of the exposure.
This is very difficult to judge mid-exposure. I usually don’t add a subjective amount of seconds, I try to calculate it.
I go about 30% of what the exposure time was before the sun went down and add it to my exposure. This allows me to add approximately 1/3 of a stop to my exposure to make up for the loss of light from the initial reading. This also gives me some more wiggle room in post processing since the RAW image won’t be effected too much by an over or under exposure of 1/3 of a stop.
| Exposure time before sun went down | Adjusted Exposure |
| 30 Seconds | 39 Seconds |
| 50 Seconds | 65 Seconds |
| 100 Seconds | 130 Seconds |
| 200 Seconds | 260 Seconds |
Light Leaks
Light Leaks are a pain in the ass (only someone who has had one would use such profanity to describe them) because they can happen when you least expect it and you won’t know until the exposure is over. A light leak is more common with square filters than screw on filters and can happen 1 of two ways.
- The Square filter slid too far to one side of the holder leaving a small gap between the adapter and the foundation holder.
- The filter’s padding that closes the gap between the filter and the adapter has worn thin or has been compromised due to mistreatment.
A light leak could look very large, like the image below, or it could look like little sprites of light coming in. I always look at the back of my camera after using an ND filter. The last thing I want to do is sit around waiting 4 minutes for an exposure just to find a light leak. Imagine doing this for 8 exposures, that would be nearly 32 minutes of your life you may never get back!

Color Cast
As you read in the very beginning of this article, ND Filters are “filters that reduces or modifie the intensity of all wavelengths or colors of light equally, giving no changes in hue of color rendition”. That being said the filter itself should not have a color cast on your image. This is not always the case!
I just recently had this problem with a 16 Stop Neutral Density filter that I purchased. I was on scene doing some field testing with the Big Stopper (10 Stop ND filter by LEE) and the 16 stop Firecrest filter by Formatt-Hitech. Both companies are known for their excellent products. I was not on the scene trying to see which was better, I was there trying to see what 10 stops versus 16 stops would look like and if it would make a difference during the day.
The 16 Stop made a huge difference in the amount of motion in the water. The streaks you see in the Big stopper image are ice chunks floating down the river. They are barely visible in the 16 stop image. That is the difference of a 30 second exposure and a 200 second exposure (I should have gone even longer than that).
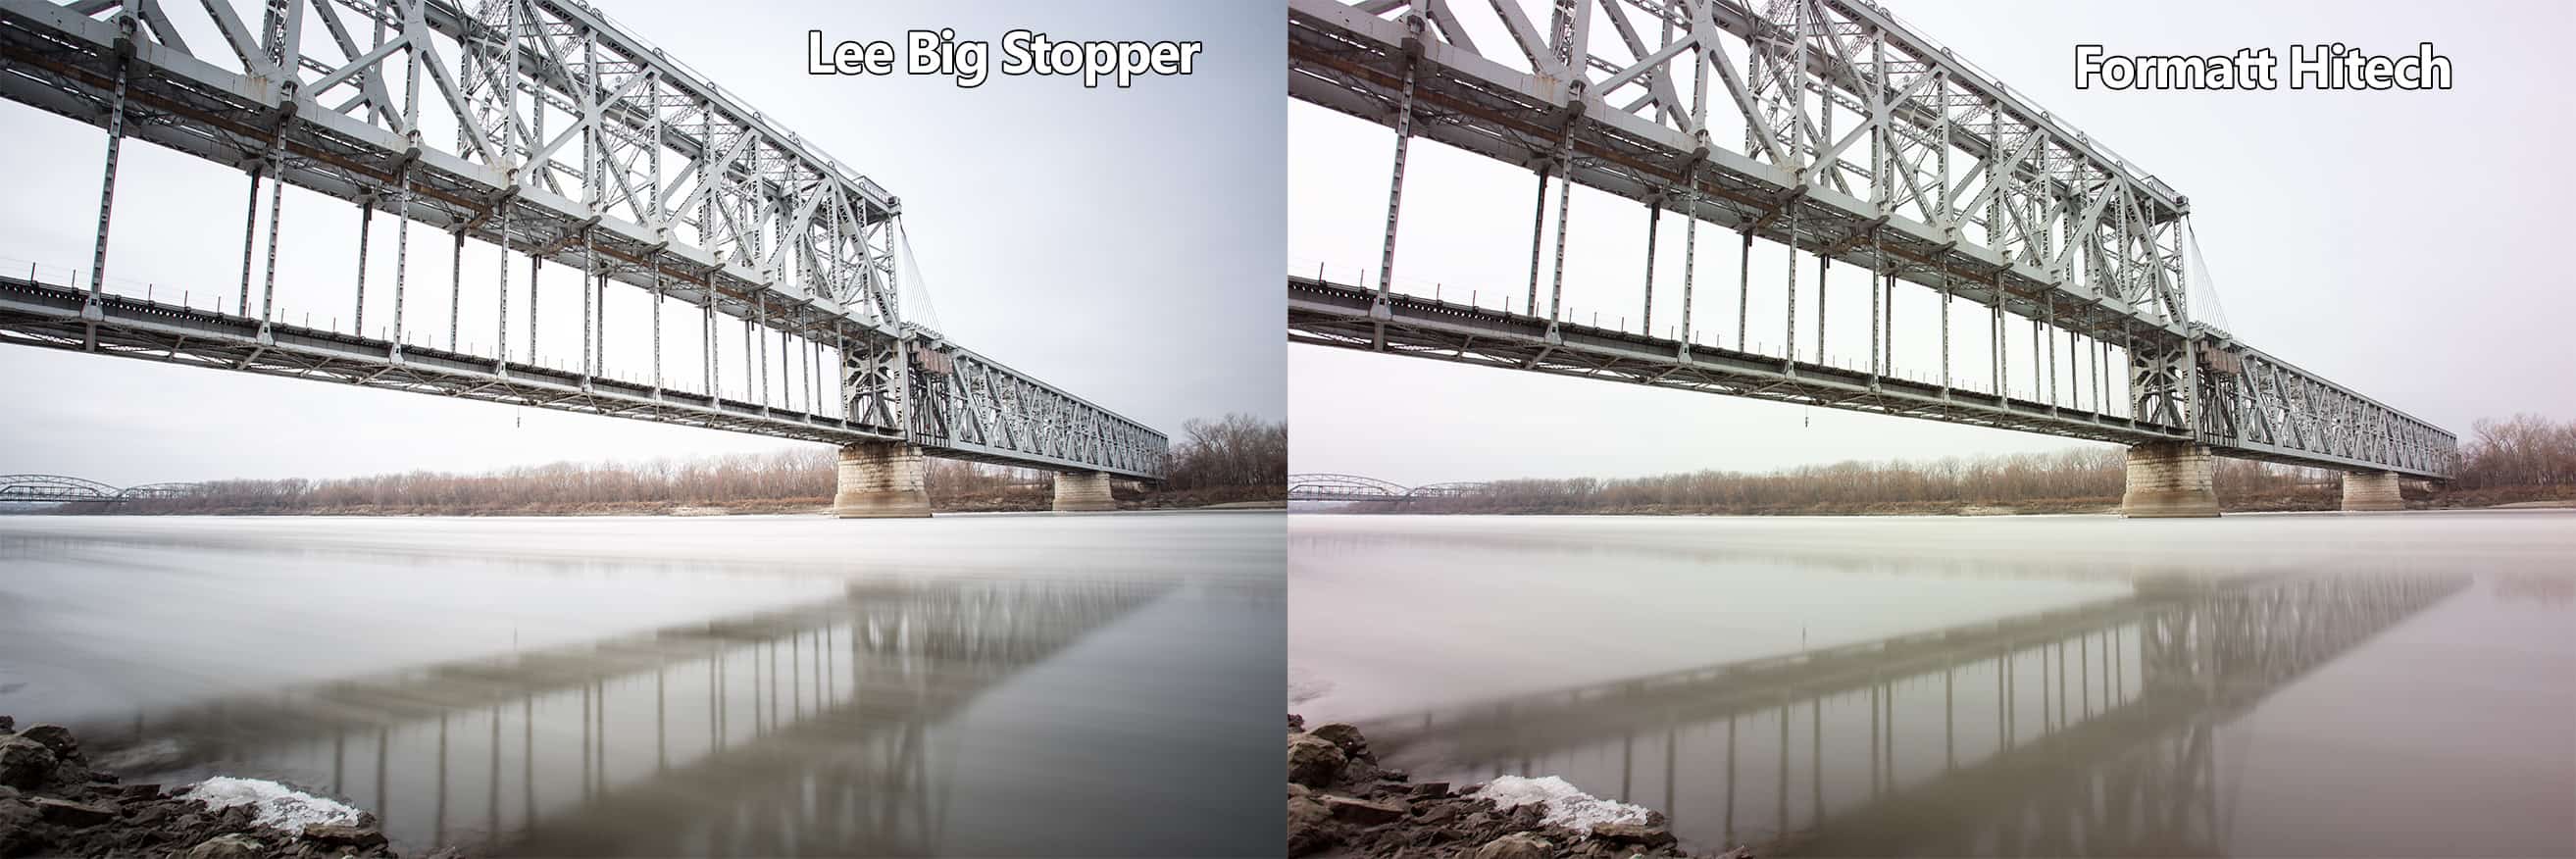
What I noticed in the images that disturbed me was the odd color cast I saw in the 16 Stop filter photo. There seemed to be a giant green spot in the center of the photo. I ran some more tests to see if it was a light leak when I was on the scene or if it truly was a green spot.
The Test
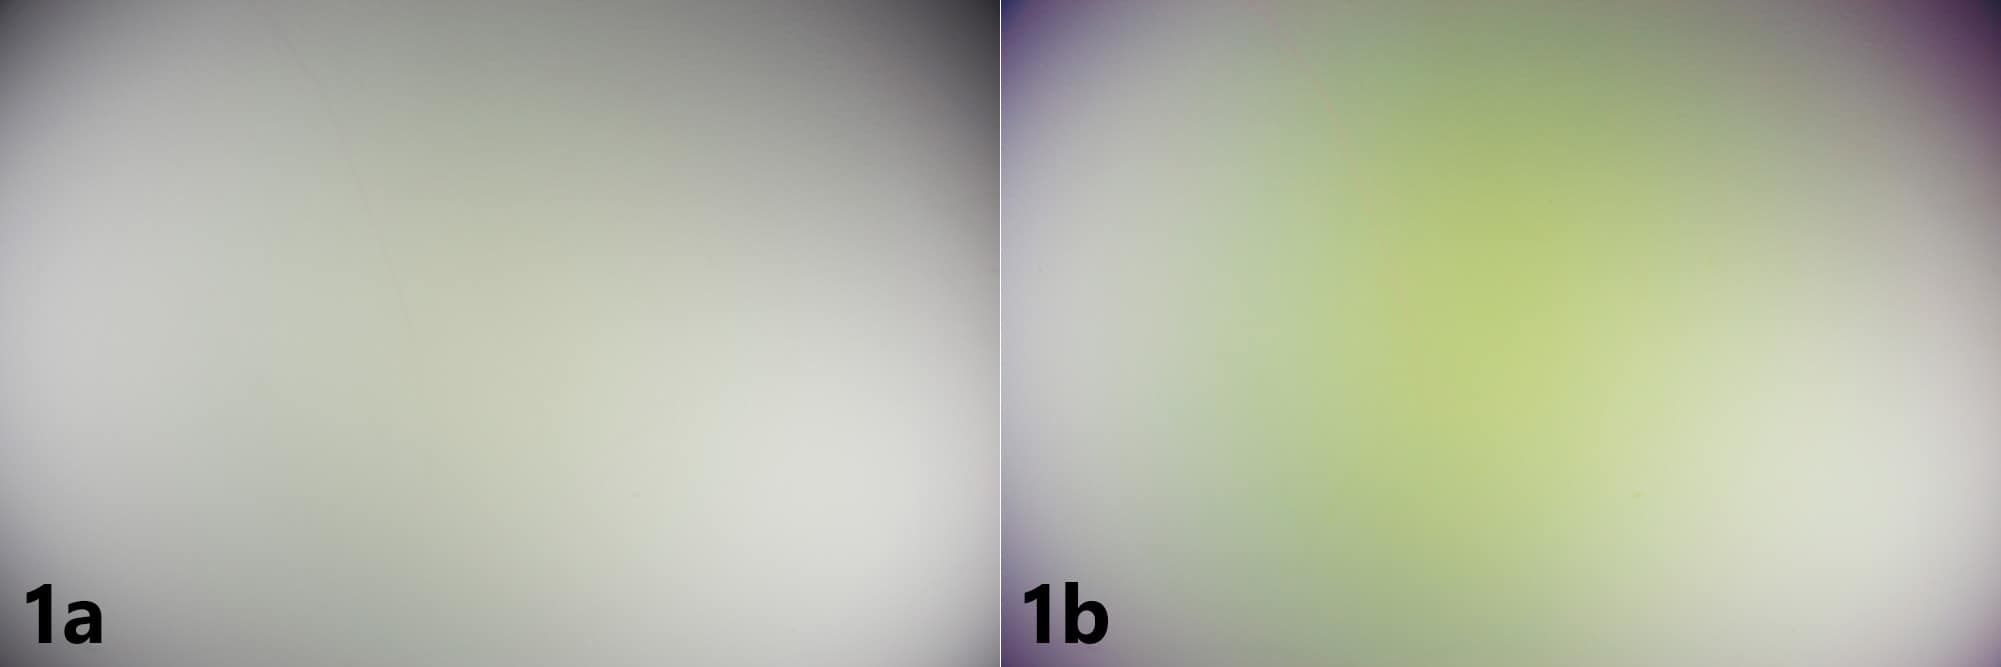
The test included a white wall and the Formatt Hitech filter.
I lit the White wall with 2 light sources on either side. I did a custom White Balance setting to match white in the current lighting conditions. I then photographed the wall. The result showed signs of the green spot in image 1a. 1b is the result of image 1a with an increase in Saturation and Vibrance.
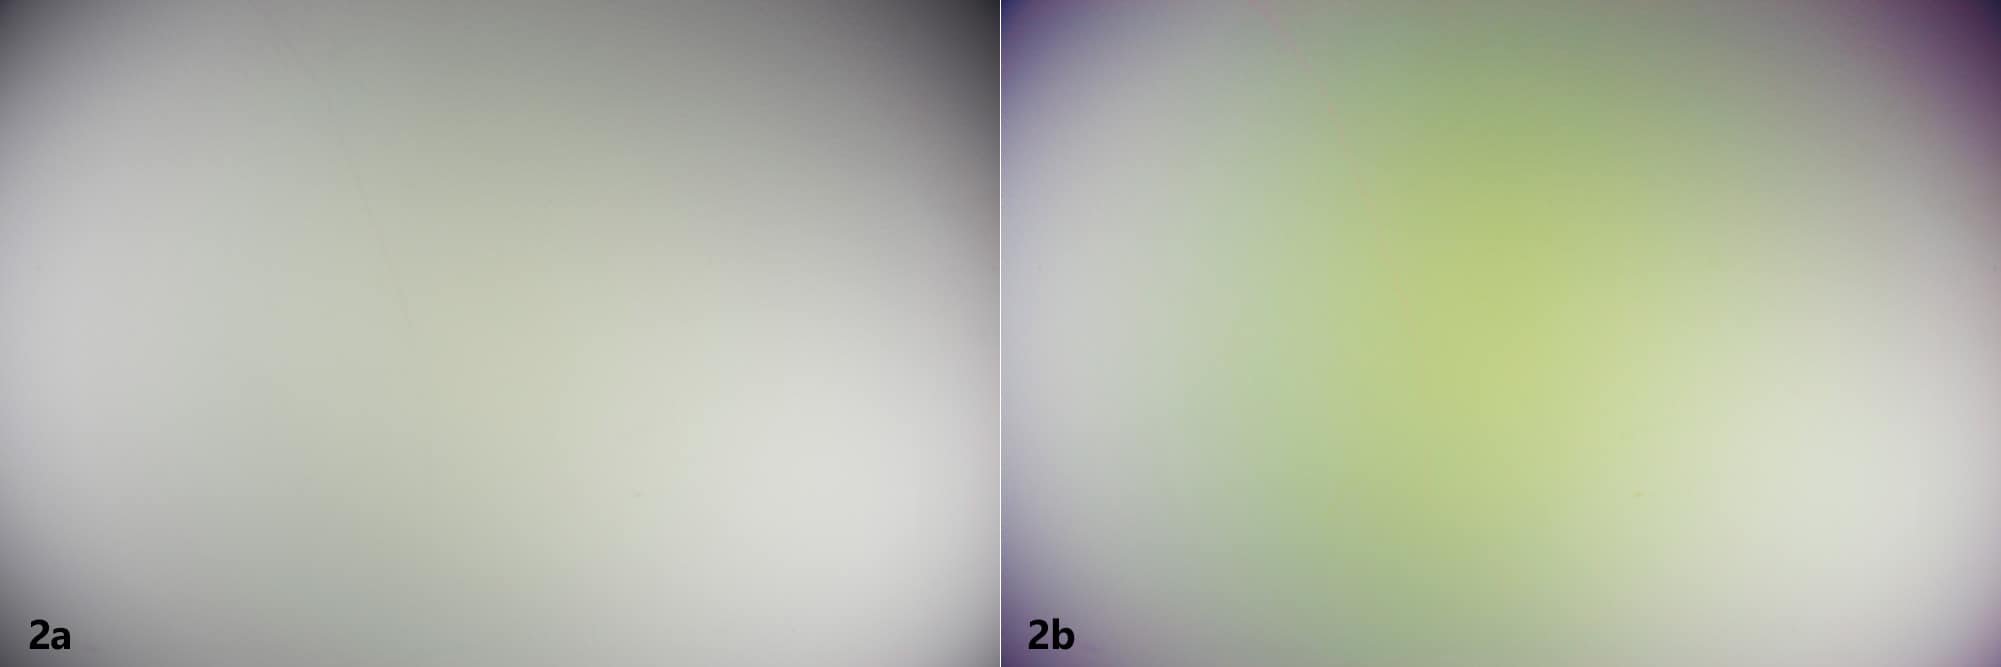
I ran the same test again. This time I placed a small piece of black tape on the viewfinder to ensure light was not leaking in through the viewfinder (this can happen during long exposures). Example 2a shows the resulting image while 2 b is the heightened saturation and vibrance.
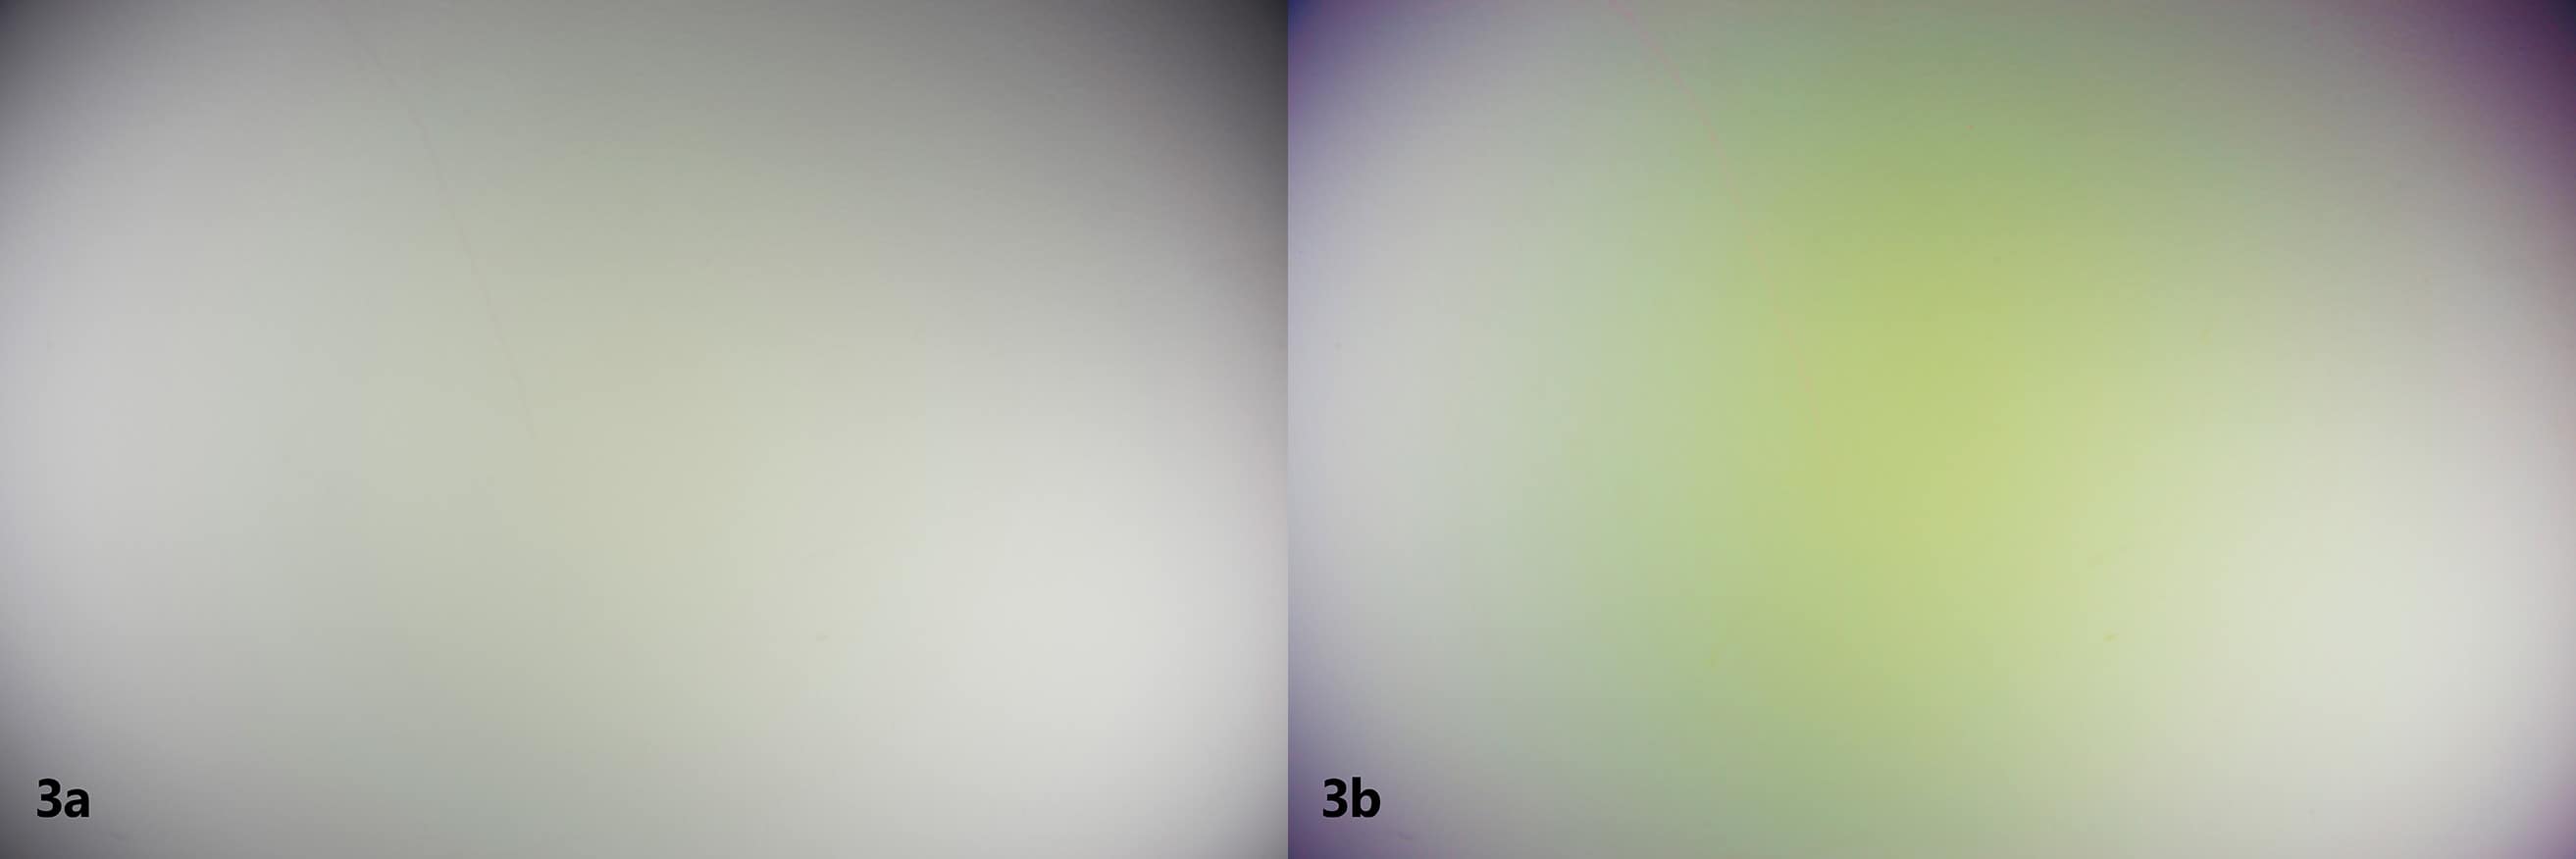
I ran the same test again… This time I put black duct tape around all points on the filter adapter and foundation kit as well as the viewfinder. Example 3a shows the resulting image, 3b is the heightened saturation and vibrance. The results were the exact same.
I figured it may be a factory defect so I returned it to Amazon per the companies recommendation. I received my exchanged part 10 days later and ran the same tests.
This time I did it next to a Tiffen 3 stop screw on filter and the Lee Big Stopper.
Test 2
In this test I added a few variables
- I used a multi-adjustable 4500 watt light setup which allowed me to photograph 3 different amounts of light per filter.
- I used a 24-105mm lens at 2 different focal lengths.
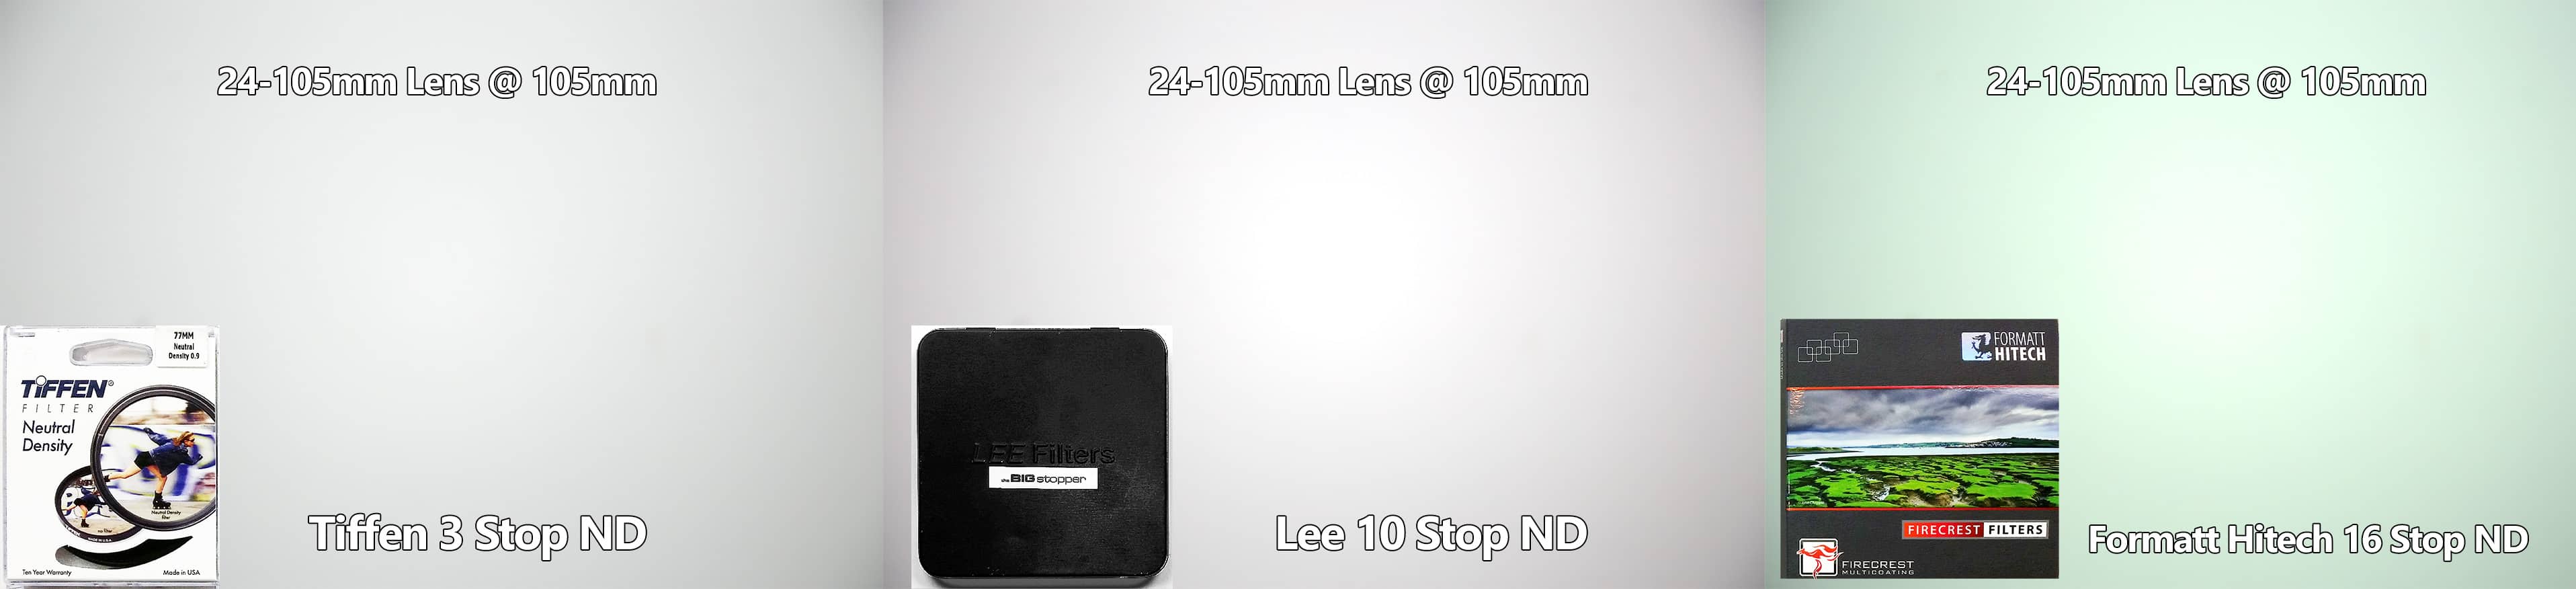
The first round of test images were shot with 3 variables of light rendering 3 differing exposures per filter for a total of 9 exposures @ a focal length of 105mm. This allowed me to see if time were an important variable. At every time interval all of the filters responded the same way in regards to color cast. Below are the different color casts from the filters.
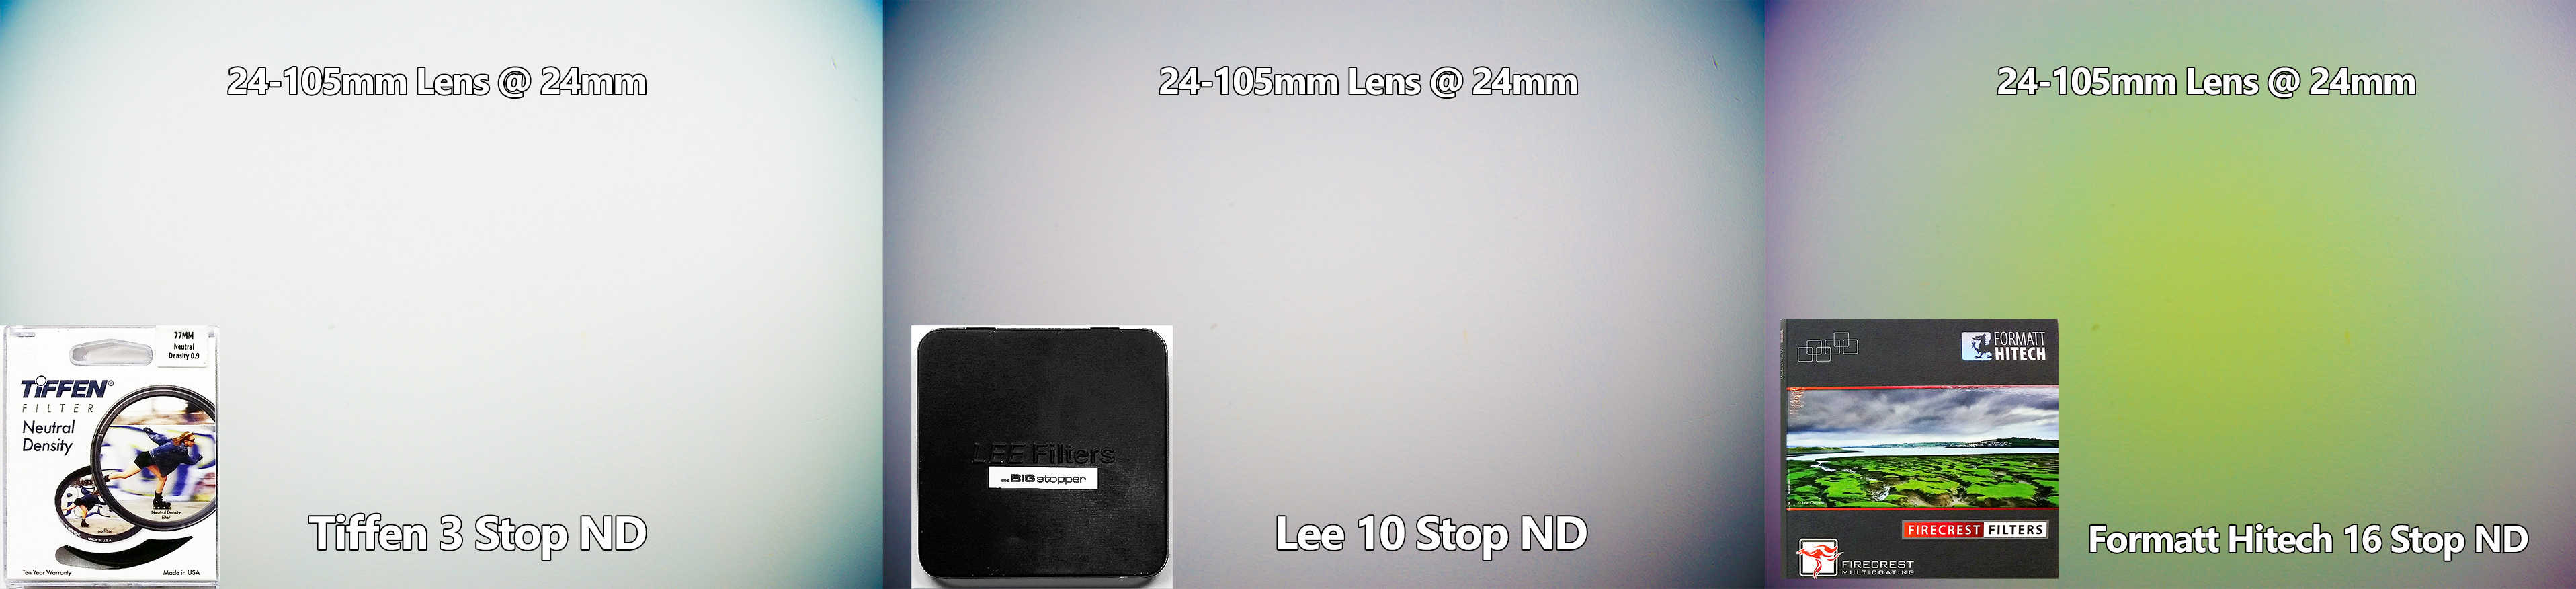
The second round of test shots were at 24mm. The time intervals did not change, just the focal length.
The images in the series below have had the Saturation and Vibrance dialed up to 100% to show signs of a color cast. As you can see, they all had serious vignetting, but that is to be expected with a wide angle lens at it’s widest focal length. However, the Tiffen and Lee Big Stopper show little to no sign of color cast. The Firecrest 16 stop ND filter has a very large green spot in the dead center of the photo.
It is relatively common that there will be some trace of color casting from the filter. More often than not this can be corrected with a very slight White Balance correction . The problem with a filter that has a giant spot is that there is no global white balance correction that can be used to fix it. Any adjustment you make to the photo to fix the green haze will reciprocally affect the areas that do not need to be adjusted.
I did everything in my power to correct for the haze but nothing worked. This was seen on both copies of the Formatt Hitech Square 16 stop ND filter I tested. I contacted the company with my findings, they assured me they have never seen this before.
In Conclusion
ND Filters can be intimidating at first, but just remember those reciprocal properties of exposure. At the most basic level an ND filter is nothing more than a pair of sunglasses for your lens. The more the ND value, the darker the shades!
I am gearing up for a trip to Cannon Beach, Oregon where I will be filming a Long Exposure course that will explain everything in this article in greater detail and then some! There is still so much to cover on the post processing side of using an ND filter. Capturing the image is half the battle, the fun begins in post! Stay tuned, I will be releasing this course in the next few months!
I would love to hear about your experiences with ND filters.
Please feel free to leave them in the comments section below.

For Blake, it's all about the art and process synergy. He dives deep into complex topics and makes them easy to understand through his outside-the-box thinking so that you can use these tricks in your workflow today!


This was great, Blake. Thanks very much. I have a Promaster Variable ND filter that goes from about 1 1/3 stops (measured from no filter to the “Min” mark on the filter) up to 5 1/3 stops at “Max” on the filter. It does the job for me without a huge expense and I like the ability to vary it on the fly. It does take some getting used to as well as some trial and error to get the right exposure, though. Your tutorial was very helpful as always.
Thanks for ALL you do,
Vinny
This was an outstanding explanation! Thanks so much.
I have been experimenting with using a ND Filter-ND 0.9-with the HDR capture process. I was out today cpaturing photos of a stream and small waterfall using the ND Filter with the bracketing for HDR. With this filter I can still focus and shoot like I always do. I’ll be posting some photos when I get them processed. The first time I tried this was by acccident. I forgot to take the ND Filter off the lens and I liked the effect. Thanks for this article Blake. It explains ND Filters very well.
Hi Blake – Are you using the regular Formatt- Hitech ND filters? After buying my initial set of filters on Amazon I went to the Formatt- Hitech website where I learned about the issue of colorcast that occurs as one uses increasingly “darker” filters. To address the issue they had just released a line of IRND Prostop filters that they guarantee will not cause the color casting you detected in their regular ND line of filters. Of course the IRND filters are a bit pricey.
Thanks for the intel! This was in fact the IRND 16. It was stamped in the upper right corner of the filter, both of them.
Bummer – May have ask Formatt-Hitech if they have had any colorcast issues reported with the use of their IRND line of filters. I’m quite concerned given their assurance and amount paid for their filters. Thanks, Blake
I was in contact with then through the whole ordeal. They assured me they’ve never seen it. Most of the reviews on these filters show the images in black and white so out is hard to see it in other examples. It was very clear in both of the filters I tested.
Great article Blake, but I think you may have got your exposure times wrong in the photos.
For your values of 1/30 at 184s I get 30s; 1/250 at 30s I get 4s; 1/15 at 60s I get 68s.
Nevertheless, trying to work this out gave me a new understanding of ND’s so I downloaded an iPhone App for it, and was pleased to see that it too agreed with me.
Sometimes poo happens so it is not a reflection on you. I thoroughly enjoy your site and articles.
Cheers
Mike Clark
You are very correct! According to the charts and apps my images are way off! But that’s also what happens in the field.
There are many variables that break the rules of the apps and charts. I use the charts and apps as a guide for the first exposure. More often than not the first exposure is not going to be good and you have to adjust.
Then there is post processing! Say you see the exposure is going to be 8 minutes, but it is freezing cold outside… That one extra stop can be easily recovered in post and shave 4 minutes in the cold 🙂
According to the charts these pictures are indeed way off! Use the charts as a guide and then use your instinct and experience in the field 🙂
Hi, Blake. I basically understand everything you said and even your calculations, tho it did make my head hurt! Simple question: which ND filter phone app did you use? There are several out there.
Really appreciate all the detailed information. I had a good chuckle when reading how to divide 10 stops in your head, keeping track with your fingers. Not sure I could even do it then, when the numbers gets down to seconds. It’s a trick I won’t forget. I’ll have to practice it before using it in the field.
Great Blog.
One for Mikki,
for ND values 1 thru 10; 2 to the power of the ND values are:- 2;4;8;16;32;64;128;256;512;1024 etc.
Just divide the relevant number by your metered exp time to get what the apps programs will give you.
For a 1/400th metered value and a 10 stop ND it is 1024/400=2.56s. I still need a calculator for this!
Cheers
Thanks Blake. I have a variable 1-10 ND and then found out from Matt Kloskowski the variables will sometimes put lines in photos. After reading this i feel confident i can buy a reliable ND filter now.
Hmm, I was just thinking about buying an ND filter… Glad I didn’t. I do appreciate the advice here. That definitely adds to the discussion! Matt Kloskowski is the man! You can’t go wrong with a Lee Big or Little Stopper at all!
I love using a variable ND filter. It makes it easy to compose and focus the image with the ND set to minimum. I can then dial in the shutter speed I want for the effect I’m after, then dial the ND filter to match the SS. I used an inexpensive variable ND for a while and found that I couldn’t use it at its maximum setting without getting “X” banding in the image. After quite a bit of research, I decided to purchase the Singh-Ray variable ND. It’s pricey, but it doesn’t have any “X” banding issues.
What you are using, the screwfilters or the square in à holder?
I use both. a 3 Stop Tiffen Screw on Filter and a Lee Big Stopper (square filter).
Hi, I am joining this conversation 2 years after it started, but I just bought a Formatt Hitech Firecrest 13 stops ND filter (circular). I am getting exactly the same issue with the green spot. IS there any further information about that? Is it just a bad copy of the filter, or is it a defect?
Hello Anthony, sorry to hear about your issues. Unfortunately, I received 2 bad copies from the manufacture so I chalked it up to manufacture defects. However, they did not get back to me about the filters I sent them and were rather standoffish in the emails. There are a lot of people in the industry that love Format Hitech, I loath them. I have used very cheap filters that have worked better than their products and they are asking a high price tag on them.
I prefer Lee and Vu Filters. Lee’s have a strong blue color cast (not neutral by any means), but it can be corrected very easily with a temperature adjustment so I dont mind.
just got my 105mm ND Firecrest. same green blob 🙁 it goes away at tighter apertures f8 and up, but i need nd filter to shoot at f2.8 and its miserable :/
ah man! That is miserable, sorry to hear that. I ended up returning mine and sticking with Vu and Lee. Lee may not be the best, but I can deal with a single blue color cast.
Thanks! Really one of the best articles I read about ND filters! 🙂