Every once in a while strolling around the net I see people that know Photoshop, but seemingly do not know its capability with text. I do not use it often in my images, but I frequently use it in designs for clients. Text, while it seems intimidating, is very similar to working with images. Everything I am going to show you in this tutorial I have already shown you in others, tricky me! I am simply going to show you how to think differently about text with applications you already know for images.
HDR Images In Text
- Open a blank document.
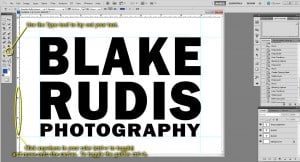
- Use the type tool to create your text.
- I always use guides for this to ensure I have my text laid precisely.
- To create a guide, click your mouse anywhere in the ruler on the side of your image and drag onto the document. Oh wait, are your rulers not up? Try pressing ctrl+r (command+r for the lesser beings, I mean Mac users).
- Guides can be moved using the move tool, (v on the keyboard) and can also be toggled on and off by pressing ctrl+h (cmd+h, on the computer that used to have a rainbow colored apple as it’s mascot, hey I am just saying guys…)
- When setting up my text I always make each word separate, just in case I want to modify one word differently than the other. I also ensure the text is in black as most magic in photoshop is done with black and white. Here’s another tip, you can resize text by pressing ctrl+t (cmd+t on Mac) this makes adjusting the font size a breeze!
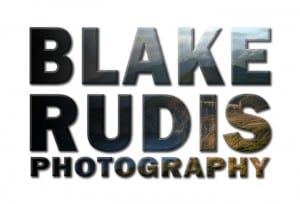
- Alright so we have this text, but now I want add my absolute favorite HDR image from an excursion I took on Highway One near the Bixby Canyon bridge in California to showcase “Blake Rudis’ Photography”.
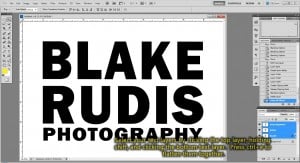
- The first thing I am going to do is merge the text together to create one layer. I will do this by selecting the top text layer then hold shift and click the bottom text layer.
- After the three layers are selected, press ctrl+e (cmd+e on Mac). This will merge the 3 text layers onto one layer making it very easy to edit.
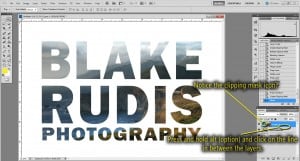
- Now pull in your favorite HDR image and place it on top of the text layer you just flattened in the layers palette.
- To place the image inside the text, all you have to do is press and hold alt (option on Mac) and click on the line in between the text layer and the picture layer. This creates a clipping mask and tells the image on top to mask itself into the layer below it.
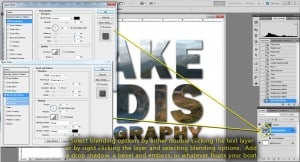
- Now you can double click on the text layer (or right click and select blending options) and add a drop shadow and and bevel emboss.
- The possibilities are endless. Go off and be adventurous with text and your HDR images. I did a little extra and threw a gradient on mine as well. See a little adventure never hurt anyone!



Blake,
In the step “After the three layers are selected, press ctrl+e (cmd+e on Mac). This will merge the 3 text layers onto one layer making it very easy to edit.”, if you select the layers and right click and select “Convert to Smart Object” you can really have ultimate control over the type.
Just thought this may help others out there that found this tutorial as useful as I did.
Chris
Very true, you could very well turn those layers into smart objects. Sometimes I don’t show all the nasty tricks like that to make it simple for people who just want to do something simple without having to go into the whole smart object stuff. While they are useful tools, smart objects, I tend to only use them at select times when I am experimenting. For something like this, when I know exactly what I want to do, I leave that part out of the workflow as smart objects can be a real pain sometimes!
Where I see the beauty of the Smart Object is in the conversion from ACR to Photoshop, it is nice to bounce back and forth between the two. They are also very nice when specifically working with filters, very powerful!