
One powerful filter: The HDR Look
Ever since I started using the Sony a7Rii I have found myself bracketing images less and less. There is a plethora of dynamic range information in every file that thing pumps out, which is awesome, but the file sizes are huge! I once bracketed a series of images, ran it through Photomatix, saved it as a 16 bit Tiff, applied the Zone Systems and then saved it. The file was over 1.8 Gigabytes…. yes, 1.8 gigabytes for a single image, not a panorama.
In any event, I found that there was more often than not, enough information in a single RAW file to extract and exploit the dynamic range of the scene to get the HDR look I yearned for. That is not true for every instance, though. I would say my bracketing has gone from all the time with the Canon to maybe 20% of the time with the Sony.
Every now and then I long for that detailed HDR Look that I grew to love from Tone Mapping brackets. Before you say it… I already know, these are first world problems in the order of cameras and technology, but I assure you the struggle is real and I am not alone!
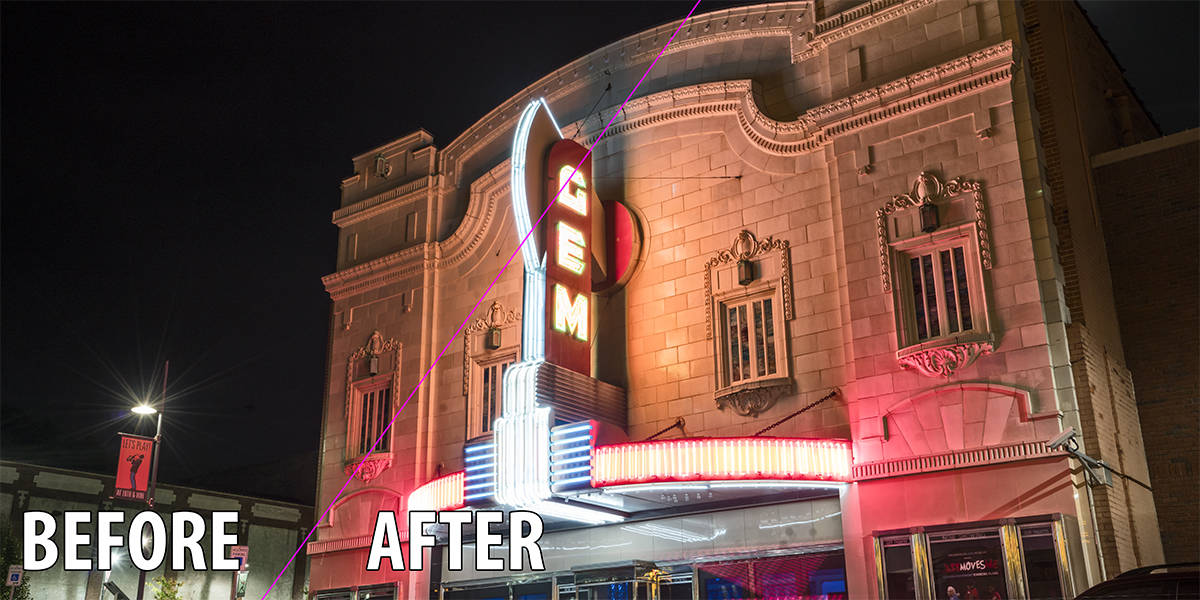
The other day I was processing a photo of the Gem Theater in Kansas City and I wanted that HDR look on the building because the architecture is just gorgeous. I remembered that ON1 had a filter called “HDR Look” so I gave it a go. At first, I wanted to reject it, but then I modified some settings and was dumbfounded by how awesome the effect looked.
There are some things you need to modify to get the HDR Effect Look to look great:
- Apply the HDR Look effect to the MIDTONES Only: With HDR images, one of the biggest flaws comes from shadow noise and tone compressed Highlights. Protect them all together with Apply To.
- Further Protect the Tones: Go into the Protect areas and bring the Highlights and Shadows all the way up to protect the highlights and shadows even further.
- Go Local: Apply brushes to the mask of the HDR Look filter to block out unwanted areas.
- It’s all about the Opacity: Lower the opacity of the filter so it is not as striking at first glance.
- Have fun: Don’t forget to have fun… ever!
Download the Prests
Download the HDR Look Presets demonstrated in this tutorial!

For Blake, it's all about the art and process synergy. He dives deep into complex topics and makes them easy to understand through his outside-the-box thinking so that you can use these tricks in your workflow today!


Just another tutorial. Can’t wait for RAW to arrive.
Wait, I left out the”Great” above.
I still have problems installing your presets. Do you have instructions somewhere?
Thank you,
Ron
The instructions are in the video tutorial right next to the download button.
My bad. Should have seen this.
One more question: How does the “Apply to all” feature of the HDR effect, compare to the new Luminosity Masking of Aurora 2017? Is OnOne making it easier to luminosity mask for us novices?
Thank you,
Ron
Not a problem. I am sorry I cannot answer that as I am not a Mac user and Aurora is only for Mac. When / if they ever make it for PC I will be more helpful.
Yellow washed nastiness, ? another Blakerism like Circus Vomit. Great tutorial Blake ,going to try your technique out for sure. Your a PS master my friend
hehe 🙂 Every once in a while I just say what’s on my mind. That is scary!
Awesome tips Blake! I am a big On1 fan and user also shoot HDR everything, I have been over here for a long while but look forward to doing some more exploring. Cheers!
Thanks for sharing love the video it help a lot and thanks for the presets