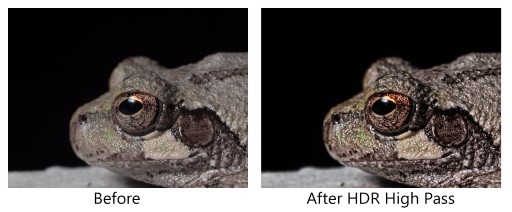
A newcomer to the blog, Larry, asked me to do a tutorial on HDR Toning in Photoshop. I have never shown this on EverydayHDR before because I don’t really care for it as a Tone Mapping engine. I do, however, use it in another interesting way.
There are two ways to use the HDR toning engine in Photoshop. The first being File>Automate>Merge to HDR Pro. This method will allow you to pull in multiple exposures and tone map similarly to Photmatix or HDR Efex Pro. There are 2 big problems with HDR Pro in PS, the time it takes to merge them is significantly longer than Photomatix and the outcome is not to my liking. Some may like it, I do not however.
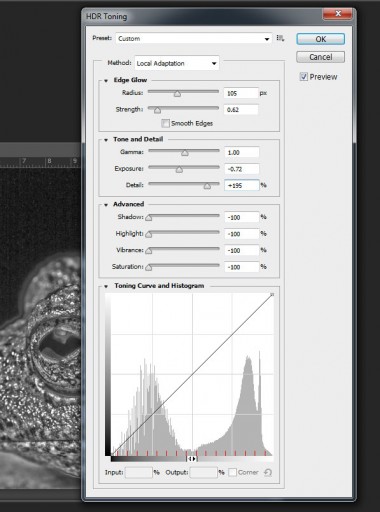
The other method is to go to Image>Adjustments>HDR Toning. This method is great for doing a quick job on a single exposure or incorporating it into your workflow to bring out the detail in certain areas on the fly. I like to use this as a High Pass Sharpen type layer. Look at the before and after pictures below, checkout the quick video, and look at the screenshot to take a mental note of the settings I used for it.


Hi Blake,
Not sure if this is deliberate and you’re taunting us with the idea of another one of your excellent tutorial videos or whether there’s an actual error occurred, but the above video simply displays a “This video is private” message when you click play.
Yours in anticipation,
Simon.
So sorry! Been a long time since I’ve done a tutorial, lol. My program for uploading put it on auto private… ergh!
Hi Blake;
Thank you for the tutorial, It helped me get a proper base for using Photoshops HDR Toning, for my single exposures. I love the HDR look but, it;s nice to know that I can get faster and better results with other programs. Then I will be doing true HDR. Thanks for the shoutout… :O) I will be watching.
Hello Larry, I am a big fan of Photomatix and HDR Efex Pro. HDR Efex Pro has some limitations though with batch processing so my go to guy is Photomatix. I really do not care for the HDR toning in Photoshop and it is a shame, such a powerful program but it really lacks in the HDR department. It is good at making a nice HDR High Pass base layer. Take care Larry!
Great info! Will have to try this.
Thank you Blake
Thank you for this clear and concise tutorial. Good job!
No problem, I am glad you found it useful!