
Tone Mapping in Adobe Camera Raw… Really?
In Photoshop CC you can use Adobe Camera Raw as a filter (Photoshop CC users only, I apologize in advance CS6er’s) and if you are creative enough with it you can do some tone mapping. This may sound odd as Adobe Camera Raw is not HDR software, but there is a way to increase the contrast enough with it to map out your tones like you would with Tone Mapping. While this may not be true tone mapping it does give you a great deal of control over the tones in your photograph, more so than a simple curves adjustment would. However, this requires the ability to think in terms of tone when editing your photos.
Lets look at the Wikipedia term for Tone Mapping particularly the Anchoring Theory of Lightness Perception:
This theory explains many characteristics of the human visual system such as lightness constancy and its failures (as in the checker shadow illusion), which are important in the perception of images. The key concept of this tone mapping method (Lightness Perception in Tone Reproduction[9]) is a decomposition of an HDR image into areas (frameworks) of consistent illumination and the local calculation of the lightness values. The net lightness of an image is calculated by merging of the frameworks proportionally to their strength. Particularly important is the anchoring—relating of the luminance to a known luminance, namely estimating which luminance value is perceived as white in the scene. This approach to tone mapping does not affect the local contrast and preserves the natural colors of an HDR image due to the linear handling of luminance. – Quoted from Wikipedia page on Tone Mapping
The process I will discuss today will do exactly as the this anchoring theory suggests, but with the adjustments in Adobe Camera Raw you have a ton of control over the localized contrast. This style of tone mapping will produce more realistic HDR images that appear natural rather than contrived or pushed too far, but that option is still on the table. for this process I need to teach you to see in terms of tone and understand what happens to colors when tones are applied with Blending Options. Specifically, Soft Light.
What you will learn in the video:
- What the blending Option Soft Light is and exactly how it affects your images.
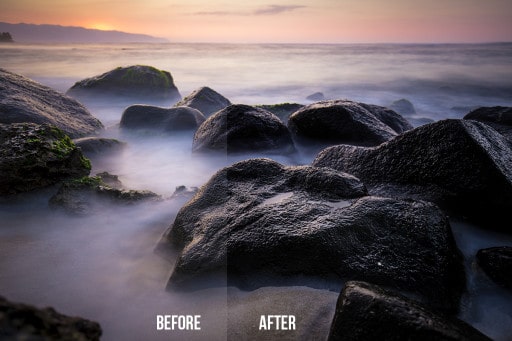
- How to use Adobe Camera Raw to simulate an HDR photo with a natural looking appearance.
- How to use Smart Objects to edit your images in Photoshop
- How to decrease the contrast in the photo using the same principles to create a dreamy or whimsical effect.
Enjoy!

For Blake, it's all about the art and process synergy. He dives deep into complex topics and makes them easy to understand through his outside-the-box thinking so that you can use these tricks in your workflow today!


Fast spoken words (auditory sequencing) is most difficult for me and others like me. I can sequence far better when I watch visually. Unless the visual is too fast, too.
I thrive when I use Lynda.com. Presenters speak moderately. I can stop to review the words below. Are you familiar? Could you use there style for others like me? If so, I think both of us will thrive!
I am a successful high end photographer living in Salem, Oregon… where I sell my images throughout the Willamette valley festivals.
Sure thing, Ron. I try top remain cognizant of my speed. I tend to be fast paced. For that I apologize. While there is no quick fix for this video, you could pause it frequently. I know that is a pain, but hey, this is half speed compared to my older stuff!
Thank you for the constructive criticism, I take it very humbly.
I’m quite new to photography, so I watch a LOT of tutorials!
For what it’s worth, I like the speed you go, Blake. Your videos don’t have the option, but with YouTube and Lynda.com (as examples), you can adjust playback speed to suit your comprehension.
I find that for most tutorials, I have to either download the video and adjust the speed in Quicktime, or (in the case of YouTube and Lynda.com, etc.) adjust the replay to 1.25x or 1.5x. Not yours though.
It looks like you also use YouTube, so you should be able to allow this kind of playback functionality too. In my real job, I’m a web guy…
Ah ha! Great tip. You can slow the embedded video down. I went to half speed, that was hilarious! I sound wicked drunk at half speed!
Brilliant video Blake opening up some fresh possibilities.
I’ll be trying to get my head around this over the weekend.
Many thanks.
Thanks, Keith. Take it slow and one tip at a time. That is the best way to do it. Have a great weekend.
Yet another “outside the box” editing technique. We can depend on you for this and thank-you. Since we’re essentially working in black and white in ACR, I tried using Topaz B&W effects in the same manner blending in soft light. Amazing new tool for tonal adjustment! ACR works a bit faster though.
Very great way of thinking, Scott. Any Black and White processor would work well for it. I just like ACR for the ease of use and overall functionality. I tried a Black and White Adjustment Layer in PS, but it didn’t have the same effect.
What an awesome tutorial! Thank you Blake. You are a great teacher. I really appreciate this tip and your efforts in providing very interesting weekly videos.
Thank you very much, Rod. I am glad you find them interesting. This one threw me off a bit as it was going in a whole different direction at first! Glad it all worked out for everyone.
Great explanation on the concept of tone mapping.
Thanks,Bruce.
More Blake “FM”. (Freaking Magic). Very, very useful. Thanks as always.
Vinny
Haha! FM, I like it!
I would love to see you ducked tape to the wall. Another great video, with alot more learned once again Marla
For another tutorial!
Your tips are greatly appreciated. Helps so much in my workflow.
Thanks, Cathy! I appreciate the feedback.
Hi Blake, like all the others who watch and enjoy your approach and the sharing of your knowledge, I am most grateful. I find it a little fast pace, specifically with your cursor selections. I really enjoy your video’s, to keep learning is to keep living.
Al
I will keep that in mind. With this technique it was not meant for beginner level, but moderately advanced to intermediate. For that I went a little bit faster than normal. I will keep your concerns in mind going forward. Thank you!
Great!!!
Thanks!
One more great tutorial…
Thanks a lot
Thanks!
Very timely, Blake. I’m a bit late to the whole HDR process, so it’s nice to see an alternative process that produces similar results from a single RAW image. By the way, thanks for pointing me to your old HDR from a single image tutorial. Glad to be along for the ride!
No problem! There is still a place for traditional tone mapping methods. This just takes advantage of the existing tone without letting it go to far so it yields more natural results. Glad you are with us!
Thanks for a great tutorial. It’s nice to have better control over tone mapping.
Thanks, Jim. I do agree!
Wow, another great tutorial, thank you so much. I am off to practice and make an action.
Woo hoo! Thanks for the feedback.
Very instructive and innovative, as always. Thanks, Blake!
Thanks, Juan. I appreciate the feedback and you stopping by to check it out.
Another great and informative tutorial as always Blake. Unfortunately I don’t have CC and would like to have seen the work around tips for using CS6.
Thanks, John. There are a few work arounds.
You could make a High Pass Sharpen layer with a very high radius and use a curves adjustment with a clipping mask, this may come close.
You could also use a really midtone heavy curve over top of a black and white adjustment layer set to soft light and manipulate tone through color.
thank for this approach. It’s excellent. I’m one of those dodge/burn guys you mentioned. This method is way better. I’m needing some practice with the blend/if end. I know the procedure; just seem to have issues with getting what my mind’s eye thinks is there.
Thanks, again.
As others have said, another great and informative tutorial.