Welcome Karl Williams to the HDR floor! I am jealous of this guy for three reasons, he writes like a philosopher with a photographer’s mind, he lives in the beautiful land of my idol William Wallace, and his portfolio is INCREDIBLE! Karl knows HDR, he has an impeccable way of capturing the true essence of the scene by controlling his color palette at all times. Take “Waterglass” for example, the dramatic reflection, the excellent eye for complimentary colors in nature, and the best part it is not over saturated! Such a delight for the taste buds!
What equipment do you use for your HDR process?
My hardware is (principally) a Canon EOS 7D with 3 zoom lenses to give me complete focal length coverage between (in 35mm terms) 16mm and 480mm. I also have a Manfrotto 190CX PRO4 Tripod with a Manfrotto 488RC4 Ball Head. Although this could hardly be described as “entry level” gear, it should be appreciated that (as said by, I think, Ansel Adams) that the most important piece of kit for any photographer is the 12” behind the viewfinder – in other words, confirmation of the generally-accepted rule that, irrespective of the relative quality of kit used by either, a good photographer will always outshine a mediocre photographer.
For anyone thinking of getting into HDR, any entry-level DSLR will suffice – providing it has an AEB (Auto Exposure Balance) capability which allows a minimum of three shots to be taken at a minimum of 2EV spacing. A firm tripod is, of course, an absolute essential!
My HDR software is Photomatix Pro V4.0. It may not be the best package on the market, or even the cheapest, but it’s easy to use and, more importantly, has great support – i.e. real people you can contact and who listen to, and act upon, what you have to say. My image processing software is Photoshop CS5.
Was there an image or artist that inspired you to start shooting in HDR?
As far as I can remember, there was no “flash of blinding light on the road to Damascus” – more an increasing awareness of the existence of this technique called HDR which produced attractive results, followed by a period of intense “googling” to find out how it was done and what software I needed to do it. In the course of this process, like many people in a similar position, I was led inexorably towards the work of Trey Ratcliff, the “Godfather” of HDR, and, in particular, his series of readable and informative tutorials. It was from there that I learned the HDR golden rule, namely “Take it easy”.
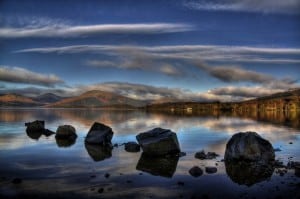
Milarrochy Rocks was quite a difficult image to take and to process. The excessive dynamic range between highlights and shadows suggested that a standard 3-exposure HDR set wouldn’t be enough so I used a 6-exposure set to give me 2EV spacing in the range between +5EV and -5EV. Because, like most cameras, the one I was using (a Canon EOS 450D) only permitted a maximum of 3 AEB shots, I had to shoot two sets of three – which resulted in a bit of unavoidable cloud ghosting (the clouds were moving quite fast) in the sky.
Despite the 6-exposure technique, the processing was far from straightforward in that, no matter how much I played around in Photomatix, I could get the sky right or I could get the rocks right, but not both at the same time. I got around that by creating two differently-tonemapped images: one where the sky was right, and one where the rocks were right. I then merged the two images using layer masks in Photoshop.
On the subject of skies, the principal problem lies with noise: no matter how good the HDR package, the process always generates a significant amount of noise which is always exacerbated by sharpening. This is generally not a problem with detailed areas but is in “bare” areas like skies. Where I’ve got a particularly tricky sky, I generally apply a bit of noise reduction to the tonemapped image (no real need to spend money on specialized noise-reduction software – the CS5 noise-reduction filter is good enough for this purpose) and, by using a layer mask, limit the effects to where I think it’s needed. When subsequently sharpening the image, I use an inverted version of same layer mask to prevent sharpening the “noise-reduced” areas.
All of your images are impressive. While going through your portfolio I found it difficult to pick 4, there were too many to choose from. It must be due to your post processing. Can you go into your post processing a bit?
All my in-camera settings (contrast, saturation and sharpening) are set to zero, as are all the basic settings in Camera Raw. The only thing I check for, and correct if necessary, when converting the RAW images to 16-bit TIFFs for processing by Photomatix, is chromatic aberration. As far as the processing of the tonemapped image goes, it varies from image to image and, to be perfectly honest, I really can’t remember what I’ve done in any particular instance except that I’ve stopped tweaking when I’ve reached the “Hmm – I don’t think I can improve on that” stage. However, given the “zeroing” of all my in-camera and Camera Raw conversion settings, the post-processing almost always starts with adjustments for Vibrance and Contrast (using Curves) and ends with sharpening using the CS5 “Smart Sharpen” filter. In between, I often use the Dodge and Burn tools to lighten shadows, or to give a bit of punch to areas of detail, or to tone down any excessive highlights. Sometimes, to enhance the tonality of the final image, I’ll also overlay a texture which has been Gaussian-blurred to around 200-250px.
Whatever the extent of image processing used – whether it involves a couple of minor tweaks or whether it’s one of those “50 adjustments using 50 layers and 10 overlaid textures” jobs which takes an hour or more – my over-riding aim is to produce an image which somebody will buy to hang on their wall and not an image which displays my prowess at using Photomatix and/or Photoshop. After all, how many people buy Rembrandt paintings because they like his brushwork?
Anything else you would like to add?
HDR is portrayed by some as “The Great Satan”; it is, they imply, an affront to the purity of the photographic process. Whilst the purists have a right to their opinion, and whilst I would defend absolutely their right to voice it, I can’t help but speculate that their forebears probably said exactly the same thing about the burning, dodging and other darkroom jiggery-pokery used by the likes of Ansel Adams.
As the purists constantly remind us, the camera “never lies” and, as a consequence, produces “correct” images of the “reality” that we viewed. Absolutely true – but that is the precise problem: the image retained in our mind’s eye, of a particular scene, is not a correct mirror of reality: it is a composite image manufactured by our brains on the basis of a number of images of various parts of the scene as viewed by our eyes with their instantaneously-variable apertures. Thus, the image in our mind’s eye contains no burnt out highlights and has detail in the deepest of shadows.
“Hang on ..”, I hear you say, “.. isn’t that precisely what HDR does?”. As the lawyers say: I rest my case!
Karl’s Other Places On The Web:



Hello Blake,
I came across your name in a Topaz flyer emailed to me, and thought I recognised it!
I’m still doing the HDR stuff, but I’ve added Topaz into my workflow – and it makes a world of difference.
Trust all is well with you.
Karl
Hello Karl!
Wow! It has been a while huh? Thanks for dropping me a line. I remember those old RedBubble days, you were always there boosting my confidence. I am still going on EverydayHDR. It has been a long road but the travel has been worth it! How are you doing?
Blake
I’ve now retired from my day job, Blake, so I have plenty of time to devote to photography. It’s nice to be able to have a week or two up in the highlands whenever I feel like it.
Awesome! Congrats, you deserve it all my friend! I can’t wait to see your images now.