
Long Exposure Workflow with ON1
Last week I did a live recording of my Long Exposure Workflow with ON1. One thing I love to do is long Exposure photography. There is something about the science behind the capturing of the images that sets me in the zone! Although, I am not sure what I love more, the capturing of the pictures or the editing of them in my various post-processing tools.
In this recorded webinar you will see how I handle my long exposure images while working with ON1 Software. I will cover quite a bit here:
- Thoughts on Long Exposure. Does a long exposure have to be longer than 1 second to be called long exposure? Or can 1/320th of a second be considered long exposure? It really depends on the subject matter.
- Going from ON1 Browse to Enhance to get the image set up for editing in ON1 Effects 10
- Processing the photo in Effects 10. This is where the bulk of the “action” took place. I will discuss the essential workflow elements, Tone, Color, and Artistic Effects. All of these areas can be targeted very easily in Effects 10.
- Going beyond the workflow, I will also show you how I protect the magical waterfall areas from destructive editing using masks and Luminosity masks.
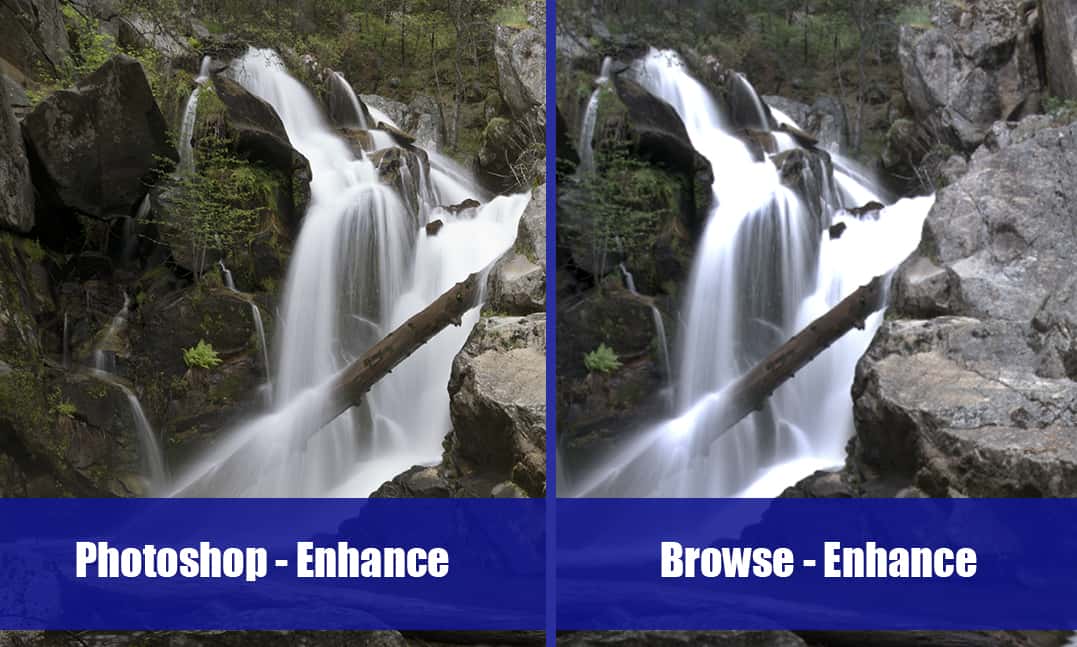
In the very beginning, I had some issues with highlight blowouts in the photo. I didn’t want to disrupt the webinar any longer than I did so I pressed on. A risky move, but it turned out alright 🙂 I have an explanation for you below. Sit back, relax and enjoy a cup of java (or tea if you are like me) while you dig into the Long Exposure Workflow with ON1 Webinar.
The ON1 Photoshop Anomaly
What the heck happened to those blowouts in the Webinar? I figured it out. Apparently, you will receive different results on your image if you open it in PS first then go to Enhance through the filters. I prepped for the webinar this way, then did the Webinar through Browse. My results were very different! Here is a detailed video explanation.
Long Exposure Workflow in ON1 Notes
Stuart Kincade of Big Mountain Photography took these notes and emailed them to me. It is a nice play by play of the webinar, thanks, Stuart!
RAW into ON1 Browse
Image processing to protect the “streaky” lines in the waterfall
Go to ON1 Enhance – Tone
- Start Here
- Drop the Highlight Slider to increase contrast in the Waterfall, WF
- Open the Shadow Slider for more Dynamic Range
- Boost the Temp Slider to bring in warmth
- Note: Water tends to retain a blue tinge to it
- “Rapid Slider Syndrome”: Full Up / Full Down to allow your eye to capture the moment it looks right.
Go to Effects – Add Filters
- HDR Look Filter – Tone
- Boost up the Compression Slider to open up the Shadows/Highlights and Detail
- Adjust the Detail Slider up to taste
- Highlights Slider down
- Shadow Slider down
- Tone Enhancer 1 Filter – Tone
- Target is to close down some of the areas of Highlights and Shadows from the HDR boost
- Hit “Auto” to reset to zero
- Bring the Brightness Slider up to taste
- Drop down the Shadows Slider to close off
- Up/Down the Highlights Slider looking at the Histogram for blow-outs
- Up/Down the Whites Slider looking at the Histogram for blow-outs
- Up/Down the Blacks Slider looking at the Histogram for blow-outs
- Leave Compression/Detail Sliders alone as already addressed in the HDR Look filter
- Set the S-Curve to taste: Darken the Shadows, set mid-point and Lighten the Highlights for contrast
- Tone Enhancer 2 Filter – Tone
- Used with lLuminosity Masks
- Right click on the Mask Icon and create a Luminosity Mask
- Right click on the Mask, go to View Mode and click on Gray Scale
- Areas of White are affected, and areas of Black are not affected by the Luminosity Mask
- To protect the waterfall (Highlights) need to invert the mask to adjust the Shadows to Mid-tones only
- Press the Invert Button
- O Key for a Red View Mode
- Adjust the Highlights Slide which only affects the highlights of the Shadows approaching the Mid-tones
- Adjust the Whites Slide which only affects the highlights of the Shadows approaching the Mid-tones
- Adjust the Blacks Slide which only affects the highlights of the Shadows approaching the Mid-tones
- Don’t use the Details Slider as it will bring noise… back into the Shadows. Already addressed in the HDR Look filter
- Back to HDR Look Filter
- Add a Mask then brush out the waterfalls again to protect the highlights from the adjustment
- Mac: Hit OPT to alternate from brushing in or brushing out
- Color Enhance Filter – Color
- Temperature Slider up to bring in warmth
- Tint Slider to up to bring in Magenta for Browns
- Color Range
- Bring up the Saturation Slider all the way up to see what are the dominant colors
- Select in the dropdown of Color Range the dominant colors to adjust one by one
- Adjust the Hue, Saturation and Brightness Sliders individually to taste
- Saturation is like paint directly out of the tube.
- Add black or white paint to darken or lighten in Brightness
- Add another color to shift Hue
- ON1 Green Slider (H/S/B) is better in bringing out greens than LR/P
- Glow Filter – Artistic Effects
- Make a deep Glow by pulling up the amount
- Change the Blending Mode to Luminosity
- Make a Luminosity Mask
- Invert Mask it to protect the Highlights by adjusting only the Shadows approaching the Mid-tones
- Adjust Opacity to taste
- Vignette – Artistic Effects
- Must be so subtle that a viewer can’t notice it
- Maybe the Subtle Preset
- Or, drop the sliders all the way down on Brightness, Size, Feather and Roundness
- Now in the reverse order, Roundness, Feather, Size to Brightness adjust to taste
- A Viewer’s eye goes to the highlights first in the image
- Need to protect the Highlights to avoid Tone Compression by hitting the Gear Icon and adjust the Highlight Slider up
- Same for the Skin Slider, which can protect the Mid-tone areas.
- Sunshine Filter – Artistic Effects
- Artistic Look for punchiness
- Glow Slider bring up
- Saturation Slider bring up
- Hit Gear Icon to Protect: Highlight Slider up and Skin Slider up for Mid-tones
- Add Mask and right click for a Luminosity Mask
- invert Luminosity Mask to restrictively apply the Sunshine Filter

For Blake, it's all about the art and process synergy. He dives deep into complex topics and makes them easy to understand through his outside-the-box thinking so that you can use these tricks in your workflow today!


