Well, now that I have figured out the inner workings of the new updates to Photomatix 4.0.1 (I know, I am slacking), I can say there is no excuse for a windy day and HDR. Most windy days yield a hell of a lot of movement in trees, water, bushes, hair, and sometimes light poles. We know that any movement in a multiple bracket set of images will produce ghosting during post processing in Photomatix. In previous versions the de-ghosting feature was decent, but it still left little lines behind the movement. These lines were time costly to clean up in Photoshop. Good news! All of these frustrations have been nearly nullified with the new features in Photomatix 4.0.1 with this nifty trick called Selective De-Ghosting. Is it perfect? Not always but its is a hell of a great start!
Selective De-Ghosting In Photomatix 4.0.1
- Select your bracketed set of images and pull them up in Photomatix. My preferred way is to select all five and drag them into the panel, it saves time from pressing that Load Bracketed Images button. Many times I drag the images straight to the Photomatix icon.
- The usual pop up screen will come up, select OK for the Generate HDR-Selecting Source Images and leave the “Show intermediary 32-bit HDR image” unchecked, unless you really enjoy that muddy looking 32-bit image prior to Tonemapping.
- In the Pre-Processing Options ensure Reduce Ghosting Artifacts is selected and set to Semi-Manual, and select OK!
- Photomatix will start converting the files as usual. This could take up to 4 minutes depending on many variables i.e computer speed, how many bracketed images you are selecting, and whether or not you are downloading something you shouldn’t be… uh hmm..
- About 60% of the way through the processing, Photomatix will stop… what did you say... Yes it will stop to ask you how you want to select your de-ghosting.
- At this time you can either continue to follow my tutorial, or you can read the directions in Photomatix. Please humor me and continue to follow MY tutorial 🙂
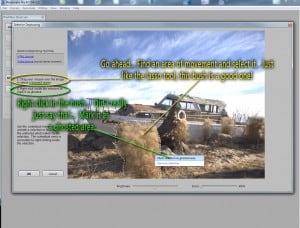
- Photomatix tells you to use your mouse to select areas of movement. This is EXACTLY like using the lasso tool in Photoshop.
- Once you have made a selection, right click inside of the selection and mark selection as ghosted area.
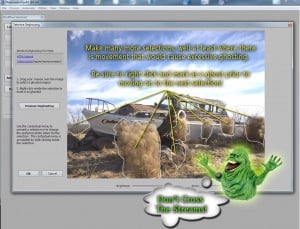
- Continue to select all of the ares of movement.
- You have to select each one individually, one at a time, and right click before moving onto the next one. Unlike Photoshop where making multiple selections can be accomplished by holding shift between selections.
- You can preview how the image will be effect by pressing the Preview Deghosting button.
- Once you have selected all of the ghosts select OK and allow Photomatix to finish processing.
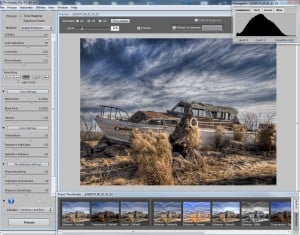
- Now it is slider bar heaven as usual!
- Press Process and move onto Photoshop for the remainder of your Post Processing.
- Pretty simple huh?
- Now, it isn’t always perfect, kinda like life and most expectations, but it is a great start!
- No more single image HDR excuses due to ghosting!


