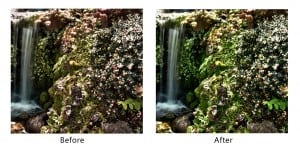
Have you ever taken a ton of pictures and found out you forgot to set the white balance? Have you ever taken a picture with Auto White Balance selected and not received accurate colors? Both of those questions are yes for me. More often than not, my white balance is wrong. I am horrible at remembering the white balance adjustment. With all of the other camera settings going on with HDR shooting how can you be expected to remember all of them. Have no fear many programs have a way to accurately fix your white balance with the click of a button. I will show you one way in Photoshop. This is the quickest and sometimes best method for me, however, it is not an end all method by any means.
Quick White Balance Adjustment:
- Open your photo in Photoshop.
- Create a levels adjustment layer, if you are unsure, click that link.
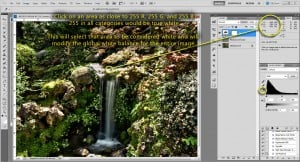
- In the levels adjustment panel, click on the little white eye dropper.
- Hover over areas you think to be white with the white eye dropper tool.
- Watch the numbers for R, G, and B in the info tab (F8 toggles the Info tab). You are looking for all numbers in all 3 categories to be as close to 255 as possible. 255 R, 255 G, and 255 B are considered true white.
- Once you have found an area comparable (I would say between 235 and 255) left click that area.
- Your image will magically receive a white balance make over!
While this is not always a tried and true, set in stone, concrete method of achieving white balance in Photoshop, it sure is a darn good start.
 One thing you may want to invest in is a certified white balance card. I have a Whibal card which is very handy. To use it, throw it into the picture, snap a shot of it in the scene, and remove it for the next series of pictures. You will need to shoot the Whibal card again when your lighting conditions change. When it comes time to post process your work, open the Whibal shot in Photoshop, create a levels adjustment layer, click on the grey dropper this time, and select the light grey area on the whibal card. You can now drag and drop that levels adjustment layer onto every picture that has relatively similar lighting conditions.


