
STOP slammin’ sliders when you reduce noise
It is a common theme when you reduce noise to do the random slider slam. I get it, heck I did it to. And why is that? Well, it is because the sliders have some interesting names that don’t really tell you what they are doing. Luminance, Luminance Contrast, Color detail, Color Smoothness, they don’t give us a good idea of how they actually work.
Lately, I have been experimenting a lot with the noise reduction capabilities in Adobe Camera Raw (similar to Lightroom). I found that they are very powerful if you know what you are doing. On the other hand, if you just do the random slider slam, you may be doing more harm to your images than good. In most applications, I don’t find myself needing to do much noise reduction, so I have been taking photos that
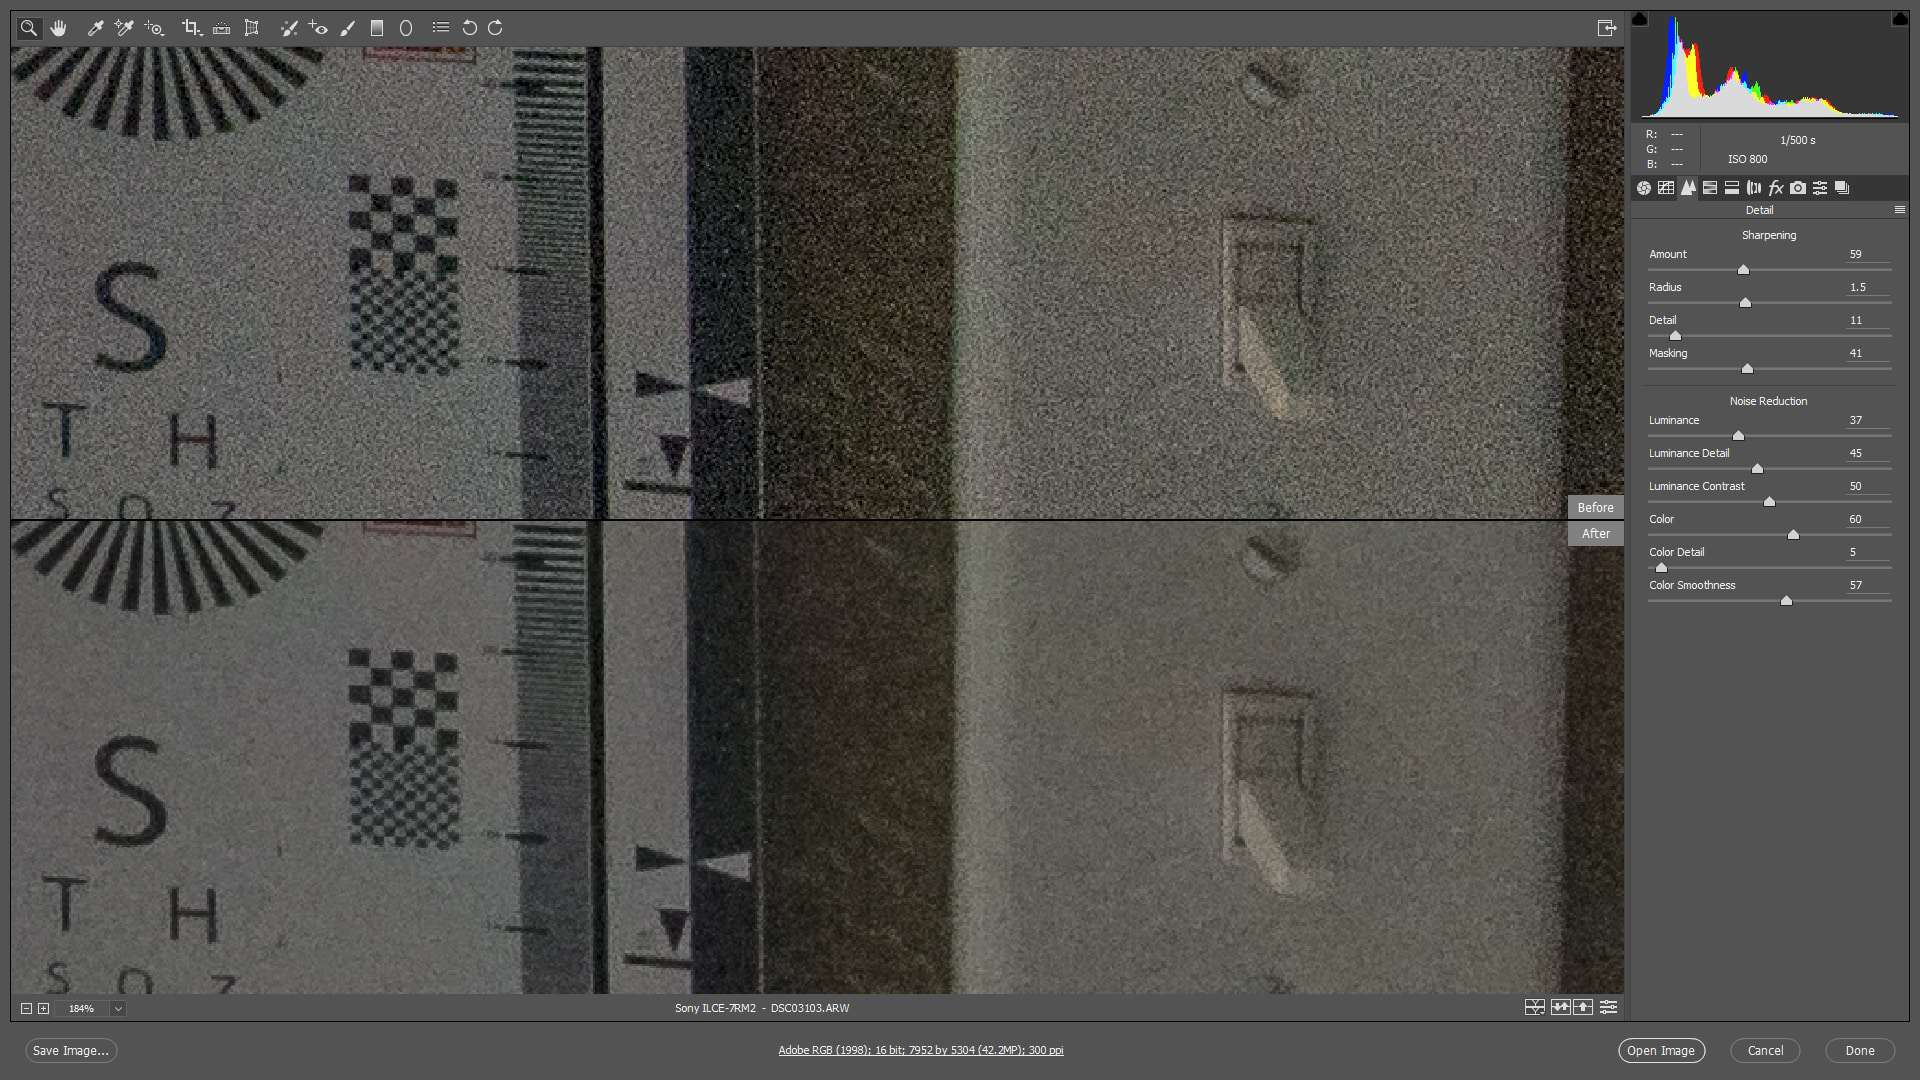
In most applications, I don’t find myself needing to do much extreme noise reduction so I have never taken the time to really dig deep into the sliders affects. In the tutorial today you will see that I am using a very boring image to conduct my experiment. It is not a robust night shot of the milky way or a fantastic landscape. It is a picture of the view from my office door, but the elements in the photo are very helpful in understanding the Noise reduction sliders.
In this tutorial, I will break down every slider in the noise reduction window, tell you what they do, and even give you some practical tips on what to look for. In a nutshell, here are of the sliders in layman’s terms.
Noise Reduction Sliders and their meanings in the form of a question:
Throughout the noise reduction process, be sure to use the ALT or Option key to see what the effect will look like in the greyscale. This makes it easier to see what is happening to the photograph.
Noise Reduction:
- Luminance: How much do you want to smudge or blur the noise?
- Luminance Detail: How much detail do you want int he blurred noise? (setting this too high will compete with your Luminance setting)
- Luminance Contrast: How much depth do you want in your noise? (increasing the contrast will add depth to highlights in the noisy areas)
- Color: Do you want to get rid of the green, red, cyan, and ugly dots in your noise?
- Color Detail: How much detail do you want in the noise color?
- Color Smoothness: How smooth do you want the color noise to be? (increasing this to a high amount could blur other colors in your photograph, use lightly)
Sharpening:
- Amount: How sharp do you want the whole photo after reducing the noise?
- Radius: How far do you want the sharpening to spread in terms of the surrounding area of the sharpened pixel? (the overall growth of the sharpening effect)
- Detail: How much detail do you want to add to the pixels? (this will increase the contrast on a pixel level and ould make artifacts if taken too high)
- Masking: What do you want to be affected by the sharpening? (Move this up to protect big areas and only sharpen outlines)

For Blake, it's all about the art and process synergy. He dives deep into complex topics and makes them easy to understand through his outside-the-box thinking so that you can use these tricks in your workflow today!


Blake, thank you continuing to share your knowledge!!
No problem! It is truly my pleasure!
Blake, as always you presented this subject in an easy to follow and logical manner, made simple by an instructor that really understands his subject. One comment…since we follow along in a browser, please slow down on your constant moving of the sliders. Give them time for the effect to come through. It doesn’t translate in real time like we would prefer to see. Thanks again…
Great, great set of concise explanations.
Thanks, Dave.
Thanks, much better understanding and more pleasing results!
Blake, thank you for sharing this. These are the capture sharpening settings I use that work very well. It’s the same approach that Mark Metternich uses.
Amount = typically 30 but it depends on the image
Radius = always 0.5
Detail = always 100
Masking = anywhere from 0 to 25
Thanks for sharing! I don’t tend to make presets for noise and sharpening because each photo is so different from the last. However, that might be a great starting point.
Thank you for the great tutorial. Your explanations have really helped me understand how to do this.
Awesome! I am just glad I could help.
I like your methods of explaining why things are done. This is an area that i’m familiar with but it’s good to go over and listen to another persons point of view. no one can ever know everything
I agree, you can never hear the same thing too many times, especially from different sources.
Ditto here, Ron. Blake has such a wonderful, generous, inspiring way of sharing his knowledge, doesn’t he? Even when he is covering a topic that I think I already “know”, I always learn something valuable. Please keep it up, Blake!
Will do as long as you keep watching ?
Thanks for that explanation Blake. I love the Sharpening and Noise Reduction in ACR/LR and use them all the time. A question popped up while I was watching this: Can I apply this effect (noise reduction and sharpening) by selecting the shadows in an image instead of the whole image? And how would this be done? Do I have to select and then apply the ACR filter in PS CC to that selection? I guess that is more than one question, but you know how our minds work!
Thanks in advance.
You can! I would use ACR as a filter in its own layer, run the noise reduction, then use blend if to protect the mid tones and highlights of the underlying layers. I like the way your brain works!
Thanks for the information in this tutorial.I think I understand what Joe is saying here, but I don’t quite understand your answer about using ACR as a filter. Can you elaborate?
Blake,
Thanks for a really great Tut. I have deliberately not used the detail section because I could not see or understand what I was seeing when I did try it. I will now go back with a lot more understanding and hopefully gain with experience.
Thanks again
Woot! It was my pleasure. Thanks for watching!
Hi, Blake — Thanks for another “enlightening” tutorial! Question: I have learned from other tutorials (as a Rule-of-Thumb) that one should always leave any Sharpening until the end of one’s workflow, because any Transformations done during that workflow would distort or displace the preliminary Sharpening effects. Does this Rule-of-Thumb not apply to ACR Sharpening, or should one still wait until the end of one’s workflow to apply ACR Sharpening?
VERY VERY useful and easy to understand !!
Thank you!
I may have an idea for you for a future tutorial. that would be removing sun / lens flair from a photo. I thought of this because Kelby community had a question regarding this but the person had a jpeg version. the photo was of 3 woman under a tent with the sun obviously behind them with the background blown out and the flair spilling over onto 2 of the 3 women. That was an extreme case but it still sparked an idea. I tried doing a dodge and burn and frequency separation o the photo to so degree of success but not much. btw good job on the ON1 Raw tutorials.
Thank you. There are so many was to do that. I would have to see the image you are referring to. However, my go to is usually a selective curves adjustment.
Thanks, as always, Blake for such a thorough tutorial. Now I have a question on the position of noise reduction in my workflow . . . I’m reworking a lot of old images, using your pseudo bracket action to create multiple exposures from a single image for tone mapping in Photomatix. Prior to the Action, I do minimal noise reduction in ACR on the master image. After Photomatix, in Photoshop, I use noise reduction in your Zone System Express panel. Now I’m thinking I should do more extensive noise reduction/sharpening in ACR. Any guiding thoughts?
That is a messy can of worms. It really comes down to the amount of noise in the original images. The zone system noise reduction is very mild compared to what I showed here.
As always very informative and easy to understand.
well done Blake ??
hello there is a program in nik collection called Dfine 2 and i find it great for getting rid off noise thanks for sharing your video
OK thank you for the tip! I will look into it.
Learned… thanks. Seems to me this technique could help some with noisy jpg artifacts.
It might help with jpg artifacts. But this technique is really for high ISO and “cleaner noise.”
I’ve used LR for nine years but never felt I was using the Detail panel to its potential. Most material seemed to avoid really digging into it. Today’s video is the first demonstration of slider purposes and interrelationships that was explained clearly enough to be useful. Well done, thank you Blake!
Thanks, Susan! I am just glad I could help 🙂
Thank you.
A nice video on an important subject.
Surprised you did not mention NR within the individual RGB channels. Might be of some advantage in avoiding NR image blur.
In future vids, would appreciate your adding On1 Photo RAW 2017 to the mix. Might be transitioning to this as product matures.
YEs, definitely something to cover in the future. This tutorial was on ACR NR, which does not allow for individual color channel reduction.
Hi Blake,
Excellent tutorial as always. I pretty much do the same things you described. One thing I do a little different is once I notice the noise in a photo (I only do this when shooting in low light) I set the Exposure slider to 2.50. Put saturation to -100 and then move the luminance slider until I get just a small amount of noise left. Then add a slight Contrast and Detail to taste. Then I put the saturation slider back to 0. Then adjust Color slider to remove the color noise. The use a small amount of detail and slide the smoother slider until the patchy look disappears. With Sharpening I do the Masking last, but after watching your tutorial, I think I’ll adjust the Masking slider first to darken the areas, I don’t want sharpened.
Thank again .. Good Stuff!
Blake, your tutorials are always THE best of all I can find. But this one is a real eye-opener!
Thanks Serge!
I agree with several of the comments. This is the only useful explanation of the sliders that I have seen. Great help for all viewers!
Awesome! I am just gladI could help! My work here is done 🙂
Blake, would you think about sharing the RAW file?
Sometimes I work in Lab space and get interesting results, especially with Chroma noise.
It might be worth seeing an independent comparison of efforts.
Always enjoy your tutorials!
Thanks for the consideration.
Sometimes I share the Raw file, but in this case, it is easy to replicate by opening a door and taking a picture. The plus side to that is you can use the knowledge on a slightly different image. Not all the settings will be the same.
Thanks, Blake for the awesome video. Learning about how to use the Alt key with these sliders is great information and so helpful. Keep up your amazing work!
Blake, thank you very much. That’s the best explanation of the Noise and Sharpening controls I have ever seen in a number of years experience with LR/ACR!
As always, a very informative, detailed and user friendly explanation. Thanks.
As usual you make it all seem so simple and logical. I’ve been using Photoshop and Lightroom for years and never had a clue.
Thanks so much for the fantastic tut.
Could you tell me how you zoom in by selecting the area you want?
Are you holding a key down as you slide your mouse/pen?
Yes. Press ctrl+space bar (cmd on mac) then click and pull the mouse into it. Release the keys and it will stay zoomed in.
Hi Blake,
Trying to sign up for Upgrade Your Photoshop Toolbox on your Home page but I keep getting a Configuration Error???
Sorry about that. I am working on it now. If you open the site in a new browser you can signup via the pop up. I do apologize.
Brilliant Video thanks. Learnt so much from that. I am one of those slam the sliders up guys but going to think again about that in future !