
Sharpening and Noise Reduction at the Exact Same Time
For years I have received emails about the proper way to sharpen and reduce the noise in your photos. Some people say sharpen at the end and do noise reduction at the beginning. Others say to use the same parameters in presets for every image. And some avoid the process altogether because it is not necessary.
No matter how you look at it, Noise Reduction and Sharpening are a necessity when you shoot in RAW. Your camera set to JPEG is going to do a great deal of both to make that picture look good. However, in RAW, it is just RAW Data that has not undergone any filtration.
In perfectly exposed images where the subject is in tack sharp focus and the ISO is low, noise reduction and sharpening are less important. But there are times when you find that you must pinch out every ounce of aperture and increase that ISO way up just to snag a decent shot. Should you miss it just because your ISO was high and your image isn’t perfectly sharp? No way!
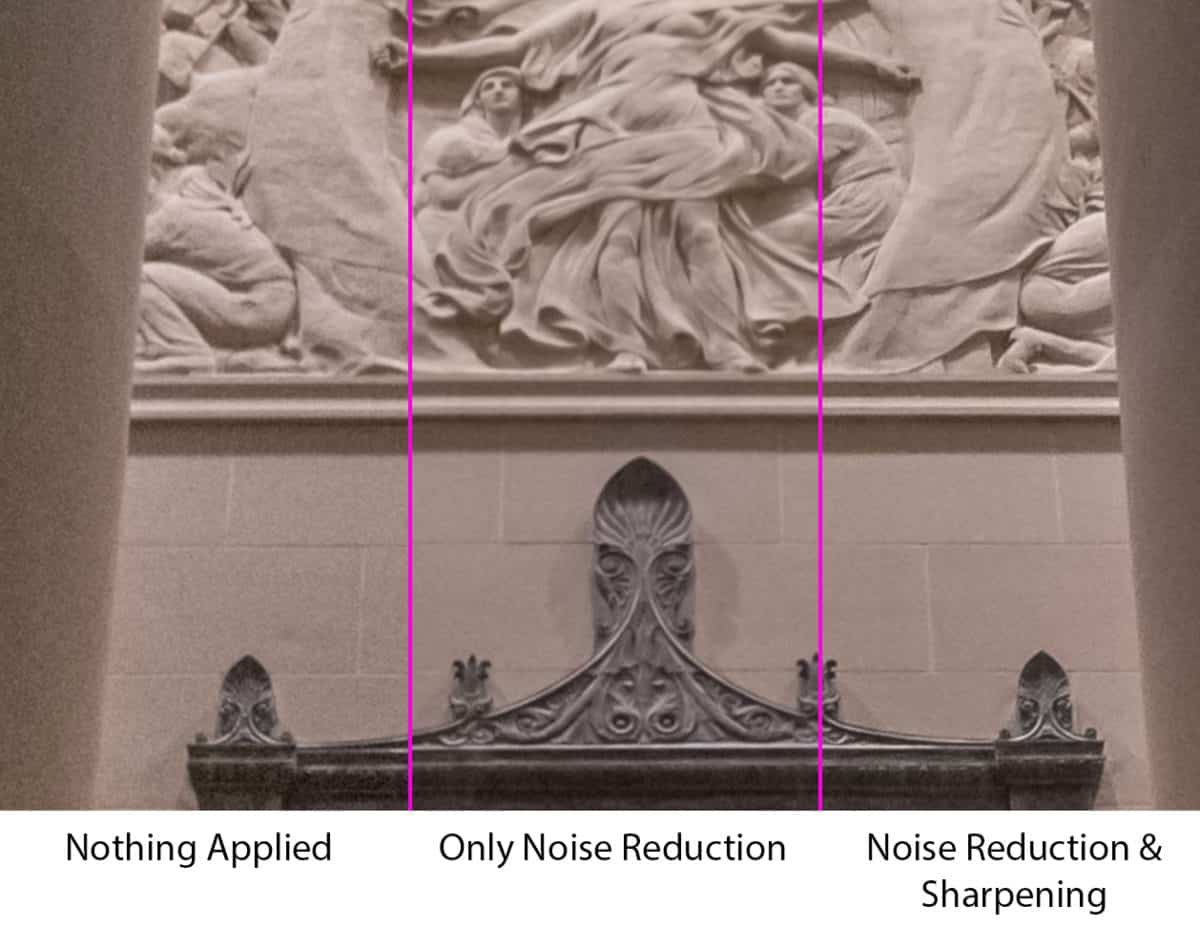
Last week I was out with Jim Welninski, he came out to visit in Kansas City, and we had a blast shooting at the Nelson Atkins Museum. When we got to the museum on Friday it was pretty late and the sun had already gone down, but the Nelson Atkins is a gorgeous structure both inside and out so we decided to shoot it. We left our tripods in the car because we were going to enter the museum, and we all know tripods and museums don’t mix! That meant we had to hike the ISO pretty high to shoot the exterior handheld with no sunlight.
As I was going through the pictures I thought they would be a phenomenal teaching moment. While I was in ACR the idea of sharpening and noise reduction really came to mind because the image really needed it and quite honestly, would have lost its luster without it. I would hate to see you throw some images away without giving this Noise Reduction and Sharpening technique a try.
You can follow the tutorial at the top of the page, or follow these steps. I am not going to put slider values in these steps because every image is different. However, you may use these steps as a starting point:
- Drop the Sharpening sliders down to zero… all of them! Afterall we do not want to be reducing our noise reduction efforts while seeing our sharpening, that would not be helpful for either.
- Address the Luminance and Luminance Detail. I tend to keep these pretty close on every photo. Whatever Luminance Detail I set, I usually set the Luminance to half that. So if 50 for Detail, then 25 for Luminance.
- A Healthy dose of Color Noise Reduction and Color Detail is a good idea. Most of the “noise” in noise comes from the color. Reducing the color noise all the way can usually produce what looks like grain rather than noise. Sometimes I just reduce the color noise a great deal and call it a day if I like the grain that is leftover.
- Now you can address the Sharpening, but start with the Mask FIRST! The mask slider has this mysterious hidden hot key. Pressing Alt (Option on a Mac) will show you where the mask is affecting the photo. Hold that hotkey while you drag it over and when all of your detail is in white and your smooth surfaces are black, you should be good to go!
- Hit the Amount, Radius, and Detail simultaneously. There is no magic bullet setting here. I use these three at the same time and dial in my sharpening with them as a set of sliders rather than individuals. Amount is how powerful the sharpening is going to be. Radius is how many pixels around the sharpened pixels is going to be, the smaller the number the more subtle the sharpening. Detail is the amount of contrast between the sharpened pixels, or how light and dark those pixels are going to be as a result of moving it.
There is no magic bullet here or magic number. I tend to rest on the side of caution and make my adjustments more subtle in nature. As for when to do them, beginning or end? Well, I tend to do it in my ACR workflow, but you can squeeze it in wherever you are comfortable.

For Blake, it's all about the art and process synergy. He dives deep into complex topics and makes them easy to understand through his outside-the-box thinking so that you can use these tricks in your workflow today!


Thanks Blake, I always appreciate your good work! Keep ’em coming.
Thank you Blake . I was useing noise reduction and sharpening tool without knowing the purpose of each slider not I can use it effectively . Can explain once the process is done how to apply changes to entire batch of images
You could always make one image adjustment, then apply and sync it to all the others, but take a look at them. Are they as sharp as the base? Are they blurred more or less than the base? You have to make a judgment call as too what you believe over or under sharpened is. I tend to go toward the side of subtle caution.
Thank you, Blake. Excellent explanation.
Thank you for this awesome information.
Thanks Blake. Excellent explanation of the process. One of the additional things I found is that after noise reduction and then sharpening, I will apply sharpening to the area needed and then use the alt key on the radius and detail sliders also. Doing this, I can see precisely where the “too much” factor happens and adjust slightly below that point. Is that a good process?
Absolutely! I love it, the ALT key on the Radius does a great job of showing you what pixels are being affected. I missed that detail here 🙂 thanks for bringing it up.
Thanks Blake. One question which you did not address. Adobe has published advice for Lightroom that in the Develop module you work from top to bottom in the righthand panel. That never made much sense to me. I think you need the camera calibration and lens corrections first, and they are near the bottom. Then WB and exposure adjustments. Should we follow exposure adjustments with the sharpening/noise reduction? Do you only do sharpening and noise reduction before exporting when you know what you are doing with the image, or do you do it once in edits, and then more in the export dialog box? (Website provided is still in production.)
I don’t like hard and fast expressions like “only” and “always” because it changes depending upon the image. I also don’t always use the camera calibration or lens corrections either. I think a lot is up to the photo and I tend to be more subtle.
What I showed here was my baseline NR and sharpening that if I am going to do it (typically on High ISO images) I do it like this. But, honestly, there are a lot of times I don’t even come into this section to edit. It is really image dependent.
nice tuto !
what is the best NR today :
– lightroom/ACR
– nik dfine
– imagenomic noiseware
– noise ninja
– DXO PRIME
– luminar
– topaz denoise
– …
?
kind regards
marc
I don’t think anyone software is the best really. They all have their purpose and it really boils down to what works best for you in your workflow. For me, it is ACR
That. Is. Awesome!
I feel a bit of a spanner cos I was pretty much randomly playing with the sliders to see if anything worked, and ignoring the mask as I didn’t know the ALT key tip. Took a few high ISO images out of the reject pile to give it a go just now and….BOOM.
Thanks Blake!
Happy New Year.
🙂 I am so excited! Such great news, thanks for letting me know.
Thank you Blake,
Great explanations on what the each of the sliders within Noise Reduction and Sharpening actually do. I have seen many videos on these topics or the video host just dialing in his preferred settings without explaining why. I consider myself a pretty advanced LR user and really like the Mask feature in LR and ACR as for one thing, you can remove the sharpening on a sky or other smooth objects.
Historically, I have used PS mainly for removing distractions, but have recently enjoyed the power of the Zone System Express 4.0. I have even used the Sharpen feature in ZSE4.0. What’s your recommended workflow when it comes to sharpening using ACR when you also use PS and ZSE4.0 in your workflow? Are there times when you prefer sharpening in ACR vs. ZSE4.0.
Absolutely! I like to use ACR for my basic NR and Sharpening. However, the ZSE4 has some killer sharpening tools in it, especially the Dynamic Contrast 2 that I use VERY selectively toward the end of my workflow. I use masks to target what I want to be more sharp than the rest of the image.
Thank you Blake!
I need to try Dynamic Contrast 2. I have effectively used Enhanced Contrast 2 and Sharpen in ZSE4.
Blake, thank you for the simple but effective explanation.
I use a Fujifilm X-T10 and I was told, that because of their X-Trans filter, Lightroom uses an other algorithm for the detail sharpening, compared to a Bayer filter. But this algorithm only starts to work if the detail sharpening is increased to at least 60. Mostly these authors increase the sharpening detail between 80 and 95. Can you confirm this?
TO JOE :
hallo joe,
what do you mean by “using alt key for radius in local sharpening” ?
there is a single location for radius in detail in sharpening global adjustment
local sharpening as you describe, for unknown reasons, doesn’t have its specific radius and detail sliders so you must choice at start in global adjustments if you focus on low or high frequency details. this is a huge limitation of lightroom sharpening
marc
I love your videos, they are so clear and easy to follow. Keep ’em coming.
Hi Blake, thank you again for the excellent explanation of noise reduction and sharpening using ACR. I think this way is better than some sharpening plug-ins for most of my high-noise images. I find especially the Masking slider (with button alt) of Sharpening most effective to control area that need/no needed sharpening. Saving my work of creating additional layer ontop and paint over the white with black brush to mask away unwanted sharpening.
Thanks again and keep the good tips coming.
I agree, I rarely use plugins anymore for noise reduction or sharpening. Adobe really stepped up their game!
Excellent advice on ACR sharpening. This has to be the best explanation of the relationship between Noise reduction and Sharpening I have ever seen. It’s going to make a huge difference to how I do my sharpening from now on.
Very cool to hear. Thanks for watching ?
Insightful and informative as always, thanks a lot Blake. I too had a couple of questions, but reading the comments above I see they’ve already been raised and answered!
Awesome! Glad we could all help!
Very nice presentation. I use ACR & PS for most of my images. If I use the techniques you have presented here is there any reason to use any of PS’s sharpening capabilities such as unsharp mask?
Hello Blake,
As mostly, again a very interesting tuto! As I struggled a lot with noice and sharpening, this tips could really help. I’ll try it asap!
HNY for everyone!
Thanks, Blake, that made it much clearer. Do you use this at the beginning of your workflow or on a stamp of the finished image at the end, or either/both?
It’s an either situation. Most of the time it’s at the beginning
How do I hit Amount, Radius, and Detail simultaneously? I mean physically how is that done?
Very thought out explanation with visuals. My kind of learning!