RAW vs JPEG
JPEG
If you are not shooting in RAW you should really consider it for several reasons. Let me first walk you through the adventurous life that a photograph travels when you shoot in JPEG. Every camera runs an image through several filters prior to compressing a JPEG, these filters include but are not limited to:
- Color Correct
- Noise Reduction
- Exposure Correction
- Contrast Correction
- Saturation Adjustment
- White Balance (if you have auto selected)
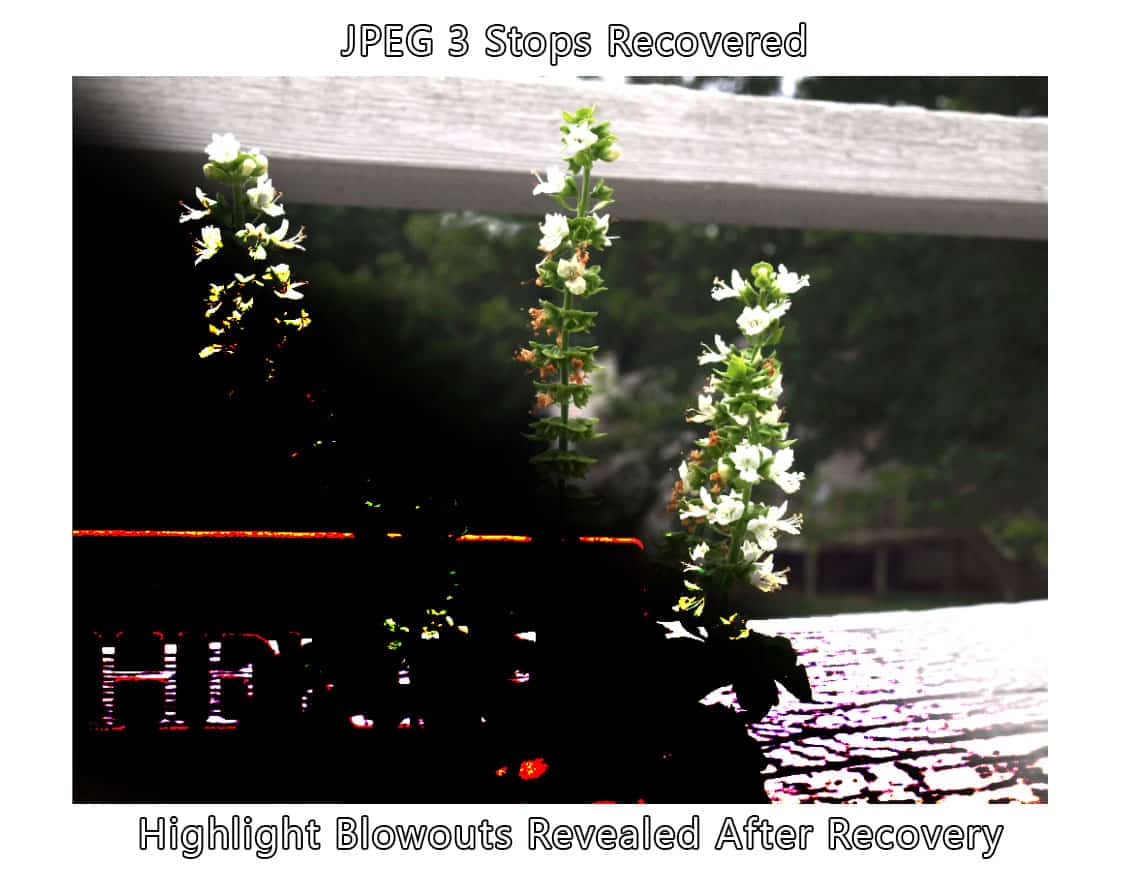
The areas showing through the black on the left reveal the highlight blowouts from the recovery of 3 stops of exposure.
Sounds awesome right? You mean to tell me that my camera is doing all of this stuff for me when I shoot in JPEG and to top it off it saves it as a compressed file alleviating much of my space issues? Awesome…. it is, until you get yourself in a tricky situation, a situation where the shot you took was underexposed by 3 stops (it looks very dark). This happens all the time, even when you look at the back of your LCD. That screen is so small it makes it very difficult to accurately troubleshoot photos on scene.
If you take an underexposed JPEG into Photoshop and try to recover the exposure many times you will find a mess of JPEG artifacts and horrible color issues, blues where blacks should be and massive amounts of color noise (especially in shadows). There will also be a large amount of highlight blowout, take a look at the image to the right. Another downfall is White Balance, it is very difficult to recover a bad white balance on a JPEG without seeing image distortion and unwanted noise. I am not saying that you cannot recover a JPEG, I am simply stating that the quality will many times be compromised.
RAW
So we have discussed some of the trials and tribulations of shooting in JPEG, now let’s take a look at RAW. If you have never shot in RAW it is difficult to fathom without a bit of explanation. First of all, those filters that are applied during JPEG compression no longer happen. There is no noise reduction, color correction, or any of the items listed previously.
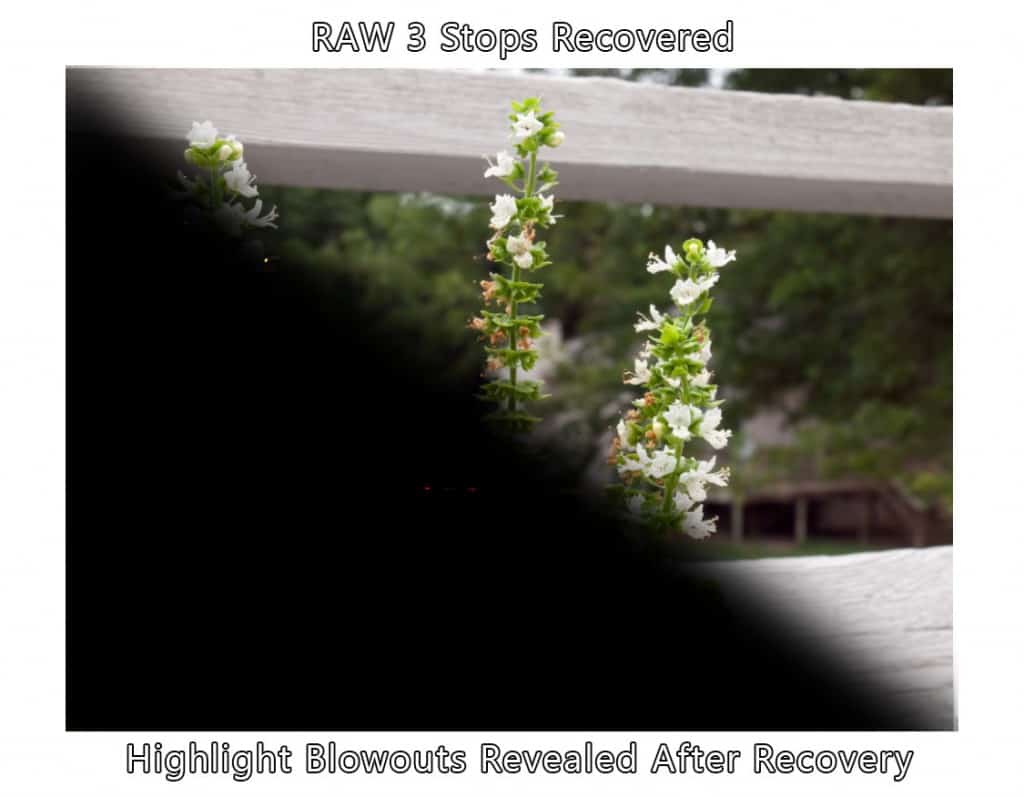
The areas showing through the black on the left reveal the highlight blowouts from the recovery of 3 stops of exposure.
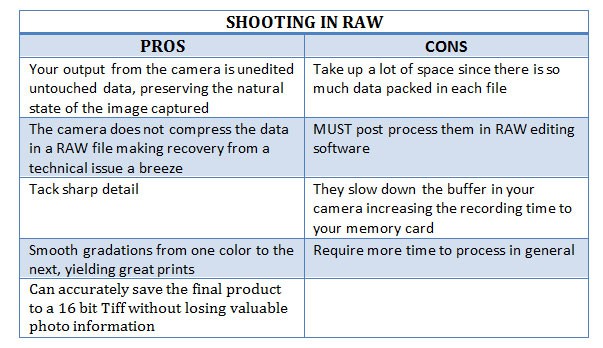
So why would you want to shoot in RAW if the image comes out of the camera looking noisy and slightly washed out due to the lack of color/saturation correction? The answer is simple, you have more control over the final product. The RAW file is not compressed, it holds a plethora of information in a nice tight package that is waiting to be unleashed. Sure you will have to use noise reduction software or the equivalent to clean it up a bit, but RAW is the closest thing to a negative (think manual photography, or film photography). You will have to use your digital darkroom to clean it up, but you will be thoroughly impressed by what you can get away with while editing RAW files. You will be able to recover several stops of over or underexposure, White Balance, Saturation, Color, and Contrast. All of these extremely important aspects can be manipulated more accurately and efficiently than JPEGS.
Consequently, RAW images must be post processed! It comes with the nature of the beast that is RAW. Most cameras come with software that will handle their proprietary RAW files. However, your most powerful options for RAW edited will be programs like Photoshop or Lightroom. While they require a bit of a learning curve to operate, you will be making photographs and stepping out of the realm of taking photographs. With such programs you have the option of saving your images as high quality 16 bit TIFF files to ensure your photos retain all of the data they contain without being compressed like JPEGs. Like all great things, they come with a price, in many cases TIFF files take up even more space than a RAW file.
So Who Should Use Which?
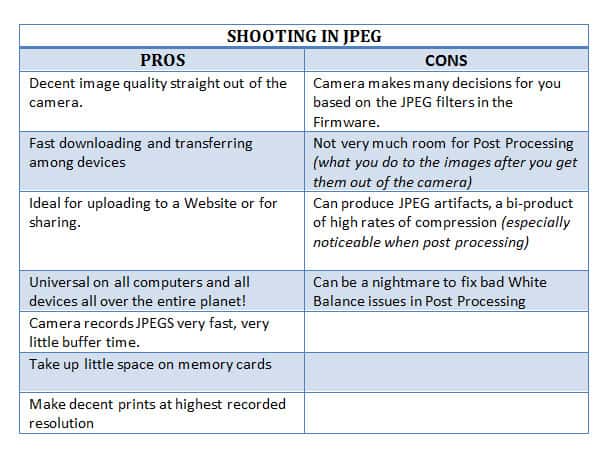
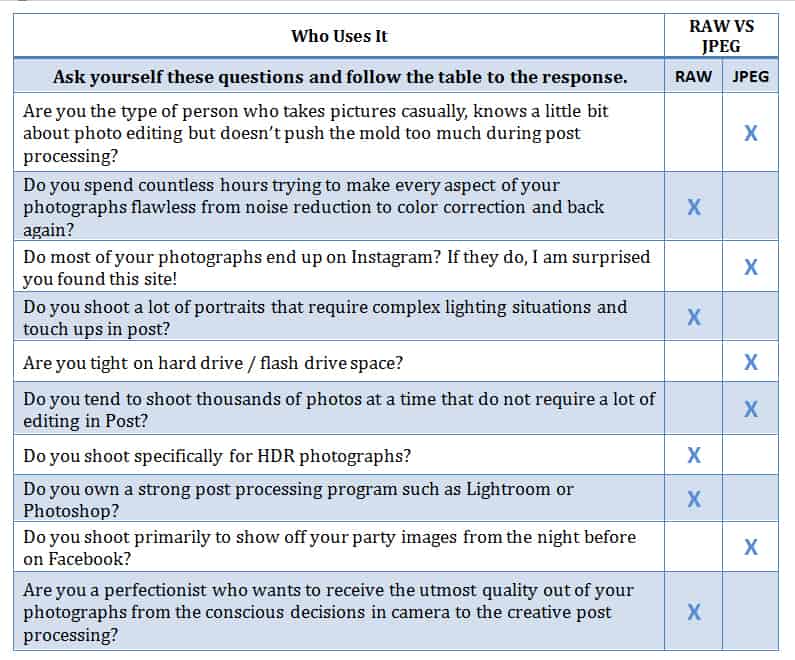
There are definitely differences between shooting in RAW and JPEG. Both formats possess some pretty strong Pro’s and Con’s. If you still haven’t decided, take a look at the chart below and see where you fit in. Use the chart simply as a guide to help steer you in one direction or another. Fortunately, most cameras can shoot in RAW+JPEG so you can experiment with both.
JPEG, RAW and Teriyaki Bowls
When I teach beginning Photography at the Adult Education Center I like to make a lot of references to cooking. Cooking analogies help out a ton when trying to make people see things in a different way. So here is my favortie RAW vs JPEG cooking analogy.
Think of the JPEG as a microwaveable-store bought teriyaki Bowl. Pop it in the microwave, watch it cook, and it tastes decent, it is better than a bowl of ramen and it gets the job done, it satisfies your hunger. When it is done cooking you can always rip away the protective plastic and add some pepper or salt to spice it up.
Very similar to a JPEG huh? You frame the shot (place the Teriyaki bowl in the microwave) and the camera does a lot of post processing for you (the microwave cooking). When you upload your JPEGS you can add some other post processing work but not a whole lot to make it better (the salt and pepper).
Now think of going to the grocery store and purchasing all of the ingredients separately to create your own homemade teriyaki bowl. You cut up the chicken, marinade it, cut up the vegetables, then get the rice going. You meticulously add spices and yummy goodness to the batch you are cooking up. Prior to throwing it all together you have endless possibilities. Once you have it all cooked up you indulge!
This is exactly like a RAW file out of the camera. You frame up the shot and get your settings just right (buying the ingredients). You then take the file into Adobe Camera Raw and get the White Balance, Exposure, Color, Contrast, and Dynamic Range just right (preparing the ingredients). Prior to saving the file as a JPEG or 16 bit Tiff you have endless editing possibilities with limited restrictions (adding all the spices and cooking). When you are finished you sit back and look at all your hard work (indulging on your meticulously prepared feast)!
JPEG, RAW and HDR
I have discussed the positive aspects of shooting in RAW in pretty thorough detail, but how does it all relate to HDR photography? I have had some pretty satisfying results using RAW files for the tone mapping process. They contain a plethora of valuable data that a JPEG normally compresses and discards. In general, you have plenty more options with RAW files when conducting the HDR process.
One major example is the single RAW image technique. I discussed how you can very easily extract up to +/- 3 Exposures accurately with Raw files earlier. Given that ability, if there is enough dynamic range in the image, you can get away with tone mapping a single RAW file rather successfully. It may be a bit noisier than multiple RAW files but you can fix that in Post. Single JPEG tone mapping… forget about it!
Another option is creating multiple exposures from a single image file. You can do this several ways, one of the more popular is to take a RAW file into ACR(Adobe Camera Raw) and manipulate it to your liking making everything nice and pretty. After hitting done, you create an Exposure adjustment layer and over expose the image by +1. You then save it as a 16 bit Tiff and repeat the process for the +2, -1, and -2 EV’s. You then process the faux bracketed set into Photomatix or your favorite HDR software and tone map accordingly.
You can use the same process for a JPEG as well, however there are 2 limitations. The first, you may come across some nasty artifacts or odd colors with each exposure modification. This is due to the lack of image data that had been discarded during the JPEG compression. The second, you will not be able to take advantage of the 16 bit TIFF file. You can surely save a JPEG as a TIFF, but it will only contain the same amount of compressed image data regardless of the bit size. You cannot create something if it is not there!
Bottom Line
There are positives and negatives for both sides of the spectrum. In general, the JPEG will suffice for beginning photographers until they want to progress farther into the realm of post processing. The RAW format will tickle the fancy of the novice to professional product who really want to get the most out of their photo experience. Either way, there is no right or wrong just different strokes for different folks!



And then there are those of us that shoot RAW and convert to DNG when we import the file from our memory cards. But why complicate things, eh…?
Blake, great advice. I have plenty of space, I own both Lightroom and PS (per CC), am adept at post processing. My stumble comes from having a camera that is just wonderful. I have been trusting far too much of my creative preferences to the camera itself. Also, I have been back and forth from RAW to JPEG every time a sports photographer claims he only ever uses JPEG (wildlife photogs as well). They seem to have super images and I immediately jump on the JPEG train…again. Thanks for bringing me back to “the light” 🙂
Grins,
Pam
🙂 SO glad to see you back on the good side!