
I have heard many times in the past that the megapixel count of your camera is not necessarily important and that a 12 megapixel camera is perfect for most situations due to the common print sizes. I can certainly agree to an extent because for several years I owned a 12 megapixel camera and everything seemed to be just fine. Recently, I have become infatuated with large megapixel counts for many reasons.
- Insane amount of detail.
- Much larger printable sizes with better image quality.
- Ability to crop without fear of image loss.
How is a Megapixel Measured?
A megapixel is measured by the product of the images width and height divided by one million [(width x Height) /1,000,000]. You can easily find the resolution of an image by (in Windows) right clicking on the image and selecting Properties>Details under the image section you will find the width and height measurements. In Photoshop you can go to Image>Image Size to see the height and width.
| Width | Height | Product | Megapixel Count |
| 5496 | 3670 | 20,170,320.00 | 20.2 |
| 4096 | 3084 | 12,632,064.00 | 12.6 |
So what does all of this really mean for you anyway?
Well, first of all, you can tell if your camera manufacturer is lying to you or not. My first digital camera was a Fuji Finepix s9000, they advertised it as a 9 Megapixel camera. However, the resolution was 3378 x 2490, coming in at only 8.4 Megapixels, last I checked you were supposed to round down right?
Secondly, this gives you a good idea of how large your image is after you crop it. Say you start off with a 20.2 megapixel image but crop off 2 inches from the top and bottom you could be left with a 15 Megapixel image. Which would still make a nice size print, but it is always a good idea to know what is happening to your images as you edit them.
So you can very easily lose megapixels, but can you ever increase your megapixel count?
You CAN Increase the Megapixel Count!
Simply going into Image Size and increasing the ratio will not effectively increase the megapixel count . Doing this will make the image interpolate, or force information into the areas that did not exist that you are forcing to grow. This interpolation produces poor quality image results when taken too far.
To increase the megapixel count, you can take a panorama of the subject you are photographing. After stitching the images together you will have a larger resolution effectively making the megapixel count higher. So if you know you are going to need to crop the photo but do not want to lose too much image quality in the process you can create a horizontal or vertical panorama.
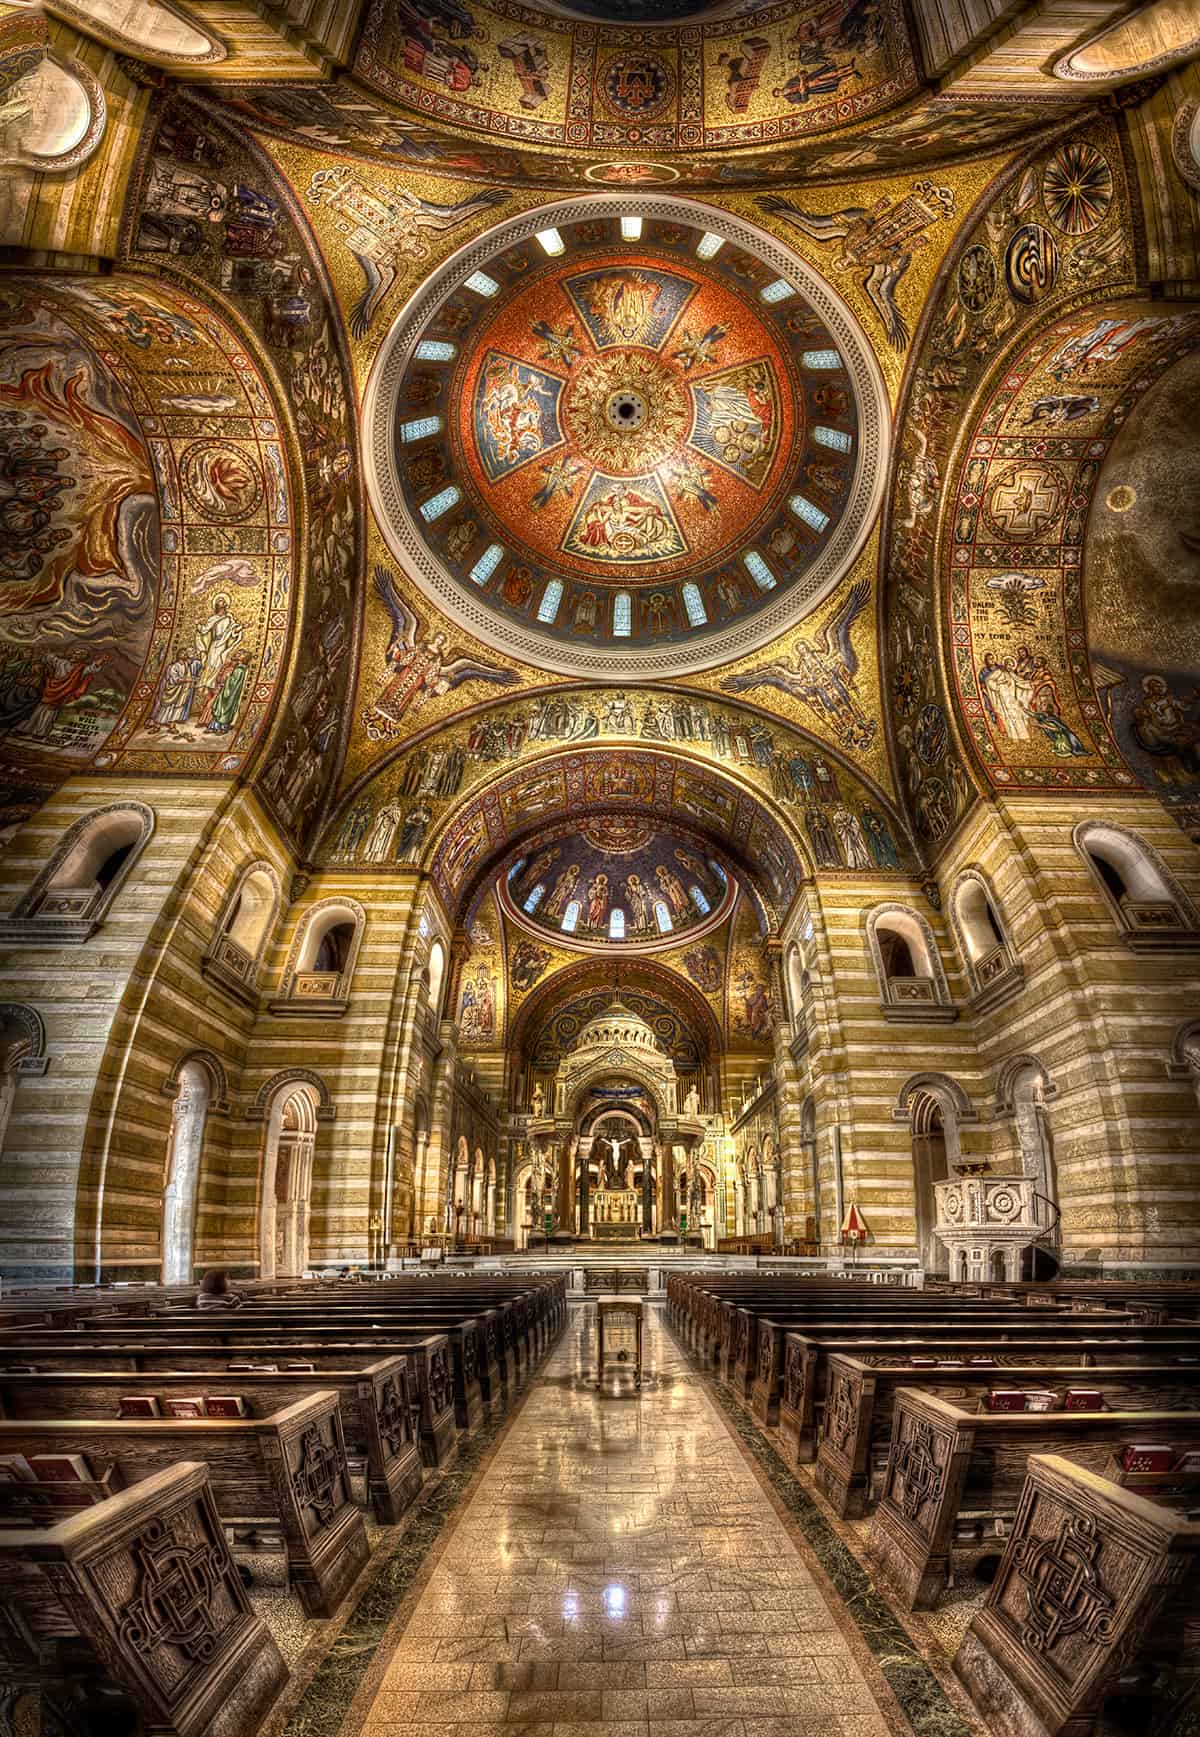
The vertical panorama, or vertorama, below was taken at the Cathedral Basilica of St. Louis. I exposed for six 5 Exposure HDR images at 20.2 Megapixels per photo. After stitching them in Photoshop, the resolution was 5363 x 7762. That is a 41.6 megapixel image, talk about immense detail! If I needed to crop that or print it large I would have no problems!
In order to upload it to the web, I converted it to a 1200 x 1737 resolution making it an effective 2.1 megapixel image.
Now do you see why images saved for the web do not print very well?

For Blake, it's all about the art and process synergy. He dives deep into complex topics and makes them easy to understand through his outside-the-box thinking so that you can use these tricks in your workflow today!


Hi Blake,
cool!
I never think about to shoot a panorama or a vertorama for getting an image with higher resolution after croppingh. But now I do so.
Great tip. Thank you.
Greetings, Harry
Yeah it really just occurred to me recently, after shooting this vertorama as a matter of fact. I am glad it helped you my friend!
This is what I have been told at a club meeting, There were less than the fingers on one hand agree with the presenter. Your HDR’s are always excellent, but that is what is expected from one who specialises in HDR. I did not take this [pixel count] into considertion as I used Photo/shop save for web, and set the ‘long side’ of the image to 8 inches and 72 DPI. You may have comment on this. You have just given me a reason to check furher. Love the vert’ HDR.
Yeah, it is a touchy subject, but in the end it all comes down to the image, right? I usually save mine by normal screen resolution rather than a certain image size. 72 DPI @ 70% Quality at 1024 x 768. Most of my viewers, usually around 85%, are viewing the site with 1024 x 768 resolution. To each their own though! Thanks Ian!