
A game-changer in the world of cloning- the Patch Tool
You may be familiar with the Clone Stamp Tool in Photoshop, but did you know there is a distant cousin just a few tools above? The Patch Tool is not too far away from the Clone Stamp tool and in many cases, it does a better job of cloning pesky areas. I typically use the Clone Stamp tool in unison with the Patch Tool and find the combination of the two to be an unstoppable force for cloning difficult distractions.
The Patch Tool may have been a little scary the first time you opened it up. I don’t blame you for running away as there are several options on the menu that are different from the Clone Stamp tool. However, these settings are what make the Patch Tool so dominant in your cloning workflow. In this tutorial, we will dissect the menu bar and look at each tool and how it changes the effects of the Patch Tool.
What we will discuss in today’s tutorial:
- When to use “Normal” and “Content Aware” modes in the tool menu.
- What is the difference between Source and Destination?
- How does structure affect the Patch Tool when using the Content-Aware mode?
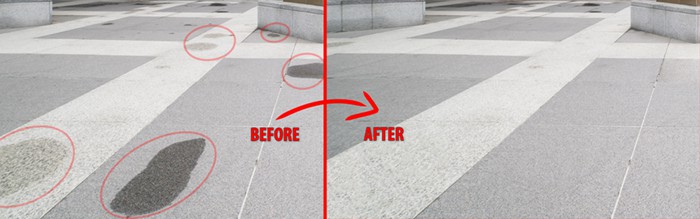
- How the Patch Tool can be used to effectively clean up distractions in your photographs.
- The importance of duplicating your background layer rather than sampling layers.
- How to use any selection tool or method to modify the Patch Tool.
Download the RAW File to Practice

For Blake, it's all about the art and process synergy. He dives deep into complex topics and makes them easy to understand through his outside-the-box thinking so that you can use these tricks in your workflow today!


Most excellent subject and explanation! And as efficiently said and done as one could hope.
Thanks Blake! This was another really good tutorial. I also like the way your tutorials always run through three stages, introduction, tutorial and summary. You are a very good communicator and teacher.
Good stuff, Blake — Thank you for reminding us about the flexibility of even the basics! (I had never thought of using the Polygonal Lasso tool to make the selection first, and then switching to the Patch tool.) And thank you for explaining about all the choices in the Options Bar with the Patch tool. “Structure” was a mystery to me!
Excellent as always, Blake. I have used the tool but never knew about the feathering feature or the difference between Normal and Content Aware.
Like I always say, your tutorial are like going to Photography College.
Many, many thanks,
Vinny
Thanks for the review. I’d pretty much forgotten about that one!
Blake, thanks again for another great tutorial. Once I make a selection with the Patch Tool, the Use Patter button becomes active. What pattern should I use for normal patching.
Hey Blake, I have tried this exercise but don’t get the same results. I have a feeling it is because Adobe have refined this tool in the CC version of PS. I think my CS6 is using a different type of algorithm to get the result you see. Perhaps it isn’t looking at the surrounding pixels as you describe. When I move the source over the wet patch it has a darker gradient radiating from the center! Perhaps it’s time to pay the monthly prescription for cc to update the software?
Just in case, did you make sure that “Show Overlay” is NOT checked?
SC
Thank you for breaking everything down in detail . I’m guilty of using the patch tool for yrs now without knowing clearly how it works compared to content aware etc .
I am definitely a fan of your tutorials .
Thanks so much for making these tutorials 🙂
Hi Blake, Great tutorial. I noticed that in “content aware” you had “color” set to 0. When would you need to change this, and how much? Thanks.
Very, very nice. Clear description of how/why, the modes, and adding the bit (to remind) about selection modification was genius. Thanks also for a perfect practice file.
Very nice. I appreciated the clarity of the explanation, the modes, and especially the pointer (reminder) on modifying the selection. Brilliant choice of an image to practice on. Much appreciated.
Thanks Blake, as always, excellent content and delivered well.
Never really understood that tool, but feeling confident to use it now, awesome.
Great instructional video as always. I use the Patch tool quite often, however this video really explained the broad range of tools and options that can be used with it. Thanks.
Love your tutorials. They are clear and easily understandable as you go over each step and illustrate their function.
I use the patch tool frequently but never new I could use the selection tool with is feathering feature to work with this tool. This will greatly increase my efficiency on doing editing.
Great video!! I always used content-aware with the Patch tool and often didn’t get good results. Using Normal is an eye-opener for me. Thanks Blake!
Hey Blake…
Just getting around to watching this great tutorial. Thanks for taking the time to share this super way to use the Patch tool!
RD